Roof Flashing Explained
There’s nothing quite like the panic that sets in when you spot a dark, spreading stain on your ceiling or feel a drip right where you thought your roof was doing its job. It's a homeowner's worst nightmare, and often, the culprit isn't a missing shingle but something far less obvious: failed roof flashing. This unsung hero of your roofing system is absolutely critical to keeping water out, especially in those tricky spots where the roof planes meet, or where something pokes through it. This guide is here to demystify roof flashing, explaining what it is, why it's so vital, and how to ensure yours is doing its job to protect your biggest investment.
What Exactly Is Roof Flashing and Why It's Crucial
Let's be real, most homeowners don't spend their days thinking about flashing. You're focused on the shingles, maybe the color, or whether it’s time for a full roof replacement. But trust me, flashing is silently doing some of the most important work on your roof, diverting water away from your home's most vulnerable areas. It’s like the specialized waterproofing system within your overall roofing envelope.
The Unsung Hero of Your Roofing System
At its core, roof flashing consists of thin pieces of material, typically metal, that are installed at points where the roof changes direction or meets another surface. Think of it as a meticulously designed raincoat for your roof's seams and penetrations. While shingles do a fantastic job of shedding water across the broad, flat planes of your roof, they simply can’t form a watertight seal around complex shapes like chimneys, skylights, or vent pipes. That's where flashing steps in, creating a barrier that forces water to flow down and away, rather than seeping into the vulnerable gaps and cracks.
Without proper flashing, these areas would be wide open invitations for water to get in. And once water gets under your shingles, it's not just an unsightly ceiling stain you have to worry about. We're talking about extensive damage to your roof decking, attic insulation, framing, and even the interior finishes of your home. It’s a silent, insidious threat that can lead to costly repairs if left unaddressed. Understanding the fundamentals of Roof Anatomy: Parts of an Asphalt Shingle Roof can help you visualize these critical components better.
Its primary role is simple: redirect water. But the execution is anything but simple. Flashing isn't just one piece of metal; it’s often a system of overlapping pieces, strategically woven into the shingle layers and sealed to create a continuous, impenetrable shield. This layering technique is what truly makes it effective, ensuring that even if one seal fails, there are redundancies in place to keep the water out.
Why Vulnerable Areas Need Extra Protection
Every roof has its weak points, those areas that are inherently more susceptible to water intrusion than the wide-open shingle fields. These "vulnerable areas" include anything that interrupts the smooth, continuous surface of the roof: chimneys, skylights, plumbing vents, exhaust fans, dormers, and valleys (where two roof planes meet). These are spots where water naturally collects, slows down, or gets directed into concentrated flows.
Imagine a heavy downpour. Water cascades down your roof, but when it hits a chimney, it has to split and flow around it. Without flashing, that water would simply run straight into the opening where the chimney meets the roof deck. Similarly, valleys act like natural gutters, collecting a significant volume of water from two converging roof sections. If the flashing in these areas isn't perfectly installed and maintained, even the most robust shingles won't stand a chance against persistent moisture. It's not enough for How Shingles Protect Against Water in general; specialized protection is needed for these high-risk zones.
The consequences of failing flashing are severe and progressive. Initially, you might notice a small, intermittent leak, perhaps only during heavy rain or melting snow. Over time, this small leak can saturate your roof decking, leading to rot and weakening the structural integrity of your roof. Moisture can also seep into your attic, promoting mold and mildew growth that can impact indoor air quality and cause health issues. In colder climates, water trapped within the roof structure can freeze and expand, exacerbating cracks and further damaging materials. That’s why paying attention to these vulnerable areas is so paramount for your home's long-term health.
Different Types of Roof Flashing and Their Uses
Just like there isn't a one-size-fits-all solution for your entire house, flashing comes in various forms and materials, each designed to tackle specific challenges. Choosing the right type and material is critical for long-lasting protection.
Material Matters: From Steel to Copper
The material used for flashing plays a huge role in its durability, cost, and even its aesthetic appeal. Here’s a rundown of the most common options:
- Galvanized Steel: This is probably the most common flashing material you'll encounter. It's steel that's been coated with a layer of zinc to prevent rust and corrosion. It's relatively inexpensive, durable, and readily available, making it a popular choice for many standard roofing projects. However, it's not indestructible. The zinc coating can wear off over time, especially in harsh environments, leading to rust.
- Aluminum: Lightweight and resistant to rust, aluminum is another popular choice. It's easy to cut and bend, which makes installation quicker for roofers. Aluminum flashing is excellent for coastal areas where salt air is a concern, as it won't corrode like steel. The downside is that it's softer than steel and can be more prone to denting or tearing in extremely windy conditions or from falling debris. It also shouldn't be used in direct contact with treated lumber or some masonry, as it can react and corrode.
- Copper: Ah, copper flashing! This is the crème de la crème for many. It's incredibly durable, boasts exceptional longevity (often outlasting the roof itself), and develops a beautiful patina over time, which adds a touch of classic elegance to a home. Copper is also highly resistant to corrosion and stands up well to extreme weather. The significant drawback, of course, is the cost. Copper is substantially more expensive than steel or aluminum, usually reserved for high-end homes or historic restorations where aesthetics and supreme durability are paramount.
- Lead: While less common today due to environmental concerns and regulations, lead flashing was historically used, especially around chimneys, because of its extreme malleability. It can be easily shaped to conform to irregular surfaces, providing an excellent seal. However, its softness makes it vulnerable to animal damage or heavy impacts.
- Plastic/Rubber Compounds: You'll often see these materials used for vent pipe collars or specialty flashing pieces. They are flexible, watertight, and can withstand UV exposure. Their flexibility is a major advantage for sealing around pipes or other circular penetrations, forming a snug, waterproof boot. While durable, they don't have the same overall lifespan as metal flashing and may become brittle over time, especially in areas with extreme temperature fluctuations.
When choosing a material, consider your climate, budget, and the lifespan you expect from your roof. A reputable contractor, like those found on Modernize, can guide you to the best material choices for your specific situation, ensuring compatibility with your shingles and local building codes.
Form and Function: The Shapes Flashing Takes
Beyond the material, flashing comes in various shapes, each meticulously engineered to handle specific architectural challenges on your roof.
Here are the most common types:
-
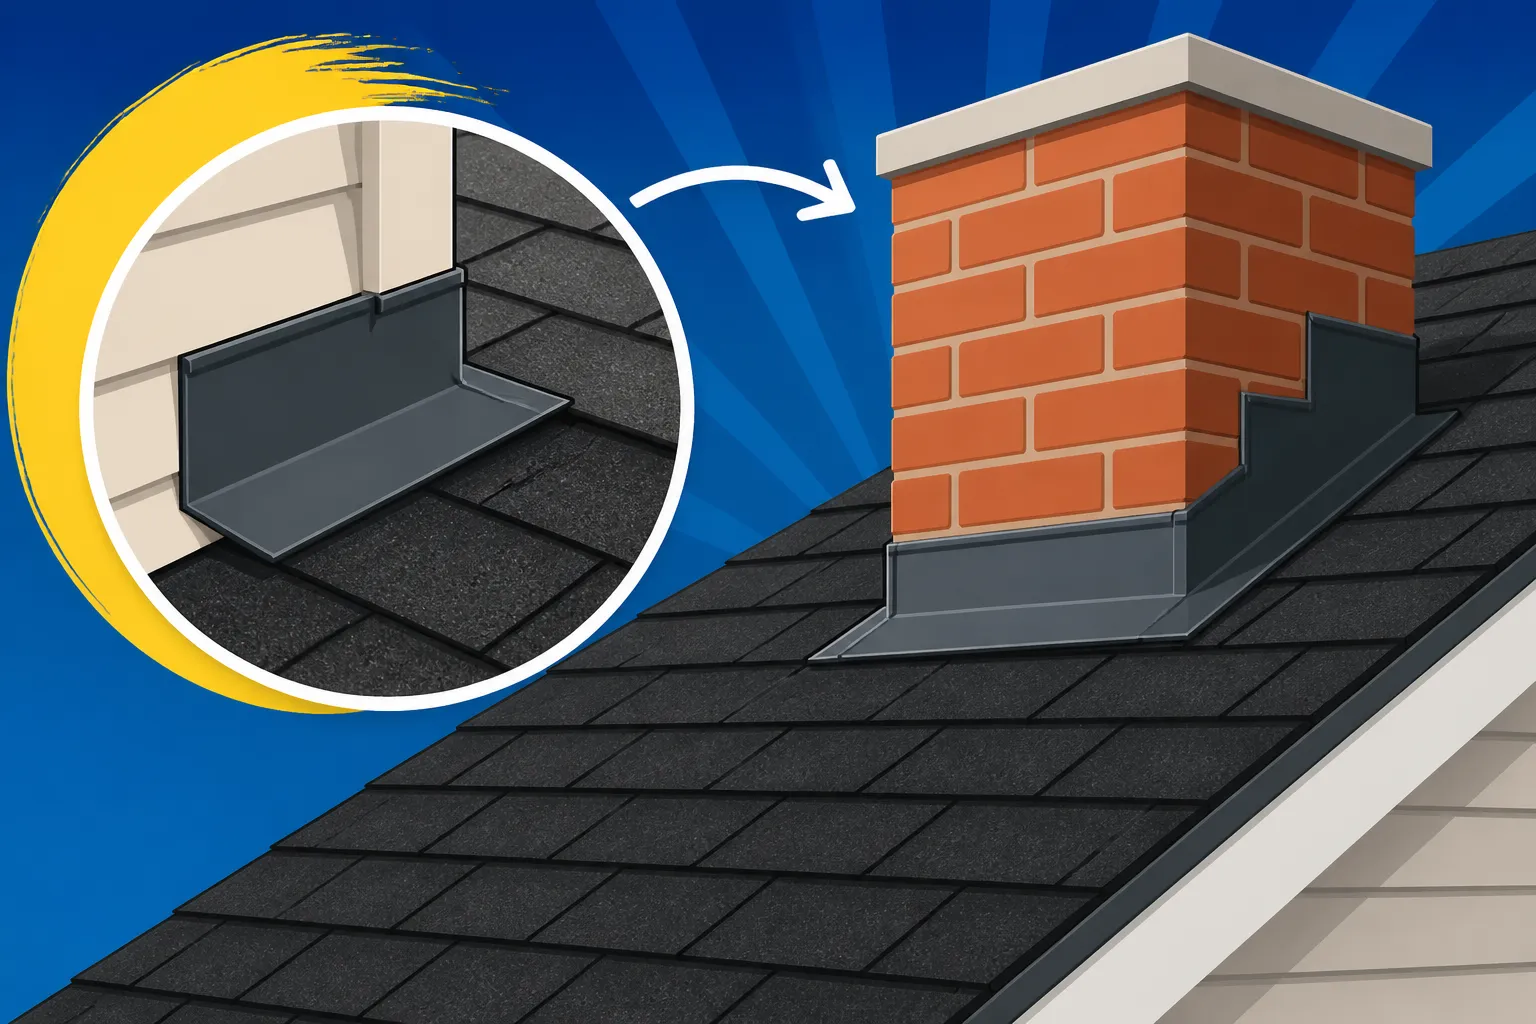
Step Flashing: This is perhaps the most widely used type of flashing. It's made of individual, L-shaped pieces of metal, roughly 8 to 10 inches long, that are woven in with each course of shingles where the roof meets a vertical wall (like a chimney, dormer wall, or a side wall). Each piece overlaps the shingle below it and is covered by the shingle above it, creating a "stepping" effect that prevents water from running behind the vertical wall. This ingenious design allows for the natural expansion and contraction of the roof and wall materials without compromising the seal. You'll often see this paired with Step Flashing Around Walls for optimal protection.
-
Valley Flashing: Valleys are major water channels, so they need robust protection. Valley flashing is typically a long, continuous piece of metal (or sometimes a rubberized membrane) installed directly onto the roof deck in the valley before the shingles are laid. It guides the concentrated flow of water down the roof. There are two main types: "open" valleys, where the metal flashing is exposed, and "closed" valleys, where shingles completely cover the flashing, creating a more seamless look. For a deeper dive, check out How Valleys Are Flashed.
-
Apron Flashing (or Base Flashing): This type is used at the base of chimneys, dormers, or skylights. It's a single, larger piece of metal that covers the front (downslope) side of the penetration, extending under the shingles above and over the shingles below. Its name comes from its resemblance to an apron, sweeping water away from the base.
-
Counter Flashing: Often used in conjunction with apron or step flashing, especially around chimneys. Counter flashing is a second layer of flashing that is installed into a mortar joint or a cut groove in the vertical surface (like a chimney brick) and then bent down to cover the top edge of the step or apron flashing. This creates a double barrier, preventing water from seeping into the wall and then running down behind the primary flashing. It's a critical component of Chimney Flashing Explained.
-
Vent Pipe Flashing (or Pipe Boot): These are specifically designed to seal around plumbing vents, exhaust pipes, and other circular penetrations. They typically consist of a metal base that slides under the upper shingles and over the lower shingles, with a rubber or neoprene collar integrated into the metal to snugly fit around the pipe. This flexible collar creates a watertight seal against the pipe itself. For more details on these vital seals, read about How Roofers Seal Around Vents and Pipes.
-
Drip Edge: While technically not "flashing" in the same sense as the others, drip edge performs a similar water-directing function at the edges of your roof. It's a metal strip installed along the eaves and rake edges to direct water away from the fascia board and into the gutters. It prevents water from wicking back under the shingles and protects the underlying components of your roof from moisture damage. It's a small but mighty component, and its importance is explained in What Is Drip Edge and Why It Matters.
Here's a quick overview of some common flashing types and their typical applications:
| Flashing Type | Primary Location | Typical Materials | Purpose |
|---|---|---|---|
| Step Flashing | Chimneys, Dormer Walls, Wall Intersections | Galvanized Steel, Aluminum | Diverts water down and away from vertical surfaces. |
| Valley Flashing | Roof Valleys (where two slopes meet) | Galvanized Steel, Aluminum, Copper | Guides heavy water flow in concentrated channels. |
| Apron Flashing | Base of Chimneys, Skylights, Dormers | Galvanized Steel, Aluminum, Copper | Collects and directs water from the base of structures. |
| Counter Flashing | Over Step/Apron Flashing at Chimneys/Walls | Galvanized Steel, Aluminum, Copper | Prevents water from entering behind primary flashing. |
| Vent Pipe Flashing | Plumbing Vents, Exhaust Pipes | Galvanized Steel with Rubber | Seals circular penetrations against water intrusion. |
| Drip Edge | Eaves and Rake Edges of the Roof | Galvanized Steel, Aluminum | Directs water into gutters, protects fascia. |
As you can see, each type of flashing has a distinct role in creating a watertight envelope. It's a complex, multi-layered system that requires precision and expertise to install correctly.
Key Areas Where Flashing Is Absolutely Essential
When we talk about flashing, we're really focusing on the critical junctures of your roof — places where water has the easiest path to ingress if not properly managed. These aren't just minor details; they are the battlegrounds where your home fights against water damage every single day.
Chimneys, Skylights, and Vent Pipes
These penetrations are essentially holes in your roof, and without meticulous waterproofing, they become prime entry points for water. It’s a common frustration for homeowners: a perfectly good roof, but suddenly a leak appears around the fireplace or a bathroom vent. That's usually flashing failure.
-
Chimneys: These are perhaps the most complex areas to flash due to their size and masonry construction. A proper chimney flashing system involves several components:
- Base Flashing (or Apron Flashing): At the front (downslope) of the chimney, a single large piece of flashing extends under the shingles above and over the shingles below.
- Step Flashing: Along the sides, individual L-shaped pieces are woven into each shingle course and bent up against the chimney bricks.
- Head Flashing (or Cricket): At the back (upslope) of wider chimneys, a "cricket" or "saddle" is often built. This is a small, peaked diversion roof that diverts water around the chimney, preventing it from pooling. The flashing for a cricket is often integrated into its design.
- Counter Flashing: This is the crucial top layer. It's cut into the mortar joints of the chimney bricks and bent down to overlap the step and base flashing, ensuring water can't get behind them. The layers are essential; the counter flashing always goes over the top edge of the step flashing, and the step flashing always goes over the top edge of the shingles. This is the essence of What Is Flashing and Why It Matters.
-
Skylights: These beautiful additions bring natural light into your home but are notorious for leaks if not properly installed. Skylight flashing kits typically include several pieces:
- Sill Flashing (or Apron Flashing): At the bottom, similar to chimney apron flashing.
- Step Flashing: Along the sides, woven with the shingles.
- Head Flashing: At the top, covering the top edge of the skylight frame.
- Sash Flashing: Some kits also include specialized components that integrate directly with the skylight's frame for an extra layer of protection. It’s a multi-component system, designed to handle water flow from all directions. Understanding How Skylights Are Flashed properly is crucial to avoid leaks and water damage.
-
Vent Pipes: These are smaller, but equally important. Every plumbing vent, furnace exhaust, or radon mitigation pipe poking through your roof needs a watertight seal. This is typically achieved with a pipe boot (also known as vent pipe flashing). This is a pre-formed piece of metal with a rubber or neoprene collar that fits snugly around the pipe. The metal base is slipped under the upper shingles and over the lower shingles, then sealed. Over time, the rubber collars can degrade from UV exposure, crack, and become a prime source of leaks, leading to problems like a Roof Leak Around a Vent Pipe: Fixes.
A poorly flashed chimney can create a devastating scenario. Imagine a homeowner in Atlanta, Georgia, noticing a persistent brown stain on their living room ceiling, especially after a heavy spring rain. They might initially think a shingle is missing. However, upon inspection, a roofer might find that the counter flashing around the chimney has pulled away from the mortar joint, or the step flashing pieces have rusted through, allowing water to slowly wick into the attic, causing damage over time.
Valleys and Wall-to-Roof Intersections
These areas represent different kinds of challenges but are equally critical for proper flashing. They handle concentrated water flow or present complex angles.
-
Roof Valleys: These are the V-shaped channels formed where two roof slopes meet. They collect a significant amount of water and direct it down the roof, often at a faster rate than the main roof planes. This high volume of water requires robust protection. There are two primary ways to flash a valley:
- Open Valleys: A continuous piece of metal flashing (galvanized steel, aluminum, or copper) is installed directly on the roof deck in the valley. The shingles are then cut a few inches back from the center of the valley, leaving a visible strip of metal. This provides a smooth, unobstructed path for water, minimizing debris buildup.
- Closed Valleys: In this method, the shingles are laid across the valley, either woven together or cut at an angle over an underlying layer of valley flashing. While visually appealing as it hides the metal, closed valleys can sometimes be more prone to issues if not installed perfectly, as debris can accumulate more easily. Regardless of the type, proper How Valleys Are Flashed is non-negotiable for preventing leaks in these high-flow areas.
-
Wall-to-Roof Intersections: Anywhere a vertical wall (like the side of a dormer, an addition, or a parapet wall) meets a sloping roof, you have a prime opportunity for water intrusion. These areas rely heavily on step flashing and counter flashing, much like a chimney. The step flashing is woven with the shingles, directing water down the roof, while the counter flashing is sealed into the wall and overlaps the step flashing to prevent water from getting behind it.
A particularly insidious issue at these intersections is often overlooked: kick-out flashing. This small, L-shaped piece of metal is installed at the very bottom corner where a roof meets a vertical wall and an eave, directly above the gutter. Its purpose is to literally "kick out" water that runs down the wall or the step flashing, directing it into the gutter rather than allowing it to run down the wall of the house. Without kick-out flashing, water can saturate the siding and framing directly below, leading to rot, mold, and damage that might go unnoticed until it's severe. It's a tiny detail that makes a massive difference, especially in regions prone to heavy rainfall.
The Installation Process for Various Flashing Types
Proper installation is not just important; it's everything when it comes to flashing. Even the highest quality materials will fail prematurely if they aren't installed correctly. This is where the skill and experience of your roofing contractor truly shine, or unfortunately, where corner-cutting becomes evident.
General Principles of Proper Flashing Installation
Regardless of the specific type or location, there are fundamental principles that govern correct flashing installation. These principles are what separate a leak-free roof from a homeowner's headache.
First and foremost is layering. Flashing is never just placed on top of the shingles or simply tacked onto the side of a wall. It must be thoughtfully integrated into the roofing system, typically in an overlapping fashion, much like shingles themselves. The general rule is that upper layers of flashing and shingles should always overlap lower layers. This ensures that water flows over successive layers, never getting a chance to seep underneath. For instance, the top edge of a step flashing piece is always covered by the shingle above it, and its vertical leg is covered by the counter flashing. This intricate dance of overlaps is critical to creating a watertight barrier. The entire process of How Asphalt Shingles Are Installed: Step by Step truly highlights the importance of this layering.
Secondly, proper fastening and sealing are paramount. Flashing pieces need to be securely fastened to the roof deck or adjacent structures. This usually involves roofing nails or screws, placed strategically to avoid creating new pathways for water. Crucially, these fasteners should never go through the exposed face of the flashing where water might directly hit them. Instead, they are often placed in areas that will be covered by subsequent layers of flashing or shingles. Additionally, sealants (like high-quality roofing cement or specialized caulk) are often used in conjunction with flashing, especially at seams, joints, or where flashing meets the surface of a pipe or wall. These sealants fill tiny gaps and add an extra layer of protection, but they should never be relied upon as the sole waterproofing method. Sealants degrade over time, but properly layered flashing will continue to divert water even if the sealant fails.
Finally, allowing for movement is a key consideration. All building materials expand and contract with temperature changes. If flashing is installed too rigidly or without accounting for this movement, it can buckle, crack, or pull away from its seals. Professional installers understand this and use techniques that allow for slight movement while maintaining a watertight seal. This might involve fastening only one side of a flashing piece, or using specific sealant types that remain flexible. It’s these nuanced details that make all the difference in the long-term performance of your roof.
Step-by-Step Examples: Chimneys and Valleys
Let's break down how these principles apply to some of the most challenging flashing installations: chimneys and valleys.
Chimney Flashing: This is a master class in integrated waterproofing.
- Preparation: After the roof deck is installed and underlayment applied, the area around the chimney is prepped. Ice and water shield membrane is often applied directly to the roof deck around the chimney for an extra layer of protection.
- Back Crickets (if needed): For chimneys wider than about 30 inches, a small cricket is built on the upslope side to divert water. This mini-roof is then covered with underlayment and flashed appropriately, often with its own metal flashing.
- Base (Apron) Flashing: A piece of metal is shaped to cover the front (downslope) of the chimney. Its bottom edge extends over the lowest course of shingles, and its top edge extends up the face of the chimney, under the subsequent layer of shingles.
- Step Flashing: Starting from the bottom of the chimney's sides, individual L-shaped pieces of step flashing are installed. Each piece is slipped under a shingle, then bent up against the chimney. The next shingle course covers the lower portion of the step flashing, and another step flashing piece is placed on top of that shingle, extending up the chimney. This continues up both sides of the chimney, weaving with each shingle course.
- Head Flashing: At the top (upslope) of the chimney, a piece of head flashing is installed, often shaped to fit snugly against the chimney and extend under the shingles above it.
- Counter Flashing: This is the final and crucial step. Grooves are cut into the mortar joints of the chimney bricks (or the siding of a framed chimney). Pre-bent pieces of counter flashing are inserted into these grooves, then cemented into place. These pieces are then bent downwards to overlap the top edges of all the base, step, and head flashing, creating a complete, watertight envelope. The bottom edge of the counter flashing should be a few inches above the roof surface, allowing for proper drainage. This intricate, multi-layered approach ensures that water is constantly directed outward and downward. This process is complex, which is why How Flashing Is Installed correctly is something only experienced roofers can consistently achieve.
Valley Flashing (Open Valley Example):
- Underlayment: After the roof decking is installed, a strip of self-adhering ice and water shield is laid centered along the entire length of the valley, providing robust secondary protection.
- Metal Valley Flashing: A long, continuous piece of metal valley flashing (often pre-bent to the valley's angle) is placed on top of the underlayment. It's carefully fastened along its edges, ensuring fasteners are not placed in the direct path of water flow.
- Shingle Installation: Shingles are then installed, carefully cut back from the center of the valley metal (typically 2-3 inches on each side) to create a clear water channel. The cut edges of the shingles are often sealed with roofing cement to prevent water from migrating under them.
The difference between a DIY attempt and a professional installation is stark. A homeowner might try to simply caulk around a chimney, unaware of the complex layering required. A professional, on the other hand, understands the dynamics of water flow, the expansion and contraction of materials, and the precise techniques for integrating flashing into the overall roof system. They know that cutting corners here inevitably leads to leaks. That's why when you're considering a roof project, seeking out experienced contractors, perhaps through a platform like Modernize, is a decision you'll never regret. They ensure that crucial elements like flashing are installed to last, adhering to all local building codes and manufacturer specifications, which is a key part of How a Roof Replacement Works: The Full Process.
Common Flashing Problems and How to Spot Them
Even the best-installed flashing isn't invincible. Over time, or due to external factors, it can develop issues that compromise its ability to keep your home dry. Knowing what to look for can help you catch problems early, potentially saving you from significant damage and costly repairs.
Signs of Failing Flashing from the Ground Up
You don't need to climb on your roof to spot many flashing problems, though a closer inspection by a professional is always recommended. There are often tell-tale signs visible from the ground or inside your home.
From the exterior:
- Visible Damage to Metal: Take a good look at any exposed flashing, especially around your chimney, skylights, or in open valleys. Are there signs of rust, particularly on galvanized steel? Do you see cracks, punctures, or bends in the metal? Is any section of the flashing missing entirely? Flashing that appears warped or has pulled away from the wall or roof surface is a huge red flag. A common issue with older pipe boots is a cracked or deteriorated rubber collar, which can be easily seen from the ground with a pair of binoculars.
- Discoloration or Staining on Exterior Walls: Pay close attention to the siding or masonry directly below roof transitions. If you see streaks of water stains, algae growth, or discoloration on the wall just below a dormer, chimney, or roof-to-wall intersection, it's a strong indicator that water is running down the wall instead of being diverted away by the flashing. This is often the first visual cue of a problem with kick-out flashing.
- Moss, Algae, or Debris Buildup Around Flashing: While some moss or algae can be normal on a roof, excessive growth localized around flashing, especially in valleys or near chimneys, can indicate that water isn't draining properly. Debris like leaves and twigs accumulating around flashing can also trap moisture, accelerate corrosion, and prevent proper water flow.
- Missing or Damaged Sealant/Caulk: While sealant shouldn't be the primary waterproof barrier, it's used in many flashing applications. If you notice cracking, crumbling, or completely missing caulk around your chimney's counter flashing or where a pipe boot meets the pipe, it's a vulnerability.
From the interior (these are often later-stage indicators, meaning a problem has progressed):
- Water Stains on Ceilings or Walls: This is the most obvious and dreaded sign. Any brown, yellow, or dark stains on the ceiling, especially near a chimney, skylight, or the intersection of a roof and an interior wall, points directly to a leak. The challenge is that water can travel, so a stain might appear several feet away from the actual source of the leak, making How to Spot a Roof Leak a bit of a detective job.
- Peeling Paint or Wallpaper: Similar to stains, if paint is bubbling, peeling, or wallpaper is detaching from the wall near a roofline, it's a sign of moisture intrusion behind the finished surface.
- Musty Odors in the Attic: Even without visible water, a persistent musty or earthy smell in your attic or upper floors can indicate hidden moisture, mold, or mildew growth due to a slow, chronic leak from failing flashing.
- Sagging Ceilings or Soft Spots: This is a severe sign of extensive water damage, where the roof decking or ceiling drywall has become saturated and weakened. At this point, the flashing failure has likely been ongoing for a considerable time.
Catching these issues early is crucial. A small repair to a piece of flashing is far less costly and disruptive than addressing widespread rot and mold caused by a neglected leak. This is where regular roof inspections, at least annually or after major storms, are incredibly valuable.
What Causes Damaged Flashing and Its Consequences
Flashing, despite its robust construction, faces a constant barrage of environmental and structural stressors. Understanding why it fails can help you prevent or quickly address problems.
Several factors contribute to flashing damage:
- Age and Wear and Tear: This is the simplest cause. Like all roofing components, flashing has a lifespan. Over decades, constant exposure to UV radiation, extreme temperatures, rain, snow, and ice will take its toll. Metal can corrode (especially galvanized steel once its zinc coating wears thin), become brittle, crack, or fatigue. Sealants dry out, crack, and lose their adhesion.
- Poor Installation: This is arguably the most common and frustrating cause of flashing failure. If flashing isn't properly layered, fastened, or sealed from the outset, it's a ticking time bomb. Incorrect cuts, insufficient overlap, improper sealant application, or using the wrong type of flashing for a specific area will lead to premature failure. An inexperienced or careless installer might rely too heavily on caulk, which is a temporary fix at best. This is a common root cause for issues that demand Flashing Leak Repair.
- Storm Damage (Wind and Hail): High winds can lift and bend flashing, particularly thinner aluminum or older, corroded pieces. Hail can dent or puncture metal flashing, creating entry points for water. Falling tree branches can also severely deform or tear flashing, especially around chimneys or skylights.
- House Settling or Shifting: Over many years, houses naturally settle. This movement can sometimes cause walls or chimneys to shift slightly in relation to the roof, putting stress on flashing and causing it to pull away from its seals or fasteners.
- Improper Repairs or DIY Blunders: Sometimes, well-intentioned but ill-informed repairs can actually exacerbate flashing problems. Slapping a layer of roofing tar over a leak might temporarily stop a drip, but it rarely addresses the underlying issue, can void warranties, and often makes proper future repairs more difficult and costly.
- Material Incompatibility: Using dissimilar metals in direct contact (e.g., copper and aluminum) can lead to galvanic corrosion, rapidly degrading the flashing material. A knowledgeable roofer will always consider these chemical interactions.
The consequences of damaged flashing range from minor annoyances to catastrophic structural failure:
- Leaks and Water Stains: The immediate and most visible consequence. Water penetrating the roof deck can cause unsightly stains on ceilings and walls.
- Rot and Mold: Persistent moisture intrusion leads to rotting of the roof decking, rafters, and other wooden structural components. This weakens your roof, potentially making it unsafe. Mold and mildew thrive in damp environments, impacting indoor air quality and potentially causing respiratory issues for occupants. This is a primary reason to act on What Causes Damaged Flashing on a Roof immediately.
- Pest Infestations: Rotted wood and damp insulation create an inviting habitat for pests like carpenter ants, termites, mice, and even raccoons, leading to further damage.
- Compromised Insulation: Wet insulation loses its effectiveness dramatically, leading to higher energy bills as your HVAC system works harder to maintain indoor temperatures.
- Structural Damage: In severe, long-term cases, flashing failure can lead to significant structural damage that requires extensive and expensive repairs, potentially involving replacing entire sections of roof decking or framing.
Essentially, failing flashing isn't just a minor leak; it's a gateway to a host of much larger, more expensive problems that compromise the integrity and health of your entire home.
Maintaining Your Flashing for Maximum Longevity
Think of your roof flashing as a critical, hard-working part of your home that needs a little love and attention now and then. Proactive maintenance is key to extending its life and preventing those nightmare leaks we talked about. It's not about being on your roof every weekend, but rather establishing a consistent routine.
Routine Inspections and Cleaning
The best defense against flashing failure is a good offense: regular inspections. This doesn't necessarily mean you have to climb up there yourself, but a professional eye at least once a year, and definitely after any major weather event, is a smart investment. For tips on how often, you might find guidance in How Often to Inspect Your Roof.
When you (or your trusted contractor) inspect your roof, pay special attention to:
- Visual Cues: Look for any of the signs we discussed earlier: rust, cracks, bends, lifted edges, or missing pieces of flashing. Check the condition of any sealant or caulk used around the flashing – is it cracked, crumbling, or gone? Even if it looks okay, if the sealant is old, it might be due for replacement.
- Debris Buildup: Valleys, around chimneys, and behind skylights are notorious for collecting leaves, twigs, and other debris. This buildup traps moisture against the flashing and shingles, accelerating corrosion and decomposition. It can also create "dams" that force water to back up and under flashing or shingles. Gently remove any debris you find.
- Tree Branches: Are there any tree branches overhanging or touching your roof, especially near flashing? These can rub against the flashing, causing wear, or shed leaves and needles that contribute to debris buildup. Trim them back if possible.
- Water Flow: After a rain, if you can safely observe, see how water is flowing off your roof. Is it being cleanly diverted by the flashing into gutters, or is it splashing back onto walls, or pooling anywhere?
For cleaning, gentle is the key. While removing debris is essential, avoid aggressive methods like power washing directly onto flashing or shingles. High-pressure water can lift shingles, force water under flashing, or damage sealant. A simple garden hose with a gentle spray, or even a leaf blower, is usually sufficient to clear away loose debris. If there's persistent moss or algae, consult with a roofing professional about safe removal methods, as some chemical treatments can be harsh on flashing materials. Regular cleaning and inspections are core to Roof Maintenance to Avoid Replacement.
Proactive Repairs and Upgrades
Don't wait for a leak to become a gushing problem. Addressing minor flashing issues as soon as they're identified is crucial.
- Minor Sealant Issues: If you spot small cracks in caulk or sealant around your chimney or pipe boots, re-caulking with a high-quality, UV-resistant exterior sealant specifically designed for roofing can be a simple, effective proactive repair. Ensure the old, degraded sealant is removed first for good adhesion.
- Loose Fasteners: If a piece of flashing has slightly pulled away or a fastener is loose, it might be possible to gently re-secure it and seal the area. This is often a job best left to professionals to ensure proper technique and safety.
- Damaged Pipe Boots: The rubber collars on pipe boots are particularly vulnerable to UV degradation. If yours are cracked but the metal base is still solid, some contractors can replace just the rubber collar, or you can get a new boot entirely. This is a relatively inexpensive fix that prevents a major leak down the line.
When you are planning a full roof replacement, that's the absolute best time for a flashing "upgrade." All existing flashing should be removed and replaced with new, properly sized, and correctly installed flashing. This is not an area to cut costs by reusing old materials. You might even consider upgrading your flashing material if your budget allows. For instance, if you live in an area with harsh weather conditions or want maximum longevity, upgrading from galvanized steel to aluminum or even copper could be a wise investment. While the Cost of New Flashing and Drip Edge might seem like an extra expense, it's a small percentage of the overall roof replacement cost and offers huge returns in terms of protection and peace of mind.
Engaging with a trusted network of professionals, like those you can find through Modernize, is a fantastic way to ensure your roof and its critical flashing components receive the attention they need. These professionals can provide thorough inspections, recommend appropriate proactive repairs, and ensure that any flashing upgrades or replacements are done with the highest standards of craftsmanship, protecting your home for years to come.
When to Repair vs. Replace Flashing
One of the most common questions homeowners have about any part of their roof is whether a repair will suffice or if a full replacement is necessary. Flashing is no different, and making the right call can save you both money and headaches.
Assessing the Damage: When a Patch Will Do
There are certainly scenarios where a targeted repair to your flashing is a perfectly viable and cost-effective solution. This is often the case when the damage is localized, minor, and hasn't compromised the broader roofing system.
Consider a repair if:
- Small, Isolated Cracks or Rust Spots: If you notice a single, small crack in a piece of metal flashing, or a small area of surface rust that hasn't eaten through the material, it might be cleaned, patched with a compatible metal patch, and sealed. Similarly, if a vent pipe flashing's rubber collar is just beginning to show hairline cracks but is otherwise intact, a professional might be able to apply a specialized sealant or replace just the collar.
- Dried-out or Missing Sealant: As mentioned, sealants degrade. If the primary flashing structure is sound but the caulk around a chimney or dormer has dried, cracked, or pulled away, reapplying a high-quality, flexible roofing sealant can effectively restore the seal.
- A Single Dislodged Piece: Occasionally, a strong gust of wind might lift or dislodge a single piece of step flashing, or a pipe boot might shift slightly. If the piece itself is undamaged and the underlying materials are dry, a roofer can often re-secure and reseal it.
- Relatively New Flashing: If your roof and flashing are relatively new (say, less than 10-15 years old) and the damage is minimal, a repair is usually the most logical choice. The overall integrity of the flashing system is still strong, so addressing a small flaw makes sense.
Before opting for a repair, a professional roofer will meticulously inspect the area. They'll look for signs of water intrusion under the flashing, check for any rot in the underlying roof decking, and assess the overall condition and age of the existing flashing. If the damage is contained and the surrounding components are healthy, a targeted repair can indeed be a smart move, often falling under typical Flashing Leak Repair services.
When a Full Replacement Becomes Necessary
While repairs are tempting for their lower upfront cost, there are many situations where replacing the flashing, or even the entire roof, is the only sensible long-term solution. Trying to patch extensively damaged flashing is often a waste of money and will lead to recurring problems.
You should lean towards a full replacement of flashing if:
- Widespread Corrosion or Deterioration: If multiple pieces of flashing, or a large section of continuous flashing (like in a valley), show extensive rust, pitting, or are severely deteriorated, piecemeal repairs won't be effective. Corrosion can spread, and the material's integrity is compromised beyond simple patching.
- Severe Deformation or Tearing: Flashing that is badly bent, torn, or severely warped by storm damage or impact often cannot be effectively straightened or repaired to provide a watertight seal. Replacing the damaged section, or the entire run of flashing, is necessary.
- Damage Affecting Structural Integrity: If the flashing failure has led to significant water damage to the roof decking, rafters, or adjacent structural elements (like the chimney masonry or dormer framing), then simply repairing the flashing is akin to putting a band-aid on a gaping wound. At this point, you're looking at a larger project that involves addressing the structural damage and replacing the flashing.
- During a Full Roof Replacement: This is the ideal scenario. When you're getting a new roof, all existing flashing should be removed and replaced with new materials. Never let a contractor "reuse" old flashing during a roof replacement unless it's a very specific, high-value material like copper that is still in pristine condition (and even then, it's risky). New flashing ensures a complete, integrated, watertight system that matches the lifespan of your new shingles. This is a critical point when evaluating Roof Repair vs Replacement: How to Decide.
- Multiple Layers of Old Flashing: In some older homes, you might find several layers of flashing from previous repairs or roof-overs. This can be problematic, as it creates an uneven surface and potential water traps. A complete tear-off and replacement with a single, properly installed layer is usually the best approach for When to Replace Roof Flashing Only.
- Outdated Materials or Design: If your existing flashing is made from an outdated material (like certain thin-gauge metals) or installed using techniques that no longer meet current building codes, it’s a good opportunity to upgrade to modern, more durable options during a larger roofing project.
Ultimately, the decision to repair or replace flashing requires an expert assessment. A reputable roofing contractor will thoroughly inspect the entire roof system, including the attic space, to determine the full extent of the damage. They will then present you with options, explaining the pros and cons of each, ensuring you make an informed decision that protects your home for the long haul.
Choosing the Right Flashing Materials and Contractor
Making informed choices about your flashing materials and, more importantly, the contractor who installs them, is paramount to the long-term health and integrity of your roof. It's an investment, and you want it done right.
Factors in Material Selection and Design
Choosing the right flashing material isn't just about what looks good; it's about what performs best for your specific home and environment.
- Climate Considerations: Your local climate plays a significant role. In regions prone to heavy hail, a thicker gauge of metal or impact-resistant materials for exposed flashing (like in open valleys) might be a wise investment. In coastal areas with salt spray, aluminum or copper will outperform galvanized steel due to their superior corrosion resistance. For areas with extreme freeze-thaw cycles, materials that can withstand constant expansion and contraction without cracking are crucial.
- Aesthetics and Home Style: While functionality comes first, aesthetics matter too. For a historic home or a house with specific architectural features, copper flashing might be chosen not just for its durability but also for its classic appearance and the beautiful patina it develops. For more modern homes, clean lines of galvanized steel or aluminum can be visually appealing. Consider how the flashing will look against your shingles and the exterior of your home.
- Budget vs. Longevity: This is often the balancing act. Galvanized steel and aluminum are more budget-friendly and offer good performance for a standard lifespan. Copper, while a significant upfront investment, can last for decades, often outliving multiple shingle replacements. Think about how long you plan to stay in your home and your appetite for future repairs. Sometimes, spending a bit more now for superior materials in critical areas can save you significant money and stress down the road.
- Building Codes and Manufacturer Requirements: Always, always, always ensure that your chosen materials and the installation methods comply with local building codes. Some areas may have specific requirements for flashing thickness, material, or installation techniques, especially in high-wind or hurricane zones. Additionally, using the correct flashing system is often a requirement to validate manufacturer warranties for your shingles. Your contractor should be well-versed in these requirements.
It's a lot to consider, but a good contractor will walk you through these options, explaining the benefits and drawbacks of each for your specific situation.
The Role of a Qualified Roofing Contractor
Let's be blunt: you can buy the most expensive, durable flashing in the world, but if it's installed by someone who doesn't know what they're doing, it will fail. Flashing installation is an art and a science, requiring precision, attention to detail, and a deep understanding of water dynamics.
When you're looking for a roofing contractor, particularly for a full replacement or significant repair, prioritize expertise in comprehensive roofing systems, not just shingle application.
- Look for Holistic Approach: A truly qualified contractor understands that a roof is a system, not just a layer of shingles. They'll emphasize the importance of every component: the underlayment, ventilation, drip edge, and, of course, the flashing. They'll talk about how these components work together to protect your home.
- Ask Specific Questions About Flashing: Don't be afraid to ask potential contractors about their approach to flashing. Ask:
- "What type of flashing materials do you typically use for chimneys/valleys/skylights?"
- "How do you ensure proper layering and sealing around penetrations?"
- "Do you use kick-out flashing?"
- "What are your fastening and sealant choices for different flashing applications?"
Their answers should be detailed, confident, and align with the best practices discussed in this guide. If they wave off flashing as a minor detail or only talk about slathering caulk everywhere, that's a major red flag.
- Manufacturer Certifications: Many leading shingle manufacturers, like GAF, Owens Corning, and CertainTeed, offer certification programs for contractors (e.g., GAF Master Elite, Owens Corning Platinum Preferred). These certifications often require contractors to undergo specialized training, adhere to strict installation standards, and allow them to offer enhanced manufacturer warranties on their work, which often extend to the entire roofing system, including flashing. This means you get a more robust warranty and peace of mind that the contractor has been vetted by the manufacturer. These Manufacturer-Certified Roofers Explained programs are a great indicator of quality.
- Check References and Reviews: Always check a contractor's references and online reviews. Look for feedback specifically mentioning attention to detail, quality of work, and how they handled any unexpected challenges. A contractor with a long track record of satisfied customers is always a safer bet.
- Licensed and Insured: This should go without saying, but ensure any contractor you hire is fully licensed and insured (liability and workers' compensation). This protects you in case of accidents or property damage during the project. For more guidance, see How to Choose a Roofing Contractor and Questions to Ask a Roofing Contractor Before Hiring.
Finding a reliable, skilled roofing professional can feel like a daunting task, but it's one of the most important decisions you'll make for your home. Platforms like Modernize can be incredibly helpful resources, connecting you with pre-vetted, qualified roofing contractors in your area who understand the critical importance of proper flashing and who can ensure your entire roofing system is installed to the highest standards. Don't compromise on flashing expertise; it's the detail that prevents the biggest disasters.
Disclaimer
This article is intended for informational purposes only and does not constitute professional advice. While we strive to provide accurate and up-to-date information, roofing is a complex field that requires specific expertise. Always consult with a qualified, licensed, and insured roofing professional for any assessments, repairs, or replacements related to your roof and its components. Local building codes and material specifications can vary significantly, and a professional can ensure your project complies with all necessary regulations and safety standards.