Roof Anatomy: Parts of an Asphalt Shingle Roof
Thinking about your roof probably doesn't happen often, until you notice a leak, a missing shingle, or a suspicious stain on your ceiling. It's easy to see a roof as just "shingles," but underneath that top layer is a complex system designed to protect your home. This comprehensive guide will peel back the layers, explaining every vital component of an asphalt shingle roof so you can understand what keeps your home safe and dry, and what to look for when issues arise.
Understanding the Big Picture: Why Roof Anatomy Matters
For most homeowners, the roof is simply "that thing on top of the house." We rarely think about it until there’s a problem, like a leak or visible damage. But truly understanding the different parts of an asphalt shingle roof isn't just for contractors or seasoned DIYers; it empowers you. When you know what each component does, you can have more informed conversations with professionals, better identify potential issues early on, and appreciate the intricate engineering that keeps your family safe from the elements. It’s like knowing the basics of how your car works – it helps you understand when a mechanic is explaining a serious issue versus a minor tune-up.
More Than Just Shingles: The Integrated System
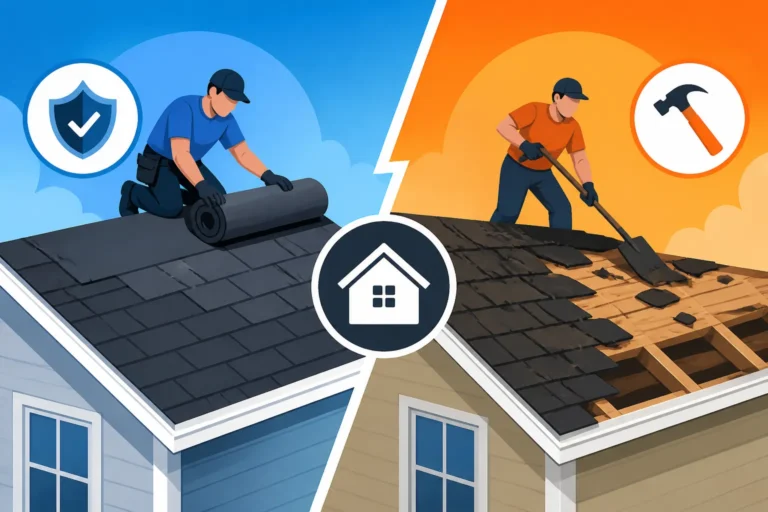
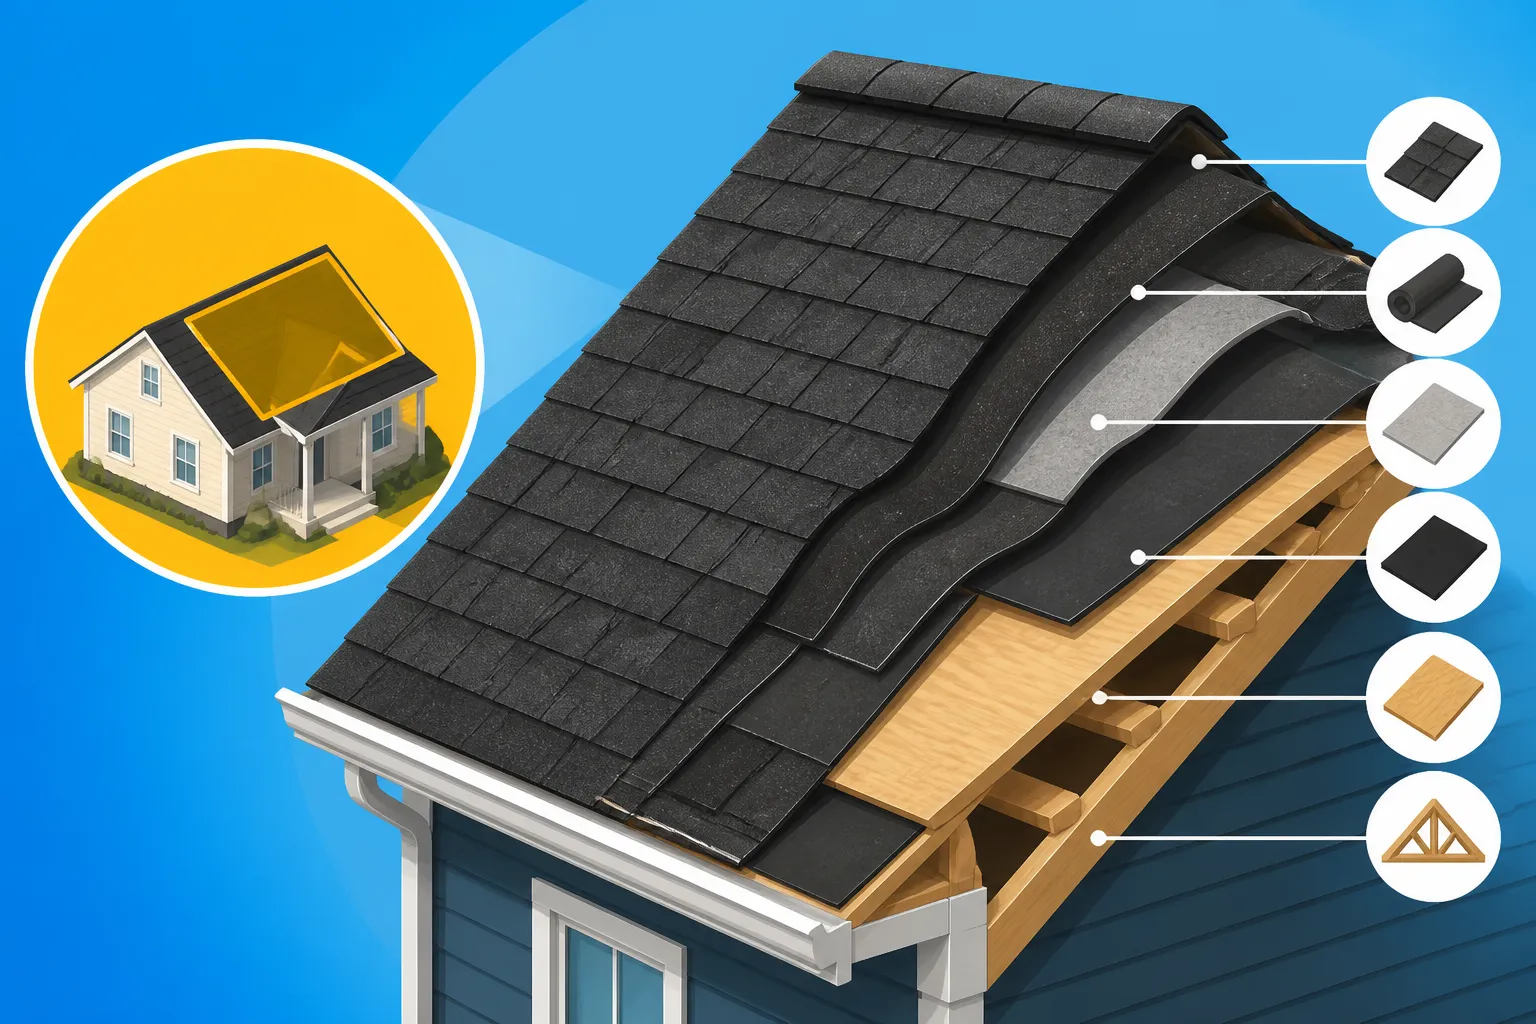
It’s a common misconception that a roof is just a layer of shingles nailed to some wood. In reality, an asphalt shingle roof is a highly engineered, multi-layered system where each component plays a critical role, working in concert to provide comprehensive protection. Think of it like an onion, with many layers contributing to the whole. If one layer is compromised, it can affect the integrity and performance of the entire system. For instance, without proper underlayment, even the most durable shingles might struggle to prevent water intrusion.
This integrated approach means that when you're considering a roof replacement, you're not just buying shingles; you're investing in a complete roofing system. Reputable contractors often emphasize this, ensuring that every element, from the decking to the ridge cap, is up to standard and installed correctly. Neglecting any single piece can lead to premature failure, warranty issues, and costly repairs down the line. It's truly a chain, and a strong roof has no weak links.
The Lifespan and Protection Connection
Knowing your roof’s anatomy directly impacts your ability to maintain it and extend its lifespan. When you can identify what a drip edge is, or understand the role of flashing, you're better equipped to spot signs of wear or damage before they escalate into major problems. For example, if you see water pooling near your gutters or dampness in your attic, knowing the function of components like the fascia or proper ventilation systems can help you narrow down the potential cause. Early detection can mean the difference between a simple, inexpensive repair and a full-blown, costly replacement.
Beyond basic maintenance, understanding the parts of your roof helps you make smarter decisions about upgrades or repairs. Do you need a better ventilation system? Is your existing flashing sufficient? These questions become less daunting when you have a foundational understanding of how your roof is built and designed to protect. It allows you to ask informed questions of any roofing professional, ensuring you get the right solutions for your home's specific needs, whether you're trying to figure out how long asphalt shingles last or if it's time for a full replacement.
The Foundation: Roof Decking and Framing
Before any protective layers can go on, a roof needs a solid foundation, and that starts with the structural components of your home. These unsung heroes are mostly hidden from view but bear the brunt of the weight of your entire roofing system, not to mention snow loads, wind uplift, and anything else Mother Nature throws at it. A strong, stable substructure is absolutely non-negotiable for a safe and durable roof.
The Backbone: Trusses, Rafters, and Joists
Deep beneath your shingles and decking, the true skeletal system of your roof resides. This is the framing, typically made of wood, that gives your roof its shape and supports its immense weight.
- Trusses: In many modern homes, especially those built in the last few decades, you'll find engineered wood trusses. These are pre-fabricated, triangular structures joined together with metal plates, designed for specific spans and loads. They are highly efficient in distributing weight and can be installed relatively quickly. The main components of a truss are the top chords (which form the slope of the roof), bottom chords (which act as ceiling joists), and web members (the internal bracing).
- Rafters: In older homes, or custom builds, individual rafters are more common. These are typically solid lumber beams that run from the ridge of the roof down to the exterior walls, forming the slope. Rafters are typically larger and heavier than truss components and offer more flexibility if you ever plan to convert your attic into living space, as they don't have the internal web bracing of trusses.
- Ceiling Joists: While technically part of the ceiling structure, ceiling joists often work in conjunction with rafters or trusses to provide lateral support and resist the outward thrust of the roof. They essentially tie the exterior walls together, preventing them from spreading under the roof's weight.
The condition of this framing is paramount. If you ever hear creaking from your attic, notice sagging in your roofline, or find signs of water damage inside your home, a professional will always check the integrity of these structural elements first. Rot, insect damage, or improperly sized framing can lead to catastrophic failure.
The Substrate: Plywood and OSB Decking
Sitting directly on top of the rafters or trusses is the roof decking, also known as the sheathing. This is the flat surface to which all subsequent roofing materials are attached. It provides the rigid platform that gives your roof its shape and offers the nail-holding power essential for securing shingles and other components.
- Plywood: For decades, plywood has been the standard for roof decking. It's made by gluing together thin layers of wood veneer, with the grain of adjacent layers oriented at right angles. This cross-graining gives plywood excellent strength and stability, making it resistant to warping and shrinking. Plywood panels typically come in 4×8-foot sheets and various thicknesses (e.g., 1/2-inch, 5/8-inch).
- OSB (Oriented Strand Board): In more recent construction, OSB has become a very popular alternative to plywood due to its cost-effectiveness and comparable strength. OSB is manufactured from strands of wood (usually aspen, yellow poplar, or southern pine) arranged in specific directions and bonded together with resin under heat and pressure. It also comes in 4×8-foot sheets and similar thicknesses to plywood.
Both plywood and OSB serve the same fundamental purpose: creating a continuous, stable surface for the rest of the roof system. However, they do have slight differences. OSB can be more susceptible to swelling and delamination if it gets excessively wet for prolonged periods during construction or due to a persistent leak. Plywood generally handles moisture a bit better, but both require proper installation, including leaving small gaps between sheets for expansion and contraction.
When a roofer performs a full tear-off during a replacement, they will carefully inspect the existing decking. Any soft spots, signs of rot, mold growth, or damage will necessitate Roof Decking Replacement Cost, as installing new shingles over compromised decking is a recipe for disaster. This inspection is a critical part of determining the overall Asphalt Roof Replacement Cost: Complete Breakdown.
The Protective Layers Beneath the Shingles
While shingles get all the glory, the layers beneath them are truly the unsung heroes, silently working to keep your home dry and protect its structure. These components are designed to provide redundant protection, meaning if water somehow breaches the shingles, these underlying layers act as a second and third line of defense. Ignoring these vital protective measures during a roof replacement or even a significant repair is a grave mistake that can lead to costly water damage inside your home.
Ice and Water Shield: Your First Line of Defense
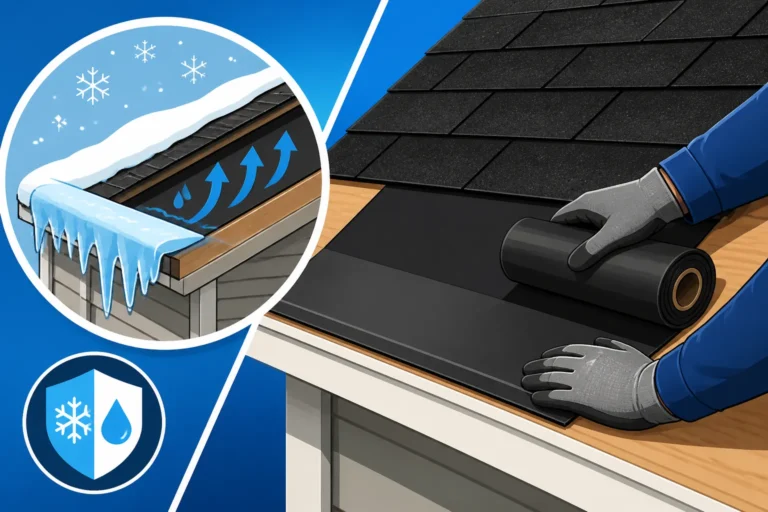
Imagine a heavy winter with snow piling up on your roof, then melting and refreezing, creating ice dams along your eaves. Or a torrential downpour driven by strong winds that forces water under your shingles. In these scenarios, regular underlayment might not be enough. That's where ice and water shield comes in.
This specialized membrane is a thick, self-adhering, waterproof material designed to create an impenetrable barrier. It typically consists of a rubberized asphalt membrane with a polyethylene surface, providing exceptional resistance to water penetration. When installed, it adheres directly to the roof decking, sealing around nails and other fasteners, preventing water from seeping into the roof deck.
Ice and water shield is critical in certain areas of the roof where water is most likely to accumulate or penetrate:
- Eaves: The lowest edge of the roof is prone to ice dam formation. Ice dams occur when snow melts on the warmer parts of the roof, runs down to the colder eaves, and refreezes, creating a barrier. This barrier can cause melting water to back up under the shingles, leading to significant leaks. Ice and water shield here is a lifesaver.
- Valleys: These are the V-shaped channels where two roof planes meet. Valleys are natural waterways, channeling large amounts of water and debris. Without proper protection, they are highly susceptible to leaks.
- Around Penetrations: Areas around chimneys, skylights, vent pipes, and dormers are notorious for leaks. Ice and water shield provides an added layer of protection in these vulnerable spots, effectively sealing around the edges of these structures.
- Low-Slope Areas: Roof sections with a very gradual pitch are more prone to water pooling. Ice and water shield can be extended further up the roof in these areas to provide enhanced protection.
Building codes in colder climates often mandate the installation of ice and water shield along the eaves, typically extending a certain distance up the roof slope. For a deeper dive into this essential component, check out our guide on Ice and Water Shield Explained. It's a small investment that offers huge peace of mind, especially if you live in a region prone to heavy snow or driving rain.
Roofing Underlayment: The Crucial Barrier
Once the ice and water shield is in place, the next layer applied to the roof deck is the underlayment. This material acts as a secondary water barrier, protecting the roof deck from moisture that might get past the shingles and providing a temporary shield during installation, should inclement weather roll in before the shingles are laid. It also helps prevent wood resins from the decking from damaging the shingles and provides a smoother surface for shingle application, which can enhance their appearance and longevity.
Historically, felt underlayment (often called "tar paper" or "building paper") was the industry standard. This material is made from organic fibers or fiberglass saturated with asphalt, giving it water-resistant properties. It's relatively inexpensive and widely available. However, felt paper can become brittle in cold weather, tear more easily, and absorb moisture if exposed for too long, which can cause it to wrinkle or buckle.
In recent years, synthetic underlayment has surged in popularity and is now often preferred by many roofers, including those found through services like Modernize, who aim to connect homeowners with reliable contractors. Synthetic underlayment is made from polypropylene or polyethylene, offering superior durability, tear resistance, and water repellency compared to felt. It's lighter, stronger, and typically UV-resistant for longer periods, meaning it can protect your roof deck for weeks or even months during construction without degrading. While synthetic underlayment usually costs a bit more upfront, its enhanced performance and ease of installation often make it a worthwhile investment in the long run. To understand the full comparison, explore our article on Underlayment Explained: Synthetic vs Felt.
Drip Edge and Flashing: Directing Water Away
These two components are absolutely critical for managing water runoff and preventing it from infiltrating vulnerable areas of your roof. Without them, your roof is essentially an open invitation for water damage.
-
Drip Edge: This is a thin, non-corrosive metal flashing installed along the eaves and rake (gable) edges of your roof. Its primary purpose is right in its name: it creates a small overhang that drips water away from your fascia and directs it into the gutters. Without a drip edge, water can cling to the underside of the shingles and run back onto the fascia board, leading to rot, paint damage, and saturation of the roof decking. It also protects the edge of the roof deck from water penetration and helps hold the underlayment and starter shingles in place. The cost of new flashing and drip edge is a small but vital part of any roofing project, ensuring long-term protection. For more detail, check out our piece on Drip Edge: What It Does.
-
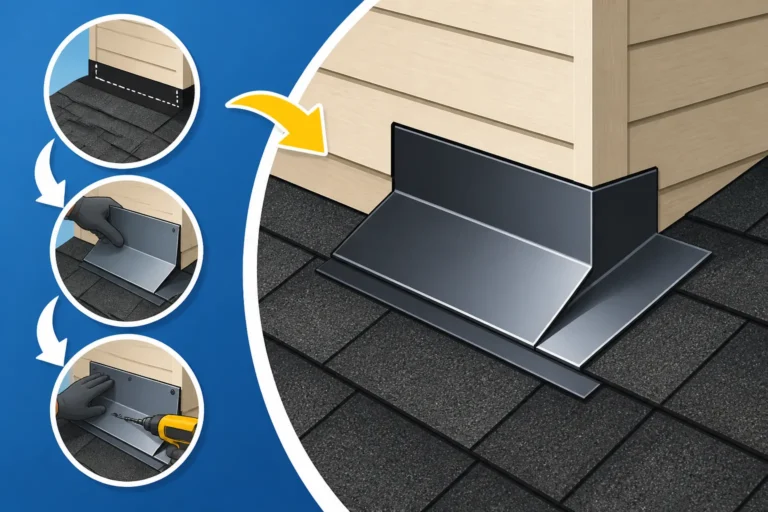
Flashing: This term refers to thin pieces of impervious material, typically aluminum or galvanized steel, used to prevent water penetration at junctions or intersections on the roof. Anywhere the roof meets a vertical surface or experiences a change in plane, flashing is essential. These vulnerable points are prime targets for leaks if not properly sealed.
- Step Flashing: Used where a roof meets a wall (e.g., a dormer or a side wall), step flashing consists of individual L-shaped pieces woven in with each shingle course to create a stair-step pattern, effectively shedding water down and away from the wall.
- Valley Flashing: As mentioned with ice and water shield, valleys are high-traffic water channels. Valley flashing, usually a continuous metal piece (open valley) or a closed-cut shingle system, ensures water flows smoothly down the roof without penetrating the deck.
- Pipe Flashing: Also known as vent boot flashing, this is a pre-formed piece of metal or plastic with a rubber collar that fits snugly around vent pipes (plumbing vents, furnace vents) that protrude through the roof. It seals the opening around the pipe, preventing water from entering.
- Chimney Flashing: Chimneys are significant penetrations in the roof and require multiple types of flashing. Base flashing covers the lower side, step flashing along the sides, counter-flashing is cut into the chimney mortar joints to overlap the step flashing, and sometimes a cricket (a small diversionary structure) is built on the high side of a wide chimney to shed water around it.
Flashing is paramount, and understanding its intricacies is key to a watertight roof. Our guide on Roof Flashing Explained delves even deeper into this critical component. Proper installation of flashing requires skill and attention to detail, as even a small gap can lead to significant leaks.
The Visible Outer Layer: Asphalt Shingles
When most people think of a roof, they envision the shingles. And for good reason – they are the most visible component and the primary barrier against the elements. Asphalt shingles have dominated the roofing market for decades due to their versatility, affordability, and relative ease of installation. But not all asphalt shingles are created equal, and understanding their different types and integral parts is crucial for appreciating their protective power.
The Different Faces of Asphalt: 3-Tab, Architectural, and Designer
Asphalt shingles come in a variety of styles, each offering different aesthetics, durability, and cost points. Your choice here impacts not only your home's curb appeal but also its long-term protection.
- 3-Tab Shingles: These are the most basic and traditionally common type of asphalt shingle. They are flat, single-layer shingles with cut-outs that create the illusion of three separate tabs when installed. They are the most economical option, but also the lightest and generally offer the shortest lifespan (typically 15-20 years) and the lowest wind resistance. While they still have their place, their popularity has waned as homeowners increasingly opt for more durable and aesthetically pleasing alternatives. The 3-Tab vs Architectural Shingle Cost Compared can help you weigh your options.
- Architectural (Laminate or Dimensional) Shingles: These are the undisputed champions of the asphalt shingle world today. Architectural shingles are multi-layered, giving them a thicker, more dimensional appearance that mimics the look of wood shakes or natural slate. They are significantly heavier, more durable, and offer superior wind and impact resistance compared to 3-tab shingles. Their varied granule patterns and profiles create a much richer, more textured look, greatly enhancing a home's curb appeal. They typically come with longer warranties, often 30 years to limited lifetime, and are available from major brands like GAF, Owens Corning, and CertainTeed. For homeowners seeking a balance of aesthetics, durability, and value, architectural shingles like GAF Timberline HDZ are a popular choice.
- Designer (Luxury) Shingles: Taking architectural shingles a step further, designer shingles are the premium end of the asphalt shingle spectrum. They are even thicker, heavier, and offer the most dramatic aesthetic appeal, often designed to replicate natural slate, cedar shakes, or even European tile with remarkable authenticity. These shingles provide exceptional durability, often carrying Class 4 impact resistance ratings and comprehensive warranties. While they come at a higher price point, designer shingles offer unparalleled curb appeal and protection, making them a worthy investment for certain homes.
Understanding these distinctions helps you make an informed decision when it comes to a roof replacement, balancing your budget with desired aesthetics and long-term performance.
Starter Shingles and Ridge Caps: The Essential Details
Beyond the main field shingles that cover the majority of your roof, there are specialized shingles designed for specific, crucial areas. These are not optional extras; they are integral to a complete and effective roofing system.
- Starter Shingles: These are the first course of shingles installed along the eaves and rake edges, laid directly on top of the drip edge and underlayment. Their primary purpose is to provide proper sealing and adhesion for the first full course of main shingles. They have an adhesive strip that seals down the bottom edge of the primary shingles, preventing wind uplift and water infiltration at the most vulnerable edge of the roof. Many modern roofing systems use pre-manufactured starter strips that simplify installation and ensure consistent performance. Without starter shingles, the edges of your roof are far more susceptible to wind damage and leaks.
- Ridge Cap Shingles: As the name suggests, these specialized shingles cover the peaks, hips, and ridges of your roof. These areas are not only aesthetically prominent but also highly exposed to the elements. Ridge cap shingles are thicker, pre-formed, and designed to bend over the angle of the ridge or hip, providing a strong, watertight cap that seals the roof system at these crucial junctures. They are usually thicker and more robust than field shingles to withstand increased exposure. Just like starter shingles, using the correct ridge cap shingles ensures a professional finish and enhances the overall durability and watertight integrity of the roof.
Both starter shingles and ridge cap shingles are often included as part of a manufacturer's "complete roofing system," like those offered by Owens Corning or CertainTeed, ensuring all components work together seamlessly for optimal performance and warranty coverage.
Granules and Sealing Strips: The Unsung Heroes
Even within the asphalt shingle itself, there are critical components that often go unnoticed but perform essential functions.
- Granules: These small, ceramic-coated mineral particles are embedded in the asphalt surface of the shingle. They serve multiple vital purposes:
- UV Protection: The most crucial role of granules is to protect the underlying asphalt from the sun's harsh ultraviolet (UV) rays. UV radiation can break down asphalt, causing it to dry out, become brittle, and crack prematurely. Granules act like a sunscreen for your roof.
- Color and Aesthetics: Granules are what give shingles their color and texture, contributing significantly to your home's curb appeal. They come in a vast array of colors and blends.
- Fire Resistance: Many granules are fire-resistant, contributing to the shingle's overall fire rating.
- Algae Resistance: Some granules are infused with copper, which helps inhibit the growth of blue-green algae (often seen as dark streaks on roofs), particularly prevalent in humid climates.
- Sealing Strips (Thermal Sealing Strips): Most modern asphalt shingles have a thin, adhesive strip on their underside or top side. Once the shingles are installed and exposed to sunlight, this asphalt-based sealant strip activates and bonds with the shingle below it. This "thermal sealing" process creates a strong bond that helps the shingles resist wind uplift and forms a more uniform, waterproof surface. Without these sealing strips, shingles would be much more prone to being blown off during high winds.
When you notice excessive granule loss in your gutters or on your driveway, it's a significant indicator that your shingles are aging and their protective properties are diminishing. This is one of the key Signs You Need a New Roof.
Vital Components for Airflow and Moisture Control
A common misconception is that a roof's job is simply to keep water out. While that's primary, equally important is managing temperature and moisture within the attic space. Poor attic ventilation can lead to a host of problems, from premature roof deterioration to significantly higher energy bills. Understanding how airflow is managed is critical for a healthy, long-lasting roof.
The Importance of Roof Ventilation: Ridge, Soffit, and Gable Vents
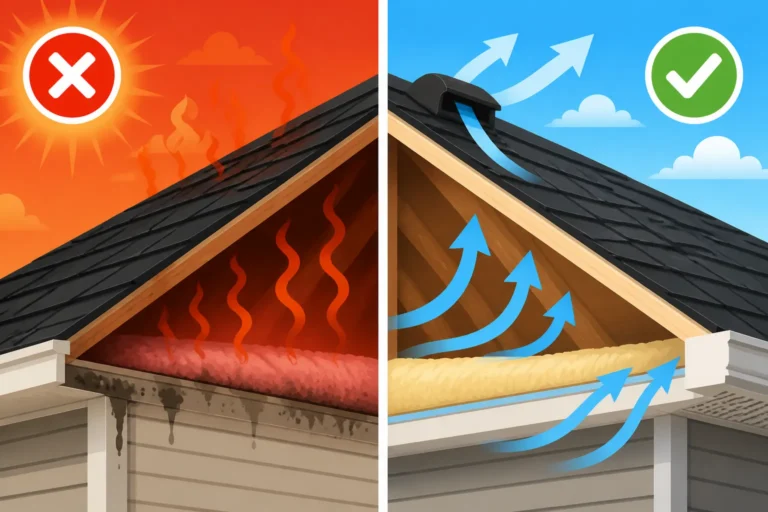
Proper attic ventilation is not just about keeping your attic cool in the summer; it's a year-round necessity that significantly impacts the lifespan of your roof, the comfort of your home, and your energy efficiency. The goal of a good ventilation system is to create a continuous flow of air: cool, fresh air enters low, circulates through the attic, and hot, stale air exits high. This "stack effect" or "convection" prevents heat and moisture buildup.
- Ridge Vents: Installed along the very peak of the roof (the ridge), these are often the most efficient and aesthetically pleasing exhaust vents. They provide a continuous opening along the entire ridge line, allowing warm, moist air to escape naturally. When combined with continuous soffit vents (intake vents), they create an ideal balanced ventilation system. You can learn more about how a Ridge Vent vs Box Vent vs Turbine compares in terms of performance and appearance.
- Soffit Vents (Intake Vents): Located in the soffit (the underside of the eaves that extends beyond the exterior walls), these vents allow cooler, fresh outside air to enter the attic. They are crucial for completing the ventilation cycle, feeding air up through the attic to replace the hot air escaping through the exhaust vents. Without adequate intake, exhaust vents can't work effectively.
- Gable Vents: These are louvered openings typically found on the gable ends of homes (the triangular walls at the end of a pitched roof). While they provide some cross-ventilation, they are generally less effective than a balanced system of continuous soffit and ridge vents, as they primarily ventilate only the portion of the attic closest to the vents. Often, if a home has gable vents, professional roofers will recommend sealing them off when installing a ridge and soffit system to ensure proper airflow and avoid disrupting the stack effect.
Why is this so important? In the summer, good ventilation prevents your attic from becoming an oven, which can radiate heat down into your living space and prematurely age your shingles by cooking the asphalt. In winter, it prevents warm, moist air from inside your home (which rises into the attic) from condensing on the cold underside of your roof deck. This condensation can lead to mold growth, wood rot in the decking and framing, and even compromise your insulation. Our article on How Roof Ventilation Works provides an in-depth look at this crucial system.
Flashing: Sealing Vulnerable Areas
While we touched on flashing earlier, it’s worth reiterating its importance, especially for moisture control. Flashing is one of the most critical elements in preventing leaks, and its proper installation is a hallmark of quality roofing work. Anywhere a roof plane changes direction or meets another structure, you'll find flashing at work, directing water harmlessly away.
Common areas requiring meticulous flashing:
- Chimneys: These large, blocky structures interrupt the smooth flow of the roof and create multiple planes where water can collect. Chimneys require a specialized system of base flashing, step flashing, and counter flashing to ensure a watertight seal. If you notice leaks around your fireplace, chimney flashing is usually the first suspect.
- Skylights: While beautiful, skylights are notorious for leaks if not installed and flashed correctly. They require a complete flashing kit that integrates seamlessly with the surrounding shingles, often including a sill flashing, step flashing, and head flashing, all designed to channel water around the window and down the roof.
- Vent Pipes and Exhaust Fans: Every pipe or vent that penetrates the roof deck needs a secure, weather-tight seal. This is typically achieved with a pipe boot or vent flashing, often made of metal with a rubber collar that fits snugly around the pipe. Over time, the rubber components of these boots can degrade, becoming brittle and cracking, leading to leaks.
- Valleys: As the busiest waterways on a roof, valleys need robust protection. Whether an open metal valley or a closed-cut shingle valley, the underlying flashing (often supplemented with ice and water shield) is what prevents significant water infiltration. A poorly formed or damaged valley is a direct route for water into your home.
Even the most durable shingles will fail to protect your home if the flashing around these vulnerable areas is compromised. Experienced roofing contractors, such as those you can find through Modernize, understand the nuances of flashing installation and the importance of using high-quality materials to ensure a leak-free roof for years to come.
Other Key Structural and Aesthetic Elements
A complete roof system extends beyond the visible shingles and the hidden underlayers. Components around the edges of your roof contribute both to its aesthetic finish and its functional protection, ensuring water is managed effectively and the underlying structure is safeguarded.
Fascia and Soffit: The Eaves' Protectors
As you look up at the edge of your roof, two often-overlooked components play a crucial role in both the appearance and health of your home: the fascia and soffit.
- Fascia: This is the long, straight board that runs along the lower edge of your roof, directly beneath the roofline and behind your gutters. It serves several important purposes:
- Finishing Touch: It creates a smooth, finished appearance for the edge of the roof, covering the exposed ends of the rafters or trusses.
- Gutter Support: Gutters are typically attached directly to the fascia board. A sturdy fascia is essential to support the weight of full gutters, especially during heavy rains or winter ice.
- Protection: It helps protect the edges of the roof decking and the interior of your attic from moisture, insects, and pests.
- Ventilation Integration: Some fascia boards are designed with vents, or work in conjunction with soffit vents, to facilitate attic airflow.
Fascia boards are commonly made from wood (often wrapped in aluminum or vinyl for protection and low maintenance) or composite materials. Damaged or rotting fascia can be a sign of poor drainage (e.g., overflowing gutters) and can compromise the integrity of your entire roof edge.
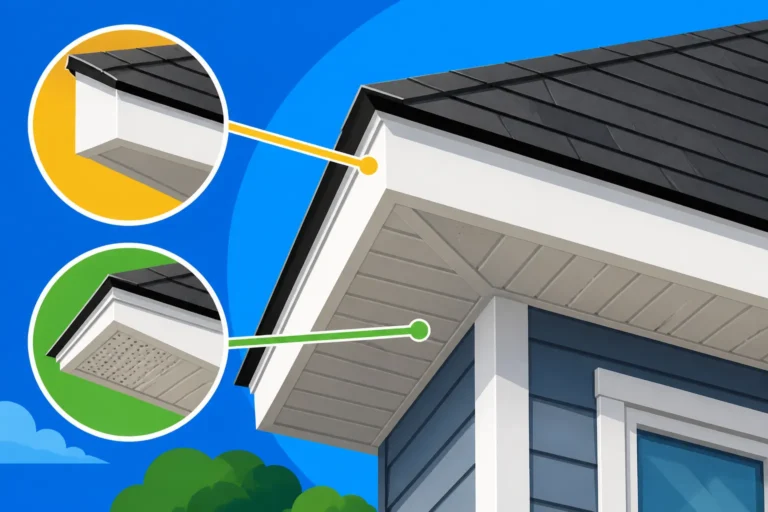
- Soffit: The soffit is the finished underside of the eaves – the portion of your roof that overhangs the exterior walls of your house. It connects the bottom of the fascia board to the side of your house.
- Aesthetic Appeal: Soffit material provides a clean, finished look, concealing the rough framing beneath the eaves.
- Ventilation: Critically, the soffit is where intake vents for your attic ventilation system are typically located. Perforated soffit panels allow fresh, cooler air to enter the attic, which is essential for proper airflow and preventing heat and moisture buildup.
- Pest Control: It helps prevent birds, squirrels, insects, and other pests from entering your attic space.
Soffits are typically made from aluminum, vinyl, or wood. Ensuring your soffits are intact and that any soffit vents are clear and unobstructed is a key part of maintaining good attic ventilation and protecting your roof structure.
Gutters and Downspouts: Managing Water Runoff
While technically not part of the roof itself, gutters and downspouts are absolutely essential partners to your roofing system. They are the final stage of water management, taking the water that sheds off your roof and directing it safely away from your home's foundation.
- Gutters: These horizontal channels are installed along the edge of your roof (attached to the fascia) and collect rainwater and melting snow as it flows off the shingles. Without gutters, water would simply cascade off the roof edge, eroding landscaping, staining siding, and saturating the soil around your foundation. This saturation can lead to basement leaks, foundation cracks, and even structural instability over time. Gutters come in various materials, including aluminum, steel, copper, and vinyl, and are available in different profiles like K-style and half-round.
- Downspouts: These are vertical pipes that attach to the gutters and carry the collected water safely down to ground level. They direct the water away from the foundation, often connecting to underground drainage systems, splash blocks, or rain barrels. Proper placement and sizing of downspouts are critical to efficiently handle the volume of water from your roof, especially during heavy rainfall.
Clogged gutters and downspouts are a common homeowner headache and a leading cause of water damage. When they overflow, water spills directly onto the fascia, soffit, and ground around the foundation, defeating their purpose. Regular cleaning and maintenance are essential. Investing in gutter guards can significantly reduce the frequency of cleaning, but they still require occasional checks to ensure they aren't accumulating debris. Remember, a perfectly installed roof can still cause foundation problems if its water management partners – the gutters and downspouts – are failing. For homeowners in areas with high rainfall, ensuring your gutters and downspouts are in top condition is as important as the roof itself. When considering Cost to Replace Roof and Gutters Together, it's often a smart move to address both simultaneously for a truly comprehensive solution.
Understanding Your Roof's Pitch and Shape
Beyond the individual components, the overall design and geometry of your roof play a significant role in its performance, material selection, and even the cost of installation. The way your roof rises and slopes, and its general form, dictate everything from how water sheds to how challenging (and expensive) it is for roofers to work on it.
Roof Pitch: The Slope of Your Protection
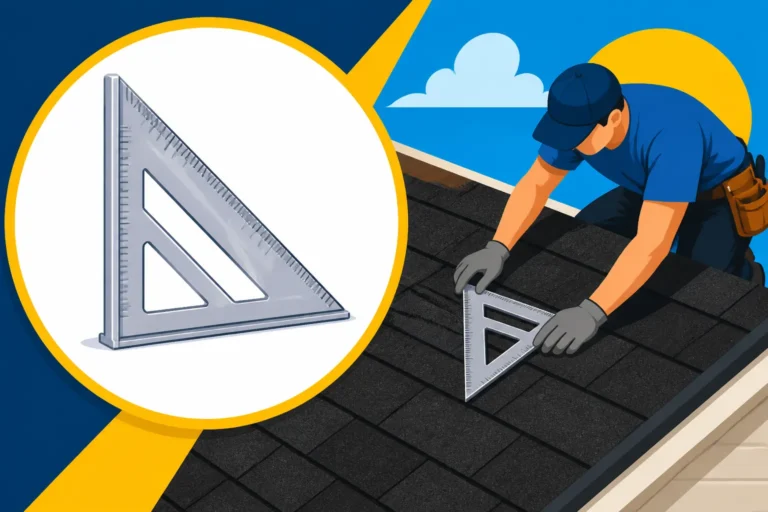
Roof pitch refers to the steepness or slope of your roof. It's typically expressed as a ratio, indicating the vertical rise in inches for every 12 inches of horizontal run. For example, a "6/12 pitch" means the roof rises 6 inches for every 12 inches it extends horizontally.
Why does pitch matter so much?
- Water Shedding: Steeper roofs shed water and snow more quickly, reducing the chance of standing water, ice dam formation, and granule erosion. This generally means less stress on the roofing materials over time. Lower-pitched roofs (below 3/12 or 4/12) may require specialized roofing products, such as rolled roofing or modified bitumen, in certain areas, as asphalt shingles are less effective at shedding water on very gradual slopes.
- Material Suitability: The minimum pitch requirement for standard asphalt shingles is typically 2/12, though many manufacturers recommend 4/12 or higher for optimal performance and warranty coverage. For very low pitches (e.g., 2/12 to 4/12), additional underlayment, like two layers of felt or a full coverage of ice and water shield, is often required to ensure watertightness.
- Cost and Labor: Working on a steeper roof is inherently more difficult and dangerous for roofing crews. It requires specialized safety equipment, more scaffolding, and slower work pace, leading to a Steep Roof Cost Premium in labor. Imagine trying to work efficiently and safely on a roof that feels like a mountain!
- Attic Space and Ventilation: Steeper pitches often create more voluminous attic spaces, which can be beneficial for insulation and ventilation. They can also allow for more effective natural convection currents to move air through the attic, aiding in temperature and moisture control.
When a roofing contractor provides an estimate, they will always factor in the roof's pitch because it directly influences labor time, material usage, and safety measures. You can learn more about this by reviewing our guide on Roof Replacement Cost by Pitch.
Common Roof Styles and Their Anatomy Variations
The overall shape of your roof, known as its style, dictates the layout of its components and can influence its inherent strengths and weaknesses. Each style has its own characteristic features, slopes, and aesthetic.
- Gable Roof: This is perhaps the most common and easily recognizable roof style, characterized by its triangular shape. It has two sloping sides that meet at a ridge, creating a "gable" wall at each end. Gable roofs are simple to construct, shed water effectively, and provide ample attic space. They are generally less expensive to build and re-roof.
- Hip Roof: A hip roof has slopes on all four sides that meet at a ridge. All sides slope downwards to the walls, usually with a gentle slope. Hip roofs are more stable in high winds because they offer less resistance than the flat gable ends. They also provide uniform eaves around the entire house, which can be beneficial for drainage. However, they are more complex to frame and shingle, which can increase the Asphalt Roof Labor Cost Explained.
- Gambrel Roof: Often seen on barns, gambrel roofs have two distinct slopes on each side; the lower slope is much steeper than the upper slope. This design creates a lot of usable space within the attic or upper floor. The complexity of these angles means more intricate flashing and cutting during shingle installation.
- Mansard Roof: Similar to a gambrel but on all four sides, a mansard roof also features two slopes on each side, with the lower slope being very steep and often punctuated by dormer windows. This style creates an entire extra floor of usable space and is characteristic of French architecture. These roofs are highly complex to build and maintain due to their numerous angles, valleys, and dormer penetrations, making their replacement significantly more involved.
- Flat Roof (Low-Slope Roof): While less common for asphalt shingles, many homes have low-slope sections over porches, additions, or garages. These roofs are not perfectly flat but have a very minimal pitch (typically 1/4 to 1/2 inch per foot) to drain water. Asphalt shingles are generally not recommended for pitches below 2/12; instead, these sections often use specialized low-slope materials like modified bitumen, TPO, or PVC membranes.
Each roof style presents unique challenges and opportunities for design and protection. A good roofing contractor, perhaps one you find through Modernize, will be intimately familiar with the nuances of each style and can advise on the best materials and installation practices for your specific home. Understanding your roof's style and pitch gives you a better grasp of what to expect during any roofing project, from the duration of the work to the final Roof Cost Per Square: What You'll Pay.
Disclaimer
The information provided in this article is for general informational purposes only and does not constitute professional advice. Roofing work can be dangerous and complex. Always consult with a qualified and licensed roofing contractor for inspections, repairs, or replacements. Never attempt to perform roofing work yourself without proper training, safety equipment, and a thorough understanding of local building codes. We are not responsible for any actions taken based on the information presented herein.