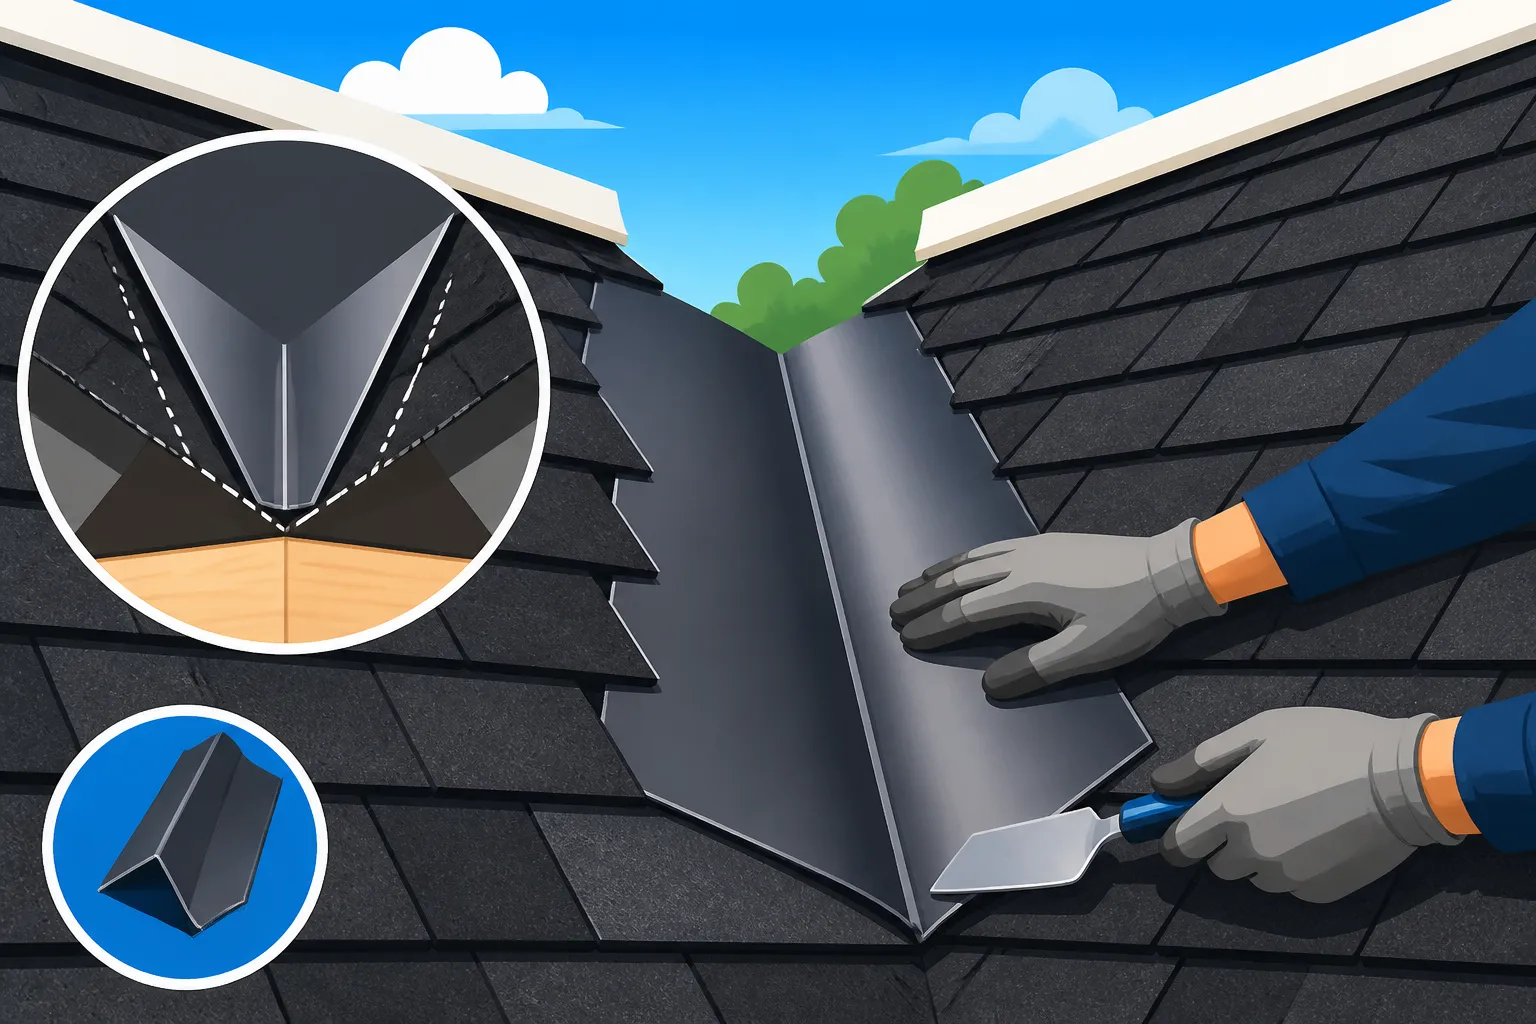
How Valleys Are Flashed
The roof over your head is your home's first line of defense, and when you start noticing problems or simply thinking about its lifespan, one area that often causes a lot of anxiety for homeowners is the roof valley. These crucial junctions, where two roof planes meet, are notoriously vulnerable to leaks if not installed perfectly, leading to serious water damage and costly repairs. This guide aims to demystify how roof valleys are flashed, helping you understand the intricacies involved in keeping your home dry and secure.
Understanding the Critical Role of Roof Valleys
Roof valleys are more than just architectural features; they are highly engineered pathways designed to manage the immense volume of water that runs off your roof during rain or snowmelt. Imagine all that water, sometimes from thousands of square feet of roof surface, funneling down into these relatively narrow channels. If these areas aren't absolutely watertight, you're in for a world of trouble.
What Makes Valleys So Important and Vulnerable?
The importance of a roof valley lies in its function: it's a superhighway for water. During a heavy downpour, water from two converging slopes accelerates, creating a much higher flow concentration and velocity than on the flat planes of your roof. This increased stress means the valley area must be built with exceptional care and robust materials to prevent water infiltration. It's essentially the plumbing system of your roof.
However, this very function also makes valleys inherently vulnerable. They are subjected to more wear and tear from water flow, debris accumulation (like leaves and twigs), and ice dams in colder climates. The constant movement of water can erode shingle granules, and trapped debris can hold moisture against the roofing materials, leading to premature deterioration. A small flaw in installation here can have widespread, devastating consequences for your home's interior, affecting ceilings, walls, and even structural components.
How Water Behaves on a Roof Valley
To truly appreciate valley flashing, you need to understand the physics of water on a roof. When rain hits your roof, it flows downwards due to gravity, collecting into streams that follow the slope. In a valley, these streams converge, creating a more concentrated flow. This is why you often see faster-moving water or even small torrents in a valley during a heavy storm.
This concentrated flow needs a clear, unimpeded path to drain off the roof and into the gutters. Any obstruction—be it loose debris, poorly installed flashing, or a deteriorated sealant—can cause water to back up. When water backs up, it has more time to find microscopic pathways into your home, especially if it's pushed by wind or held in place by ice. This is known as capillary action or hydrostatic pressure, and it's your roof's worst enemy.
The Dangers of Improper Valley Installation
The consequences of a poorly installed valley can be far-reaching and incredibly costly. The most obvious danger is a leak, which can manifest as water stains on your ceiling, peeling paint, or even dripping water during a storm. But the damage often extends beyond the visible. Water can seep into your attic, saturating insulation and leading to mold growth, which poses significant health risks and can require extensive remediation.
Beyond mold, persistent moisture can compromise the structural integrity of your roof decking, rafters, and even interior walls. Rotted wood can weaken your home's framing, leading to expensive repairs that go far beyond a simple roof patch. In some severe cases, especially with persistent leaks that go unnoticed, structural decay can lead to ceilings collapsing or other major structural failures. This is why paying close attention to this critical detail during a roof replacement cost: complete breakdown is so important.
The Two Main Approaches to Valley Flashing: Open vs. Closed
When it comes to flashing roof valleys with asphalt shingles, contractors typically choose between two primary methods: open valleys and closed valleys. Both aim to achieve the same goal – preventing water intrusion – but they do so in distinct ways, each with its own advantages, aesthetic considerations, and installation nuances. Understanding these differences is key to ensuring your roof is built to last, regardless of the choice.
Deciphering Open Valleys and Their Design
An open valley is easily recognizable by the strip of metal flashing that runs down the center of the valley, exposed to the elements. The shingles on either side of the valley are trimmed back, leaving a clear channel of metal down which water can flow. This method is often favored for its efficient water shedding capabilities. Water has a smooth, unobstructed path to follow, which can reduce the chances of debris accumulation and ice damming, particularly in regions prone to heavy snowfall or intense rainfall.
The metal used in open valleys is typically galvanized steel, aluminum, copper, or painted steel, chosen for its durability and resistance to corrosion. Copper, while more expensive, offers exceptional longevity and develops a beautiful patina over time, which can enhance the home's curb appeal. The exposed metal needs to be thick enough to withstand foot traffic and the impact of debris, usually at least 24-gauge for steel or 0.032-inch for aluminum. Proper installation involves centering the metal in the valley, securing it without puncturing the water-bearing surface, and often bending the edges of the metal upward to create a small "kick-out" or crimp that prevents water from flowing sideways under the shingles. This is a critical detail that many homeowners often overlook but makes a huge difference in preventing leaks.
Exploring the Aesthetics and Function of Closed Valleys
Closed valleys, by contrast, are designed so that the asphalt shingles from both roof planes meet and overlap directly within the valley, completely concealing any underlying flashing material. From the ground, it looks like a continuous shingle surface, providing a seamless and often more traditional aesthetic. There are two common techniques for creating closed valleys: the cut valley and the woven valley. Each provides a different visual and functional result.
The primary function of closed valleys is to create a more integrated look, which can be particularly desirable on certain architectural styles or with specific shingle designs, such as CertainTeed shingles. However, this aesthetic comes with certain functional considerations. While effectively shedding water, closed valleys can be more prone to issues if not installed perfectly, as they rely heavily on the precise cutting and sealing of shingles. The lack of an exposed metal channel means that water flows directly over shingle layers, increasing friction and potentially accelerating wear on the shingles themselves. This method often appeals to those who want a uniform appearance, but it demands meticulous attention to detail during installation to prevent future problems.
Weighing the Pros and Cons of Each Method
Choosing between open and closed valleys involves a trade-off between aesthetics, performance, and cost. It's not a one-size-fits-all decision, and what works best for one home in, say, Arizona, might not be ideal for another in Michigan.
| Feature | Open Valley | Closed Valley (Cut or Woven) |
|---|---|---|
| Aesthetics | Exposed metal strip provides distinct line. | Seamless shingle appearance, more integrated. |
| Water Flow | Unobstructed, efficient water shedding. | Water flows over shingle layers, potentially slower. |
| Debris | Less prone to debris accumulation due to smooth metal. | More prone to debris and leaf accumulation. |
| Ice Dams | Metal can help shed ice/snow more easily. | Shingles can hold ice/snow, increasing dam potential. |
| Durability | Metal flashing can be very long-lasting. | Shingles in valley wear faster due to concentrated flow. |
| Installation | Generally simpler for water shedding, but metal work requires skill. | More labor-intensive due to shingle cutting/weaving. |
| Cost | Varies based on metal type (copper > aluminum). | Typically included in shingle installation cost, but labor can be higher. |
| Repair | Easier to spot and repair metal damage. | Harder to isolate and repair hidden shingle damage. |
For instance, an open valley might be a better choice in areas with heavy rainfall or consistent snow accumulation, as the slick metal surface helps water and snow slide off efficiently. This can mitigate the risk of ice damming, a common problem in colder climates. Conversely, a homeowner looking for a clean, uninterrupted shingle line, perhaps with a high-end architectural shingle like GAF Timberline UHDZ, might prefer a closed valley for aesthetic reasons, even if it requires more diligent maintenance and a skilled installer. It's always a good idea to discuss these options thoroughly with your roofing contractor, getting their professional opinion based on your specific climate and roof design, especially when you are trying to understand the full how a roof replacement works: the full process.
Detailed Look at Open Valley Flashing
Open valleys are a time-tested method for handling water on a roof, and when installed correctly, they offer excellent protection and longevity. The key to their success lies in the quality of the materials chosen and the precision of the installation. A well-executed open valley ensures that water never has a chance to penetrate the underlying roof structure.
Choosing the Right Metal for Open Valleys
The choice of metal for your open valley flashing is a critical decision that impacts both the performance and the lifespan of this vulnerable area. While various metals can be used, each comes with its own set of characteristics. Galvanized steel is a common and economical option, offering good durability against rust, especially if it's painted or coated. However, the coating can wear down over time, eventually leading to corrosion. Aluminum, often preferred for its lightweight nature and superior rust resistance, is another excellent choice, particularly in coastal areas where salt air can accelerate corrosion in other metals.
For those seeking the ultimate in durability and a distinctive aesthetic, copper is the premium choice. Copper valleys can last for a century or more, developing a beautiful green patina that enhances the look of many homes. While the upfront cost is higher, its longevity often makes it a worthwhile investment. Regardless of the material, the metal should be of an appropriate gauge (thickness) to prevent bending, cracking, or tearing under the stress of foot traffic, heavy water flow, or falling debris. Roofing professionals will typically recommend a minimum of 24-gauge galvanized steel or aluminum, or 16-ounce copper for robust protection. You'll also want to consider the color of the metal if it's exposed, ensuring it complements your asphalt shingles.
The Step-by-Step Installation Process for Open Valleys
Installing an open valley is a meticulous process that begins long before the first shingle is laid. First, a peel-and-stick ice and water shield membrane is applied directly to the roof decking in the valley, extending several inches onto each adjacent roof plane. This self-adhering membrane provides a secondary layer of waterproofing, acting as a crucial backup in case water ever gets past the primary metal flashing.
Next, the chosen metal flashing is carefully laid over the ice and water shield. It's crucial that this metal be one continuous piece if possible, running from the ridge down to the eaves, to avoid seams that could become weak points. If seams are unavoidable on a very long valley, they must be overlapped by several inches and sealed with roofing mastic. The metal is then secured with roofing nails along its outer edges, carefully placed so they are not in the direct water channel. Many contractors will also create a small "W" or "V" shape in the middle of the metal strip. This crimp acts as a diverter, preventing water from one side of the roof from rushing across to the other side underneath the shingles during heavy rain or wind, significantly improving water control and keeping the shingles protected from excessive scour. The shingles are then installed, cut precisely to create a clean, straight line, usually about 2-3 inches back from the center of the valley, exposing the metal. This ensures the water flows freely down the metal channel without obstruction from the shingles themselves. This detailed approach is part of the overall understanding of how asphalt shingles are installed: step by step.
Best Practices for Durability and Aesthetics
To maximize the durability and aesthetic appeal of an open valley, several best practices are essential. Firstly, ensure the metal flashing is perfectly smooth and free of dents or creases, as these can impede water flow and create weak points. The use of a quality metal ensures it will stand up to the elements. Secondly, the cut line for the shingles must be straight and consistent on both sides of the valley. A chalk line is typically used to ensure this precision, providing a neat, finished look and preventing jagged edges that could trap debris or direct water incorrectly.
Furthermore, proper nailing of the shingles near the valley is critical. Nails should not penetrate the metal flashing itself or be placed too close to the valley line where they could be exposed to water. Shingles typically get clipped at the top corner near the valley cut to prevent capillary action, where water can wick upwards under the shingle. Finally, regular inspection and cleaning of open valleys are paramount. Removing leaves, twigs, and other debris prevents clogs that could lead to water backup and potential leaks. In colder climates, ensure proper attic ventilation to minimize the risk of ice dams forming in the valleys, which can put immense stress on the metal and surrounding shingles. You might also consider hiring a qualified professional through services like Modernize to ensure these critical best practices are adhered to during installation, safeguarding your investment for years to come.
Exploring Closed Valley Flashing Techniques
Closed valleys offer a sleek, seamless look that many homeowners prefer, as they integrate the valley into the overall shingle pattern. However, because the underlying flashing is hidden, the quality of the shingle installation itself becomes even more crucial. There are two primary techniques for closed valleys: cut valleys and woven valleys, each demanding a high level of skill and precision from the roofing contractor.
Understanding Cut Valleys (and Their Risks)
The cut valley method involves extending the shingles from one side of the roof deck across the valley and onto the adjacent roof plane. The shingles from the other side of the roof are then laid up to the valley line, where they are trimmed neatly in a straight line, typically 2 inches from the center. A chalk line is snapped to guide this cut. The underlying shingles that extend across the valley act as the initial waterproofing layer. Underneath it all, of course, is the critical ice and water shield.
While providing a clean aesthetic, cut valleys carry some inherent risks. The exposed cut edges of the shingles can be more vulnerable to damage from sun exposure, hail, or high winds. Water flowing directly over these cut edges can also accelerate granule loss and shingle wear over time. If the underlying shingles are not installed perfectly flat or if debris accumulates, water can get trapped or redirected, potentially seeping underneath the cut shingles. Furthermore, improper sealing of the cut edges, or if the nails are placed too close to the cut line, can compromise the valley's watertight integrity. This is why some manufacturers, like Owens Corning, provide specific guidelines and sometimes even require a certain installation method for their warranties to remain valid.
The Weave Valley Method: A Stronger Closed Approach
The woven valley is generally considered the most robust and water-resistant type of closed valley. In this technique, the shingles from both roof planes are interwoven, or "woven," together across the valley line. Instead of cutting them in a straight line, each shingle course alternates, extending across the valley and overlapping the shingle from the opposite side. This creates a continuous shingle surface with no exposed cut edges within the valley itself.
The major advantage of the woven valley is its exceptional waterproofing. By interweaving the shingles, it creates multiple layers of protection, making it very difficult for water to penetrate. There are no exposed cuts to deteriorate, and the continuous shingle coverage provides a more durable surface for water runoff. However, the woven method requires significantly more skill and time to install correctly. The shingles must be heated slightly in colder weather to prevent cracking when bent, and careful attention must be paid to prevent "fishmouthing" (where shingles curl up) or buckling. The visual appearance of a woven valley is also distinct; it doesn't have a sharp, defined line like a cut valley, but rather a softer, blended look. This technique is often seen as a superior choice for long-term durability in closed valleys, though it might not be compatible with all types of architectural shingles due to their thickness and rigidity.
Critical Considerations for Closed Valley Longevity
Regardless of whether you choose a cut or woven valley, several factors are critical for ensuring the longevity of your closed valley. First and foremost is the installation of a high-quality ice and water shield beneath the shingles. This self-adhering membrane is the ultimate backup, providing a watertight barrier if the shingles ever fail. It should extend at least 24 inches from the center of the valley onto both adjacent roof planes.
Secondly, proper shingle selection and application are vital. Thicker, more durable architectural shingles may not always be suitable for woven valleys due to their stiffness, which can make bending difficult and lead to buckling. For cut valleys, using a high-quality shingle with robust granules will help resist the accelerated wear from concentrated water flow. Proper nailing is also paramount: nails should be kept several inches away from the valley centerline to prevent puncturing the underlying layers where water flow is heaviest. Lastly, diligent maintenance is key. Closed valleys can be more prone to collecting debris, which can hold moisture against the shingles and accelerate deterioration. Regular cleaning to remove leaves, pine needles, and other organic matter will significantly extend the life of your closed valley. To get a comprehensive understanding of your roof's components and their care, you might explore resources like roof anatomy: parts of an asphalt shingle roof.
Common Problems and Maintenance for Roof Valleys
Even with the most careful installation, roof valleys are high-stress areas that require attention. Homeowners often neglect these crucial spots, only noticing a problem when a leak finally manifests inside the home. Being proactive about inspection and maintenance can save you a world of headaches and expensive repairs down the line.
Identifying Signs of Valley Failure
Catching problems early is paramount when it comes to roof valleys. One of the most common signs of valley failure is visible water staining on your interior ceilings or walls, especially after a heavy rain or snowmelt. However, not all signs are so obvious. From the ground, you might notice missing, cracked, or curled shingles in the valley area, which are clear indicators of wear and tear. For open valleys, look for corrosion, buckling, or punctures in the metal flashing. Rust streaks running down the roof from the valley can signal a compromised galvanized steel valley.
Another subtle sign is an excessive amount of shingle granules in your gutters directly below the valleys. This indicates that the concentrated water flow is eroding the protective granules from your valley shingles faster than on other parts of the roof. Pooled water or debris accumulation that doesn't clear after a rainstorm is also a red flag, as this can lead to accelerated deterioration and potential leaks. If you have a closed valley, look for any signs of "fishmouthing" where the shingles are lifting or buckling due to improper weaving or expansion/contraction. These visual cues, while sometimes small, are your roof's way of telling you it needs attention. It’s important to know the signs you need a new roof and not just a repair.
Regular Maintenance to Prevent Issues
Proactive maintenance is the best defense against valley problems. The simplest and most effective step you can take is regular cleaning. Twice a year, typically in the spring and fall, clear any leaves, pine needles, branches, and other debris from your roof valleys. Accumulated organic matter holds moisture against the shingles and flashing, leading to rot, corrosion, and moss or algae growth, which can further degrade materials. If you have trees overhanging your roof, consider trimming them back to reduce the amount of debris falling onto your roof.
Beyond cleaning, a visual inspection from the ground with binoculars can help you spot potential issues like damaged shingles or buckling metal before they escalate. After severe weather events like heavy storms, hail, or high winds, it's particularly important to check your valleys for any signs of damage. If you live in an area prone to ice dams, ensuring your attic has proper ventilation and insulation can prevent warm air from melting snow, which then refreezes in the valleys and backs up under shingles. For very steep roofs or when you're uncomfortable inspecting from the ground, consider hiring a professional for a routine roof inspection.
When to Call a Professional for Valley Repairs
While basic cleaning is something most homeowners can handle, anything beyond that usually warrants calling a professional roofing contractor. If you notice any of the signs of valley failure mentioned above – actual leaks, visibly damaged flashing, cracked or missing shingles in the valley, or significant granule loss – it's time to get an expert involved. Attempting complex repairs yourself, especially if you're not experienced with roofing, can often do more harm than good and potentially void your roof's warranty.
A professional roofer can accurately diagnose the problem, recommend the most appropriate solution, and perform the repair safely and effectively. They have the right tools, materials, and expertise to ensure the repair is watertight and durable. For instance, fixing a buckled metal valley or re-weaving a closed valley requires specialized skills that most DIYers simply don't possess. Furthermore, if the damage is extensive, a repair might not be sufficient, and the roofer may advise a partial replacement of the valley section or even a full roof replacement, depending on the overall condition and age of your roof. Don't hesitate to reach out to reputable contractors for an assessment; platforms like Modernize can help you connect with qualified professionals in your area. They can also help you determine when to repair a roof leak vs replace the roof.
Ensuring Proper Installation and Longevity
The longevity of your roof, and especially its valleys, hinges significantly on the quality of the initial installation. Even the best materials won't perform as intended if they're not put in place correctly. This is why selecting a skilled, reputable roofing contractor is arguably the most important decision a homeowner will make when embarking on a roofing project.
Why Expertise Matters: Hiring the Right Roofer
Roofing, particularly detailing like valley flashing, is not a job for amateurs. An experienced and skilled roofing contractor understands the nuances of different roofing materials, local building codes, and the specific challenges posed by your roof's design and local climate. They know how to properly prepare the deck, apply the ice and water shield, cut and shape metal flashing without compromising its integrity, or meticulously weave shingles for a seamless, watertight closed valley.
An expert roofer will also understand the importance of proper ventilation in preventing issues like ice dams that can severely stress valleys. They will ensure that every component, from the underlayment to the final cap shingle, works together as a system. Hiring someone without adequate experience or proper licensing can lead to costly mistakes, premature roof failure, and even safety hazards during the installation process. Always ask for proof of licensing and insurance. You want to make sure the team on your roof is protected, and that you're protected from any liabilities. When evaluating candidates, consider asking them about their specific experience with different valley types, as the expertise needed for a complex woven valley differs significantly from a straightforward open metal valley. Don't fall into the trap of solely focusing on the cheapest bid; remember that quality workmanship pays dividends in the long run.
Key Questions to Ask About Valley Flashing
When you're discussing your roofing project with potential contractors, don't be afraid to ask detailed questions about how they plan to handle the valleys. This is your opportunity to gauge their expertise and commitment to quality. Here are some critical questions to pose:
- "What type of valley flashing do you recommend for my roof and why?" A good contractor will explain the pros and cons of open vs. closed valleys specifically for your home, considering your roof's pitch, climate, and aesthetic preferences.
- "What materials will you use for the valley flashing (e.g., metal type, gauge, ice & water shield)?" They should specify the type and thickness of metal, and confirm the use of a high-quality ice and water shield that meets local building codes. You can also ask about the brand of underlayment, as products from companies like GAF or CertainTeed are often part of a comprehensive roofing system.
- "Can you describe your installation process for valleys, including any specific techniques to ensure waterproofing and durability?" Listen for details about continuous metal runs, crimped edges, proper shingle cutting/weaving, and nailing patterns that avoid puncturing the water-bearing surface.
- "How will you address potential issues like debris accumulation or ice damming in the valleys?" Their answer should reflect an understanding of your local climate challenges and proactive solutions.
- "What kind of warranty applies to the valley installation specifically, both for workmanship and materials?" Ensure you understand the coverage, as valley issues are often specifically addressed in comprehensive warranties.
By asking these questions, you're not just getting information; you're also assessing the contractor's professionalism and attention to detail. This due diligence is part of understanding how to choose a roofing contractor and comparing multiple quotes.
Warranty Considerations for Valley Work
Understanding your roofing warranty, especially concerning valleys, is vital. Most reputable contractors offer a workmanship warranty that covers their installation labor, typically for several years. This is separate from the manufacturer's warranty on the shingles and other materials, which can last for decades. For valleys, you want assurance that if a leak develops due to faulty installation (like improper flashing or shingle placement), the contractor will stand behind their work and fix it without additional cost.
Many premium roofing systems, such as those installed by GAF Master Elite contractors or Owens Corning Platinum Preferred contractors, offer enhanced manufacturer warranties that cover not just the materials but also a significant portion of the labor, sometimes for 20 years or more, provided the entire roofing system (including valleys, underlayment, and ventilation) is installed according to their strict specifications. Always clarify what part of the warranty covers the valley flashing and if there are any specific requirements (like annual inspections or manufacturer-certified installers) to keep it valid. A robust warranty provides peace of mind, knowing that you're protected against both material defects and installation errors in these critical areas of your roof. Remember to ask about roofing warranty: workmanship vs manufacturer coverage, as both are equally important.
Disclaimer
Please remember that this article provides general information and recommendations. Roofing work can be complex and dangerous. Always consult with a qualified, licensed, and insured roofing professional for specific advice tailored to your home's needs and local building codes. Attempting DIY roof repairs without proper experience and safety equipment can lead to serious injury or further damage to your property.