How Valley Is Installed
When you're dealing with a roof, especially one made of asphalt shingles, the valleys are arguably some of the most critical and often misunderstood areas. These are the points where two roof planes meet, forming a V-shape, and they bear the brunt of concentrated water flow during rain or melting snow. A poorly installed valley is a prime suspect for leaks, water damage, and costly repairs down the line, leading to immense frustration and worry for homeowners. This guide will walk you through the intricate process of how a roof valley is properly installed, ensuring your home stays dry and protected for years to come.
Understanding the Anatomy and Importance of Roof Valleys
Before we dive into the nitty-gritty of installation, it's essential to truly grasp what a roof valley is and why it commands such careful attention. Think of a valley as the gutter system of your roof itself – it’s designed to collect and channel vast amounts of water quickly off the roof surface. Unlike flat, open areas of your roof where water spreads out, valleys funnel all that moisture into a single, high-flow pathway.
What Makes Roof Valleys So Critical?
The concentration of water is what makes valleys such a potential problem area. During a heavy downpour or significant snowmelt, water rushes into these channels with considerable force. If the underlying materials aren't perfectly sealed, if the flashing is improperly installed, or if the shingles aren't cut and laid precisely, even the tiniest gap or misstep can become a leak point. This isn't just about a drip in your attic; prolonged leaks can lead to rot in the roof decking, damage to the framing, mold growth, and compromised insulation, impacting your home's structural integrity and indoor air quality. Understanding the full Roof Anatomy: Parts of an Asphalt Shingle Roof helps put the valley's role into perspective.
Types of Roof Valleys
While the function remains the same, how valleys are finished on an asphalt shingle roof can vary, primarily falling into two categories: open valleys and closed valleys. Each has its own aesthetic, installation challenges, and considerations.
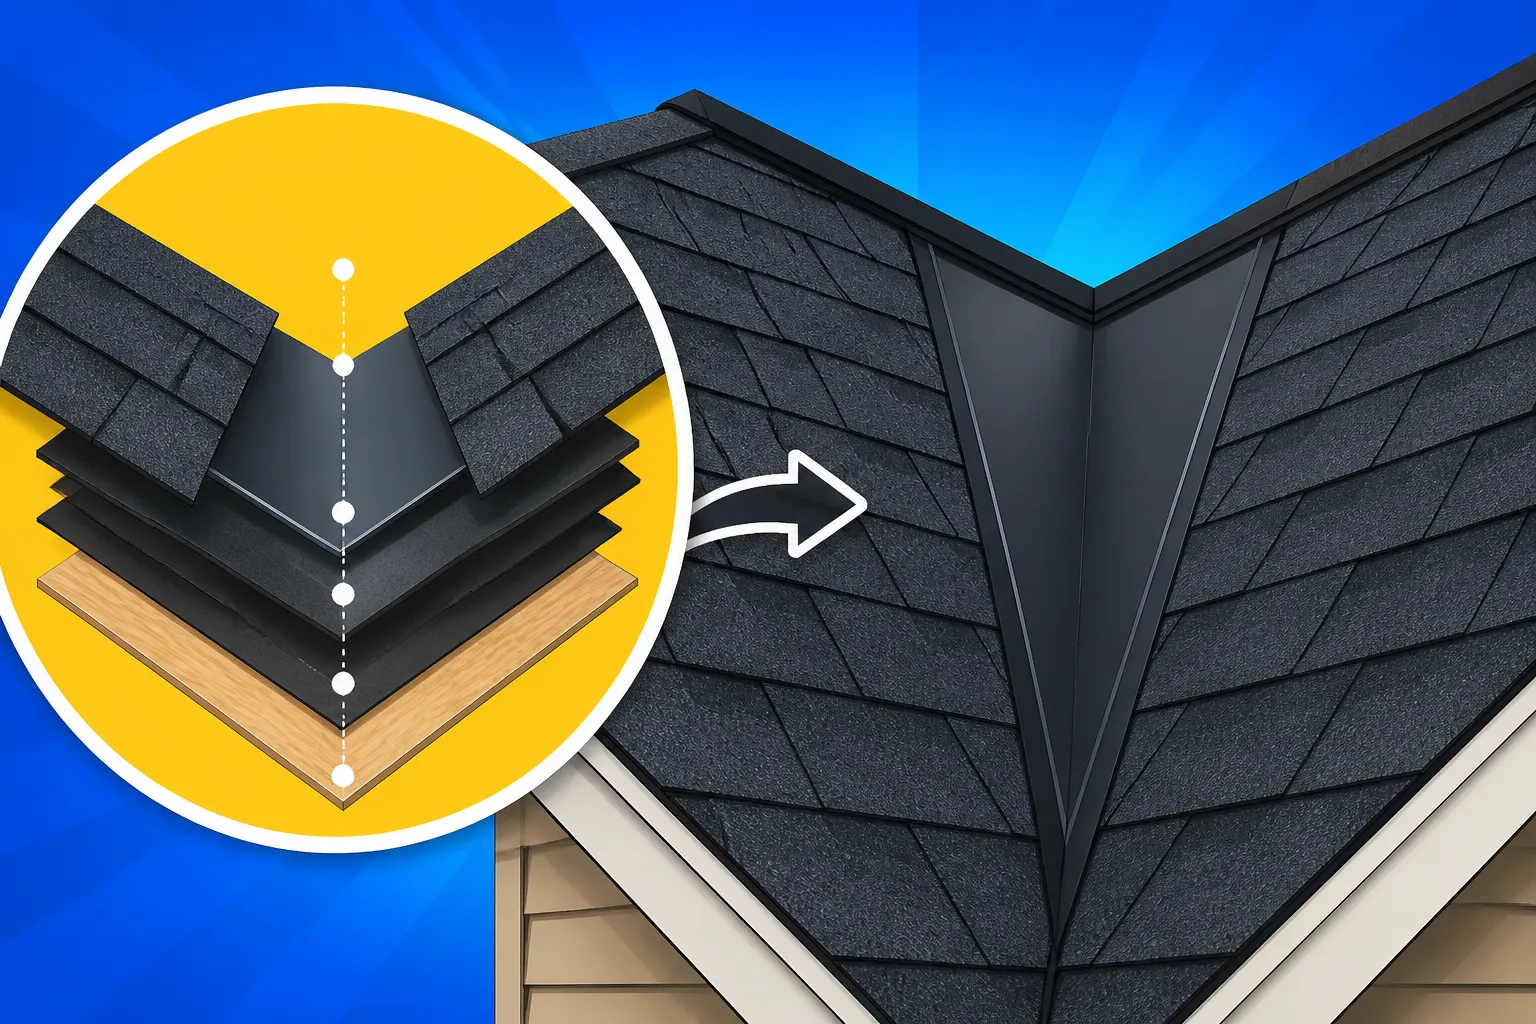
- Open Valleys: These are characterized by a visible metal flashing running down the center of the valley. The shingles are trimmed back a few inches on either side, exposing the metal underneath. This creates a smooth, unobstructed channel for water to flow, making them very efficient at shedding water and debris. Many roofers prefer open valleys because they are often considered more robust and easier to maintain in the long run.
- Closed Valleys: In a closed valley system, the asphalt shingles extend across the valley, completely covering the underlying flashing or underlayment. From the ground, the roof appears continuous and seamless, as if the valley just disappears under the shingles. There are two main methods for closed valleys: the "cut" valley and the "woven" valley, which we'll explore in detail. These can be more visually appealing for some homeowners but require extremely precise shingle installation to prevent leaks.
Choosing between an open or closed valley often comes down to aesthetic preference, the pitch of your roof, and local climate conditions. Your roofing contractor can help you decide which method is best suited for your home, taking into account factors like the amount of snowfall you receive and the overall architectural style of your house.
Essential Preparations Before Valley Installation
Just like any major construction project, the success of a roof valley installation hinges significantly on the preparation. You can't just slap shingles down and hope for the best, especially in such a vulnerable area. Proper preparation ensures a watertight seal and a durable, long-lasting valley. This attention to detail is part of why understanding How a Roof Replacement Works: The Full Process is so vital.
Inspecting and Repairing Roof Decking
The very first step is to ensure the structural integrity of the roof deck beneath the valley. This means a thorough inspection of the plywood or OSB sheathing. Water damage can easily compromise decking, leading to soft spots, rot, or even holes. If any damage is found, those sections of decking must be cut out and replaced before any new roofing materials go down. It's a non-negotiable step because a compromised deck won't hold nails properly, and any movement in the decking can crack shingles or flashing, creating immediate leak pathways. Think of it as building a house – you wouldn't start on a crumbling foundation.
Underlayment and Ice-and-Water Shield Application
Once the decking is sound, the next layer of defense is applied. This involves a combination of roofing underlayment and, critically, ice-and-water shield.
Standard Underlayment Explained: Synthetic vs Felt is typically installed over the entire roof deck, but valleys require an extra layer of protection. This is where Ice and Water Shield Explained comes into play. This self-adhering, waterproof membrane is specifically designed for high-risk areas like valleys, eaves, and around penetrations (like chimneys or skylights). It creates a rubberized, watertight seal that will prevent water from penetrating the deck even if primary roofing materials are compromised.
For valley installation, the ice-and-water shield is laid directly onto the clean, dry decking, spanning the entire length of the valley. It's crucial to ensure proper overlap according to manufacturer specifications, typically at least 6 inches onto each adjoining roof plane, and often a second layer is recommended for maximum protection, especially in cold climates prone to ice dams. The self-sealing nature of this material means that nails driven through it will be sealed by the membrane, adding an incredible layer of leak protection.
Open Valley Installation: A Clear Path for Water
The open valley method is a time-tested approach that many roofing professionals swear by for its durability and excellent water-shedding capabilities. It provides a distinct, clean channel that is less prone to trapping debris.
Measuring and Cutting Valley Metal
After the ice-and-water shield is in place, the next crucial component is the valley metal. This is typically a pre-formed piece of painted steel or aluminum, though copper is also used for a premium, long-lasting option. The metal comes in rolls or long strips and needs to be custom-cut to the exact length of your valley.
When cutting, it's essential to account for proper overhang at the eaves, usually about an inch, to ensure water drains directly into the gutters rather than behind them. The metal should also be wide enough to extend several inches onto each roof plane, typically 18-24 inches total, allowing plenty of room for shingle overlap. It's often bent slightly in the middle, creating a small V or W-shape (known as a W-valley) to prevent water from washing from one roof plane to the other, especially on lower-pitched roofs.
Securing the Metal Flashing
Once cut and bent, the valley metal is carefully placed over the ice-and-water shield, centered in the valley. It must be laid flat and smooth, without buckles or wrinkles. Securing it properly is key to preventing wind uplift and ensuring it stays in place. The metal is typically fastened with roofing nails, but here's where precision is paramount: the nails should never be driven directly through the center of the valley where the heaviest water flow occurs. Instead, they are placed roughly 6-8 inches in from each edge of the metal, along the outer edges of the valley, and spaced every 6-12 inches. This ensures the nails are covered by the overlying shingles and reduces the risk of penetration leaks in the most vulnerable area. This careful placement of fasteners is critical for any type of Roof Flashing Explained.
Trimming Shingles for an Open Valley
With the metal in place, the roofing crew can begin installing the asphalt shingles. As shingles are laid on the adjacent roof planes, they are extended over the valley metal, but only temporarily. Once a section of shingles is installed, they are carefully marked and trimmed back, typically 2-3 inches from the center line of the valley, leaving the metal exposed. This creates a clear, open waterway.
The edges of the trimmed shingles must be cut cleanly and straight, and importantly, the corners are often "clipped" or beveled at a slight angle. This small detail prevents the sharp corner of a shingle from getting caught, curling up, or cracking over time, which could impede water flow or lead to leaks. Each shingle adjacent to the valley is then secured with roofing cement or sealant along its trimmed edge, ensuring it adheres firmly to the valley metal and prevents water from migrating underneath. This meticulous trimming and sealing process is crucial for effective water shedding and contributes to How Shingles Protect Against Water.
Closed Valley Installation: Seamless Roof Aesthetics
Closed valleys offer a continuous, unbroken roofline, which many homeowners find more aesthetically pleasing. However, their installation demands even greater precision to ensure watertight performance, as the shingles themselves form the primary water barrier.
The "Cut" Valley Technique
The "cut" valley method is a popular choice for closed valleys. In this technique, the underlayment and ice-and-water shield are installed as usual. Then, the shingles from one roof plane (often the lower-sloping or less visible side) are installed first and run continuously across the valley line and onto the adjacent roof plane by at least 12 inches. These shingles are nailed as they would be normally, but no nails are placed directly in the valley crease itself or in the portion that will be cut.
Once the first side is shingled across the valley, shingles are installed on the second roof plane. These shingles are laid up to the valley line, and then a chalk line is snapped about 2 inches parallel to the valley center line on the first set of shingles. The second set of shingles is then carefully trimmed along this chalk line, creating a clean, straight edge. The underlying portion of the first set of shingles is then sealed with roofing cement, creating a strong bond and preventing water from getting underneath the trimmed edge. This technique results in a neat, uniform appearance.
The "Woven" Valley Technique
The "woven" valley is considered by many roofers to be one of the most durable closed valley methods because it creates multiple layers of shingle protection. In this method, instead of trimming shingles, the shingles from both adjoining roof planes are interlocked or "woven" together across the valley line.
To achieve this, as shingles are laid on both roof planes, they are alternated in the valley. A shingle from the first plane is laid, extending across the valley onto the second plane. Then, a shingle from the second plane is laid, overlapping the first shingle and extending across the valley onto the first plane. This alternating pattern continues up the entire length of the valley, creating a thick, multi-layered weave.
It's vital to ensure that no nails are driven through the shingles within the actual valley crease; nails should be kept at least 6 inches away from the center line to avoid creating penetration points. Each shingle should be pressed firmly into the underlying layers to ensure good adhesion. While providing excellent water shedding, woven valleys can be more challenging to install correctly and might have a slightly bulkier appearance due to the overlapping layers.
Nailing and Sealing in Closed Valleys
Regardless of whether you choose a cut or woven valley, precise nailing and sealing are paramount. As mentioned, nails must be kept several inches away from the valley's centerline to avoid puncturing the core water-shedding area. Roofing cement or sealant is typically applied generously to the undersides of the critical shingles – for cut valleys, along the cut edge; for woven valleys, underneath each overlapping shingle in the valley. This adhesive helps to bond the shingles together and to the underlayment, preventing wind uplift and creating a watertight seal.
Here's a quick comparison of open vs. closed valleys:
| Feature | Open Valley | Closed Valley (Cut/Woven) |
|---|---|---|
| Aesthetics | Visible metal strip, distinct lines | Seamless shingle surface, uniform look |
| Water Flow | Very efficient, clear, unobstructed channel | Shingles channel water, can snag debris |
| Durability | Metal flashing is highly durable | Relies on shingle integrity and sealant |
| Installation | Requires precise metal work and shingle cuts | Requires extremely precise shingle cuts/weaving |
| Maintenance | Easier to clean debris from metal surface | Debris can collect in shingle gaps |
| Repair | Easier to replace damaged metal section | More complex to repair individual shingles |
| Cost | Often slightly more expensive due to metal | Can be slightly less for materials, more for labor skill |
Common Pitfalls and Best Practices for Valley Durability
No matter how skilled your roofing crew is, a few common mistakes can turn a perfectly good valley installation into a leaking nightmare. Being aware of these pitfalls and understanding best practices can help you ensure your roof's valleys are robust and long-lasting. Ultimately, a well-installed valley contributes significantly to How Long Asphalt Shingles Last.
Avoiding Leaks and Water Penetration
The number one goal of any valley installation is to prevent leaks. The biggest culprits are often insufficient or improperly installed underlayment, especially the ice-and-water shield. If the self-adhering membrane isn't laid smoothly, has gaps, or doesn't extend far enough onto the roof planes, it leaves a weak spot. Over-nailing in the valley center, using too few fasteners, or failing to seal shingle edges adequately are also common causes of water penetration.
Another common issue is improper shingle overhang into the valley or inadequate clipping of shingle corners in an open valley. If shingles extend too far into the metal, they can trap water. If corners aren't clipped, they can lift and break, allowing water underneath. For closed valleys, if the woven or cut shingles aren't tightly sealed, capillary action can draw water upwards and underneath the layers. It's also crucial that a proper drip edge is installed at the eaves to guide water off the roof and into the gutters, ensuring the entire system works in harmony. Understanding Drip Edge: What It Does is important for overall water management.
Ensuring Proper Shingle Alignment and Adhesion
A visually appealing valley isn't just about looks; it's a sign of a professional installation that implies proper water management. Shingles should be aligned cleanly and consistently, with even spacing and overlap. For closed valleys, uneven weaving or cutting can create irregular gaps where water can pool or debris can collect. The heat-activated sealant on asphalt shingles needs sufficient sunlight and warmth to properly adhere, especially in the overlapping layers of a woven valley. If installed in very cold weather, the sealant strips may not activate properly, leaving shingles vulnerable to wind uplift.
Proper adhesion isn't just about the sealant; it's also about the nailing. Using the correct length and type of roofing nails, driven at the appropriate angle and depth, is essential. Nails that are over-driven (too deep) can cut through the shingle, while under-driven nails can stick up, preventing the shingle above from lying flat and creating stress points. Professional roofers follow manufacturer specifications for nailing patterns, ensuring each shingle is securely fastened without compromising its integrity.
Maintenance Tips for Your Roof Valleys
Even a perfectly installed valley needs a little love and attention over the years. Debris is the biggest enemy of roof valleys. Leaves, pine needles, branches, and even granules from your shingles can accumulate in valleys, especially closed ones, impeding water flow. If water is dammed up, it can sit and eventually find its way under shingles, or it can lead to premature wear of the valley materials.
Regular inspections, ideally once or twice a year, are a great idea. Safely clear any debris by hand or with a leaf blower. Look for any signs of wear on the valley metal (scratches, corrosion), lifted or cracked shingles, or signs of granule loss that might indicate premature aging. If you notice any issues, address them promptly. Catching a small problem early can prevent it from turning into a major leak. If you're unsure about the best valley method for your home or need help finding a reputable contractor, services like Modernize can connect you with qualified professionals who understand these critical details. Don't forget to ask your potential contractor about their experience with How Valleys Are Flashed during your interview process; it's a critical detail. It's also essential to work with a reputable contractor who understands current Roofing Building Codes: What to Know.
Installing a roof valley is far from a simple task. It requires meticulous attention to detail, proper material selection, and skilled execution to create a truly watertight and durable seal. By understanding the intricacies of both open and closed valley installations, you'll be better equipped to appreciate the work of your roofing professional and ensure your home is protected from the elements for decades to come.
Disclaimer
This guide provides general information about roof valley installation for asphalt shingle roofs. Specific techniques, materials, and local building codes may vary. Always consult with a qualified and licensed roofing professional for assessments, recommendations, and installation specific to your home and location. This information is not a substitute for professional advice or hands-on expertise.