What Is Step Flashing and Why It Matters
There’s nothing quite like the panic that sets in when you spot a water stain spreading across your ceiling, especially when it’s near a wall or a chimney. It's a homeowner's worst nightmare, and often, the culprit isn't the main roof expanse but a subtle weakness in how your roof meets a vertical surface. This comprehensive guide will peel back the layers on step flashing, demystifying this critical component and explaining exactly why it’s so important for keeping your home dry and sound.
Understanding Step Flashing: The Unsung Hero of Roof-to-Wall Transitions
When we think about roof protection, our minds usually go straight to the shingles themselves. And while shingles are certainly the first line of defense, they can't do it all, especially in those tricky spots where the roof plane abruptly ends and a wall begins. That's where step flashing comes in, quietly doing its job, often out of sight, but always indispensable.
What Exactly Is Step Flashing?
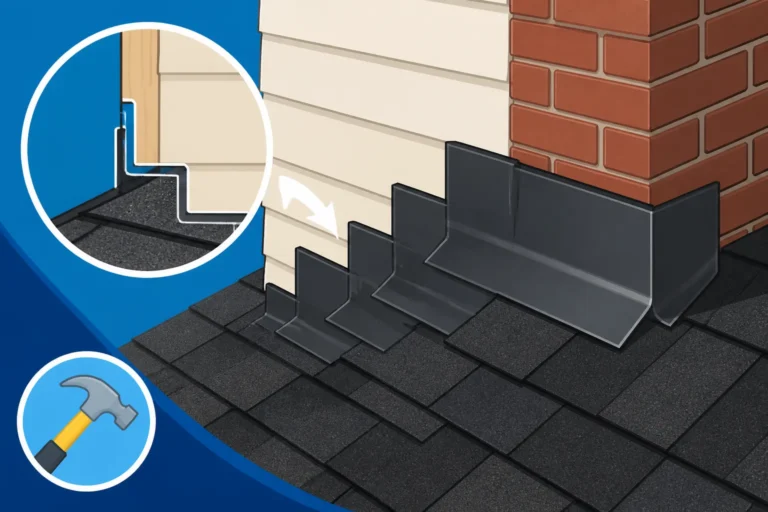
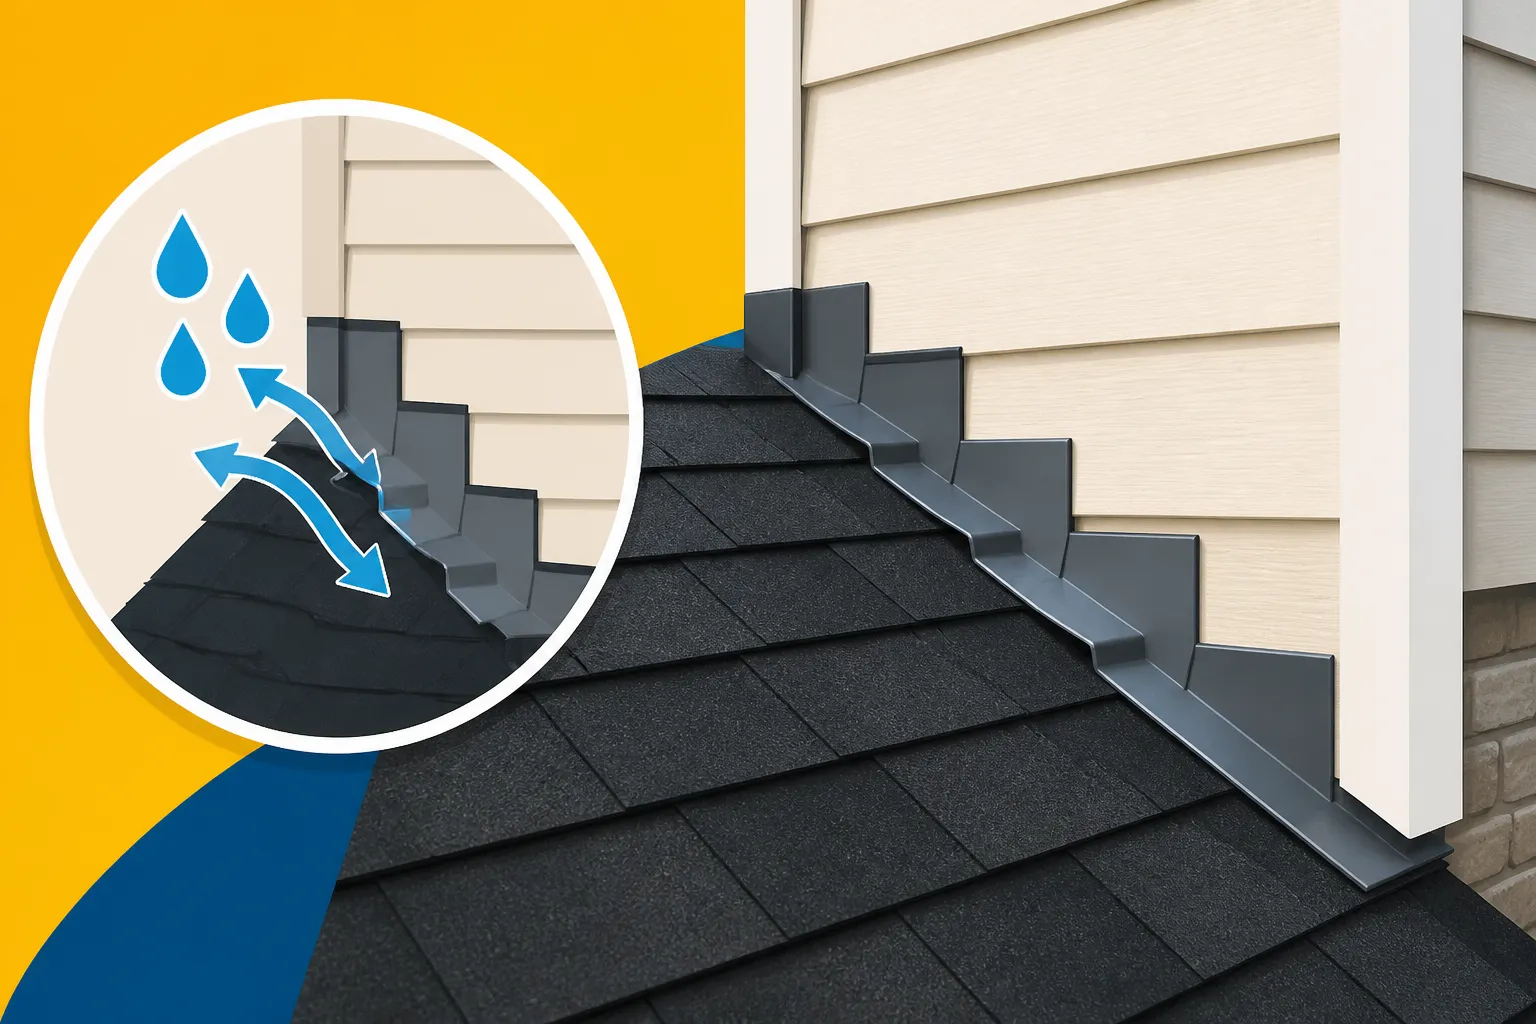
At its core, step flashing is a series of individual, L-shaped pieces of metal, strategically interwoven with your roof shingles wherever a roof surface meets a vertical wall. Imagine a small metal right angle, perhaps 8-10 inches long and equally wide on both "legs" of the L-shape. The material can vary, but you'll most commonly find it made from galvanized steel, aluminum, or sometimes even copper for a more upscale, durable, and aesthetically pleasing finish. Each piece is designed to be installed in an overlapping, "step" pattern, much like the shingles themselves.
The genius of step flashing lies in its simplicity and its ability to mimic the shedding action of shingles. Instead of having one continuous piece of flashing that water could potentially wick up or get trapped behind, these individual stepped pieces ensure that water flows over each piece and onto the shingle below it, directing it away from the vulnerable wall junction. It's a brilliant engineering solution that, despite its critical role, rarely gets the credit it deserves. Without it, you’d simply have a gap where water would inevitably seep into your home, causing untold damage.
Where You'll Find Step Flashing on Your Roof
Step flashing isn't just one type of flashing; it's a specific technique used in particular areas. Think of any place where your sloped roof butts up against a vertical structure, and you've likely found a spot for step flashing. The most common locations include:
- Dormers: Those charming little windows that pop out of your roof? Every side of a dormer where it meets the main roof slope will have step flashing.
- Chimneys: A classic leak spot! Where the chimney brickwork meets the roof, step flashing (often combined with other flashing types like apron flashing and saddle flashing) is essential to seal the perimeter.
- Adjoining Walls: If you have an extension, a garage, or even a neighboring row house where your roof meets a taller vertical wall, step flashing will be hard at work.
- Skylights: Similar to dormers, the sides of skylights that run parallel to the roof pitch are prime locations for step flashing.
- Roof-to-wall intersections: Any time your roof slope directly connects to a side of your house, or another part of the building, step flashing provides the necessary waterproof barrier.
These areas are incredibly vulnerable because water naturally flows down the roof, and when it hits a vertical obstruction, it tries to find the path of least resistance. Without proper step flashing, that path would be directly into your home's structure.
Why Step Flashing Is Absolutely Critical for Your Home's Protection
It might seem like a small detail in the grand scheme of a roofing system, but step flashing truly is one of those unsung heroes. Overlooking its importance, or having it installed improperly, can lead to a cascade of problems that are far more expensive and frustrating to fix than ensuring it's done right the first time.
Preventing Costly Water Damage and Leaks
Imagine a small drip inside your attic, barely noticeable at first. You might think, "It's just a tiny leak, I'll get to it later." But that tiny leak, often originating from compromised step flashing, can quickly turn into a monumental headache. Water, even in small amounts, is relentlessly destructive. Over time, it will saturate your roof decking, leading to rot and weakening the structural integrity of your roof. From there, it moves to the attic insulation, rendering it ineffective and leading to higher energy bills.
Next, it attacks your interior finishes. We're talking about unsightly water stains on your ceiling, bubbling paint on your drywall, and eventually, the growth of mold and mildew, which can pose serious health risks and diminish your home's air quality. A minor issue with step flashing, left unaddressed, can necessitate extensive repairs ranging from replacing sections of roof decking and insulation to completely re-drywalling and repainting interior rooms. It's a prime example of how a relatively small component can lead to monumental and costly issues. If you’re ever wondering When to Repair a Roof Leak vs Replace the Roof, a persistent leak around a wall junction could be a strong indicator that deeper issues are at play, starting with your flashing.
The Mechanics: How Step Flashing Works Its Magic
The effectiveness of step flashing isn't a mystery; it's a testament to smart design. Unlike a continuous piece of flashing that might be bent into a long channel, step flashing takes advantage of gravity and overlapping materials. Here's a breakdown of how it works its magic:
Each L-shaped piece is installed so that one leg lies flat on the roof deck, beneath a shingle, and the other leg extends vertically up the adjacent wall. The next course of shingles then covers the horizontal part of that flashing piece, and a new piece of step flashing is installed over the shingle, slightly higher up the wall. This creates a "step" effect. This sequence is repeated, shingle then flashing, shingle then flashing, all the way up the roof-to-wall intersection.
The beauty of this method is that any water running down the wall or the roof will encounter the vertical leg of a flashing piece, then run down onto the shingle below it. If water gets under a shingle, it hits the horizontal leg of the flashing and is directed out onto the next lower shingle. This layered, overlapping system prevents water from ever finding a direct path into the wall or roof decking. The vertical leg of the flashing is then typically covered by siding, stucco, or a separate piece of "counter-flashing" (a piece of metal embedded into the wall) to protect it from direct exposure and ensure a watertight seal. This meticulous layering is what makes step flashing so incredibly effective at creating a durable, long-lasting barrier against water intrusion.
Common Issues and the Lifespan of Step Flashing
Even the best-installed step flashing isn't invincible. Like any part of your home, it's subjected to the elements and can degrade over time. Knowing what to look for can save you a world of trouble down the line.
Signs Your Step Flashing Might Be Failing
Catching problems early is key. Here are some tell-tale signs that your step flashing might be past its prime or was improperly installed:
- Visible Rust or Corrosion: Especially if your flashing is galvanized steel, rust is a clear indicator of aging and potential failure. Rust weakens the metal, making it brittle and prone to cracking or pitting. This allows water to seep through.
- Cracks, Bends, or Kinks: Hail, falling branches, or even strong winds can damage metal flashing. Any deformation can lift the flashing, create gaps, or prevent water from shedding properly.
- Water Stains Indoors: This is the most obvious and alarming sign. If you see water stains on your ceiling or walls, particularly near a chimney, dormer, or where an addition meets the main house, faulty flashing is a prime suspect. It’s crucial to act quickly when you How to Spot a Roof Leak to prevent further damage.
- Loose or Missing Siding/Counter-Flashing: If the siding or counter-flashing that covers the vertical leg of the step flashing is loose, cracked, or missing, it exposes the flashing and the wall sheathing beneath it to direct water intrusion. This can lead to water bypassing the flashing entirely.
- Excessive Sealant or Tar: While sealant is used in some flashing applications, an excessive amount or evidence of repeated tarring over a problem area often indicates a contractor attempting a temporary fix for a deeper flashing issue, rather than replacing it properly. It's a red flag for a substandard repair.
Don't wait until water is dripping into your living room to address these issues. A proactive approach to identifying these problems can save you thousands in repairs.
Factors Affecting Longevity and the Importance of Maintenance
The lifespan of your step flashing is closely tied to several factors, from the quality of the materials to the local climate. Generally, well-installed step flashing should last as long as your roof—typically 20-30 years for an asphalt shingle roof. However, several elements can shorten this duration:
- Material Quality: Aluminum flashing, while more affordable, can sometimes be thinner and more prone to bending or puncturing than heavier gauge galvanized steel or copper. Copper, being highly resistant to corrosion, is often the longest-lasting option, sometimes outliving the shingles themselves.
- Installation Quality: This is paramount. Poorly cut pieces, insufficient overlap, improper nailing, or inadequate sealing around fasteners can compromise the entire system from day one. Shoddy installation will lead to premature failure, no matter how good the materials are.
- Environmental Factors: Harsh weather takes a toll. Intense sun can degrade sealants, heavy rains can test seams, and repeated freeze-thaw cycles can cause expansion and contraction that stresses the metal. High winds can loosen pieces, and hail can dent or crack them.
- Debris Accumulation: Leaves, twigs, and other debris can build up in the corners and valleys where step flashing is present. This debris traps moisture, leading to premature corrosion and creating an environment for moss and algae growth, which can further impede water flow. Regular gutter cleaning and roof maintenance are crucial for all components, including your flashing. Speaking of longevity, understanding How Long Does an Asphalt Roof Last is important, as your flashing should ideally be replaced with your shingles. Regular Roof Maintenance to Avoid Replacement also extends the life of your flashing.
Performing routine roof inspections, especially after severe weather, is your best defense. If you're not comfortable climbing on your roof, consider hiring a professional. Platforms like Modernize can connect you with experienced roofing contractors in your area who can conduct thorough inspections and address any flashing concerns before they escalate.
The Installation Process: A Meticulous Art
Installing step flashing isn't a task for the faint of heart or the inexperienced DIYer. It requires precision, a good understanding of water dynamics, and meticulous attention to detail. This isn't just about nailing metal to wood; it's about creating an impenetrable barrier.
The Step-by-Step Installation of Flashing
Proper step flashing installation is a foundational element of a waterproof roof. Here’s a simplified breakdown of the process:
- Preparation: Before any flashing goes down, the roof decking must be sound and dry. A layer of ice and water shield is typically applied to the roof deck along the wall intersection. This self-adhering membrane offers an extra layer of protection, especially in cold climates where ice dams can form. Then, the underlayment, usually synthetic felt, is installed over the rest of the roof.
- Starter Shingles: The roofing process begins with starter shingles along the eaves.
- Shingle and Flashing Interweaving: As the first course of main shingles is laid, the roofer measures and cuts an L-shaped piece of step flashing. This piece is placed over the shingle, with one leg flat on the roof and extending up under the next shingle, and the other leg extending vertically up the wall. It’s secured with roofing nails only on the part that will be covered by the subsequent shingle, or hidden beneath the siding, to prevent creating new leak points.
- The "Stepping" Sequence: The next shingle is then laid, covering the horizontal portion of the first flashing piece. Immediately, another piece of step flashing is installed over this new shingle, slightly higher up the wall. This pattern continues – shingle, flashing, shingle, flashing – working its way up the roof slope. Each piece of flashing overlaps the shingle below it, creating that critical cascading effect that sheds water away.
- Wall Integration (Counter-Flashing or Siding): The vertical leg of the step flashing needs protection too. Often, new siding is installed over the vertical leg of the flashing, effectively "lapping" it to ensure water running down the wall sheds onto the flashing, then onto the shingles. In other cases, especially with masonry walls like chimneys, a separate piece of metal called "counter-flashing" is installed. This counter-flashing is often cut into the mortar joints of the masonry and bent down to cover the top edge of the step flashing, creating a double barrier against water.
- Sealing and Finishing: While the design is primarily mechanical, sealants are often used judiciously in areas like nail heads or where flashing meets dissimilar materials to provide extra watertightness.
This meticulous, layered approach is key. You can learn more about the complete process in our guide on How Asphalt Shingles Are Installed: Step by Step.
Why Professional Installation is Non-Negotiable
Trying to tackle step flashing installation yourself, or hiring an inexperienced handyman, is one of the biggest risks a homeowner can take. Here's why you need a seasoned professional:
- Precision is Everything: The angles, overlaps, and cuts must be precise. Even a small miscalculation can lead to a gap where water can easily penetrate. Rookies often make mistakes with the spacing or the way they secure the flashing, creating vulnerabilities.
- Understanding Water Flow: Experienced roofers don't just follow instructions; they understand how water moves across a roof. They anticipate potential problem spots and adjust the flashing installation accordingly, taking into account roof pitch, proximity to valleys, and other factors.
- Tooling and Materials: Proper installation requires specific tools for cutting and bending metal, as well as knowledge of the best fasteners and sealants for the job. Professionals also know which flashing materials are best suited for your climate and the specific conditions of your roof.
- Code Compliance: Roofing codes vary by locality. A professional contractor knows the local building codes for flashing and permits, ensuring your roof replacement meets all safety and structural requirements.
- Warranties: Improper installation can void both your shingle manufacturer's warranty and the contractor's workmanship warranty. Manufacturers like GAF, Owens Corning, and CertainTeed have specific installation guidelines that must be followed for their warranties to be valid. Hiring a Manufacturer-Certified Roofers Explained ensures compliance. When looking to How to Choose a Roofing Contractor, always prioritize those with proven experience in flashing work.
It's an investment, but hiring a qualified, reputable roofing contractor for any work involving flashing is paramount to protecting your home. Services like Modernize can help you find vetted professionals in your area who specialize in this kind of intricate work, ensuring your step flashing is installed correctly and lasts for decades.
Costs and Considerations for Step Flashing
When you're thinking about a roof replacement, the cost of flashing isn't usually a line item you see broken out on its own. It's typically bundled into the overall roofing estimate, but it's good to understand what influences that part of the cost, whether you're replacing your entire roof or just tackling a repair.
Cost Implications for New Installation and Repair
For a full roof replacement, the cost of step flashing and its installation is integrated into the larger project. The total How Much Does an Asphalt Shingle Roof Cost will include all the necessary components for a complete, watertight system, and flashing is a non-negotiable part of that. Therefore, you won't generally see a separate charge for "step flashing" itself, but rather it's part of the comprehensive "materials" and "labor" costs for the entire roofing system.
However, if you're dealing with a localized leak due to failing step flashing, you'll be looking at a repair cost. This can range from a few hundred dollars to over a thousand, depending on several factors:
- Extent of Damage: Is it just a few pieces of flashing, or has water already caused rot to the underlying roof decking and wall sheathing? If decking replacement is needed, that significantly increases the cost.
- Location and Accessibility: Repairing flashing around a complex chimney or a hard-to-reach dormer will naturally cost more in labor than a simple wall intersection on a low-slope roof.
- Material: If your existing flashing is standard aluminum or galvanized steel, replacement pieces are relatively inexpensive. If you're dealing with copper flashing, the material cost will be higher.
- Labor Rates: Roofing labor rates vary significantly by region. A roofer in a high-cost-of-living area like Boston or California will charge more per hour than one in a rural part of the Midwest.
- Added Services: Often, when repairing flashing, a roofer might recommend resealing other vulnerable areas, or addressing minor shingle damage nearby, which will add to the total.
The average cost for a minor flashing repair (without significant decking damage) could be anywhere from $300 to $800, but complex repairs involving structural damage or extensive flashing replacement could easily push past $1,500. It's always wise to get multiple estimates from reputable contractors when you're facing a repair of this nature. Understanding Roofing Material Cost vs Labor Cost can help you interpret these estimates.
Choosing the Right Materials and Contractors
Making informed decisions about your step flashing involves considering both the materials and the professionals who will install them.
Flashing Material Choices:
- Galvanized Steel: This is a very common and cost-effective choice. It's durable and strong, but it can corrode over time, especially if the protective zinc coating is scratched or compromised. Its lifespan is typically 20-30 years.
- Aluminum: Lighter and rust-resistant, aluminum is also a popular and affordable option. It's easier for roofers to cut and bend but can be more prone to denting than steel. It’s also often used in conjunction with aluminum siding.
- Copper: The Cadillac of flashing materials, copper is exceptionally durable, highly resistant to corrosion, and develops an attractive patina over time. It’s significantly more expensive but can last 50-100 years, often outliving several roof replacements. It's usually chosen for high-end homes or historic renovations where aesthetics and longevity are paramount.
Here's a quick comparison:
| Material | Pros | Cons | Typical Cost Range (per linear foot installed) | Durability |
|---|---|---|---|---|
| Galvanized Steel | Strong, durable, cost-effective | Prone to rust if coating is compromised | $4 – $8 | Good |
| Aluminum | Lightweight, rust-resistant, affordable | Can dent more easily | $3 – $7 | Good |
| Copper | Exceptional longevity, highly durable, aesthetic | Most expensive, requires specialized skills | $15 – $30+ | Excellent |
Note: These are rough estimates and can vary significantly based on region, complexity, and contractor.
Choosing the Right Contractor:
No matter the material you choose, the contractor is the most critical part of the equation. You need someone who understands the nuances of proper flashing installation, not just the basics of shingle laying.
- Experience: Look for contractors with extensive experience in your specific type of roofing system and a strong track record of successful flashing installations.
- References and Reviews: Ask for references and check online reviews. Look for comments specifically mentioning leak prevention or flashing quality. Modernize is a great resource for finding local, vetted contractors who have a solid reputation.
- Detailed Estimates: A thorough estimate should detail all components of the roof replacement, including flashing. If you're getting a repair estimate, it should clearly outline the scope of work for the flashing, the materials used, and the warranty provided. Always know How to Read and Compare Roofing Estimates carefully.
- Warranties: Ensure the contractor offers a strong workmanship warranty that covers flashing defects, in addition to any manufacturer warranty on the materials.
Ultimately, investing in quality step flashing and professional installation is an investment in the long-term integrity and protection of your home. It's one detail you absolutely cannot afford to skimp on.
Disclaimer
Please note that the information provided in this guide is intended for general informational purposes only and does not constitute professional roofing or construction advice. Always consult with a qualified and licensed roofing contractor for specific recommendations and services tailored to your individual property and local building codes. Roofing work can be dangerous and should be performed by experienced professionals.