Ice Barrier Code Requirements
It’s a frustrating scenario many homeowners in colder climates face: winter arrives, snow piles up on your roof, and then, inexplicably, water starts creeping into your attic or even down your walls. Often, the culprit is an ice dam – a thick ridge of ice that forms at the edge of your roof, preventing melting snow from draining properly. This guide will walk you through the essential ice barrier code requirements, helping you understand why this crucial roofing component is mandated and what you need to know to ensure your home is properly protected against the costly and damaging effects of ice dams.
Understanding Ice Barriers and Why They're Crucial for Your Roof
When you're looking at a roof replacement, there are so many components to consider, and sometimes the less visible ones, like underlayment and ice barriers, can feel like an afterthought. But trust me, these unsung heroes are absolutely vital, especially if you live somewhere that experiences harsh winters. Without them, you're practically inviting water damage into your home, which is a headache no one wants.
What Exactly is an Ice Barrier?
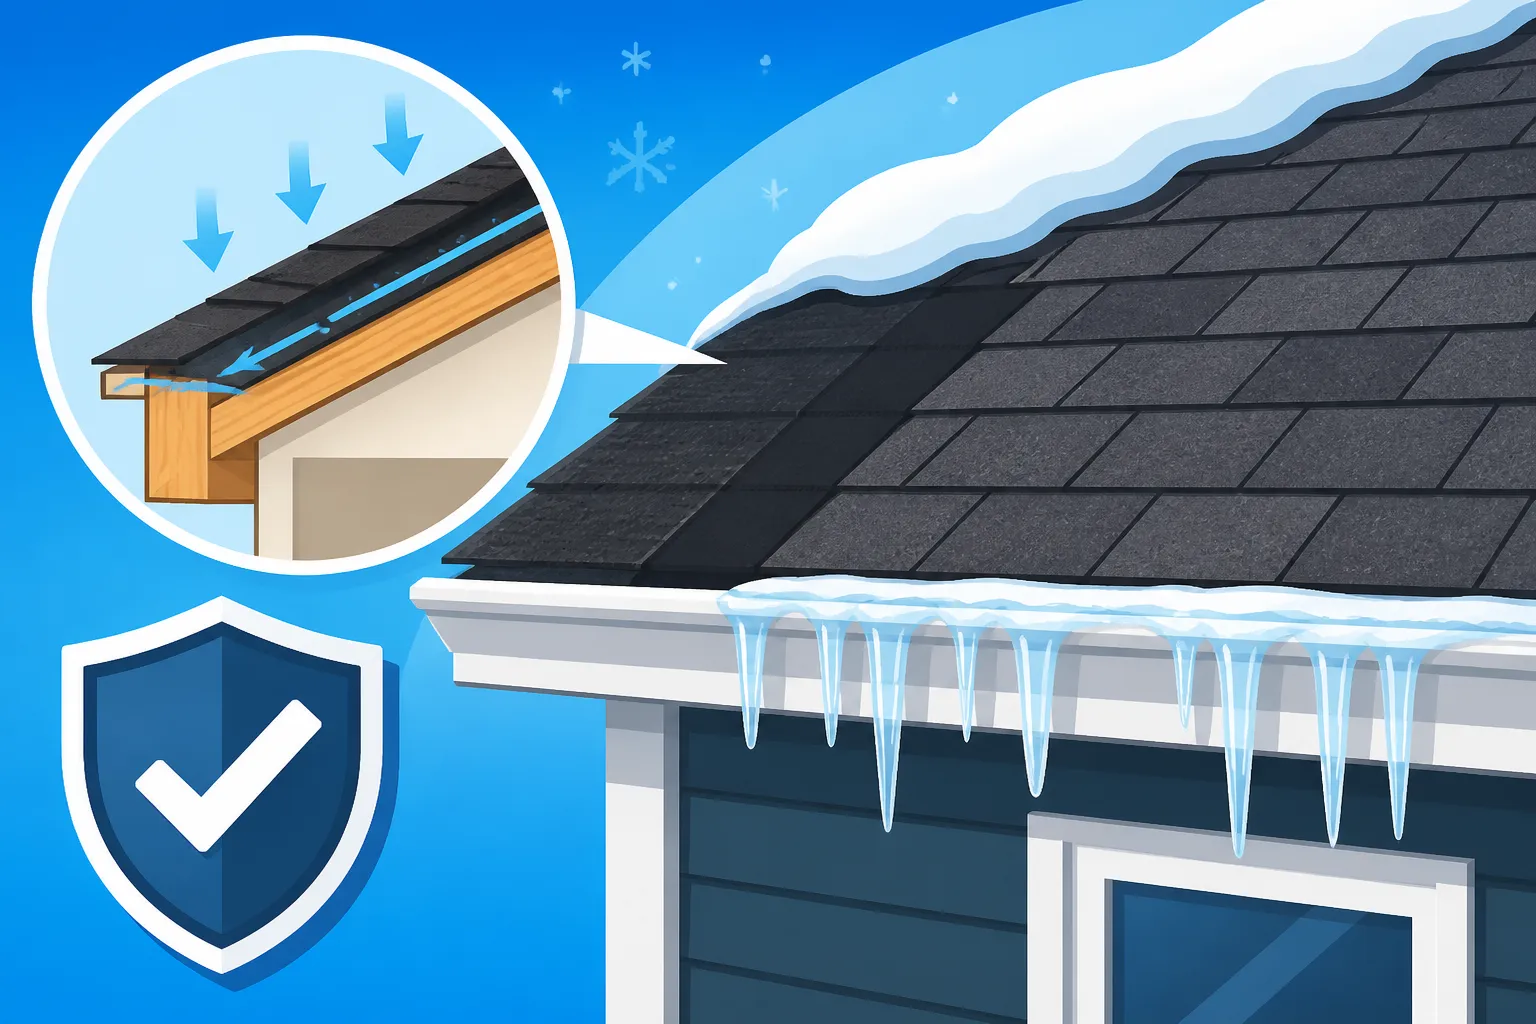
An ice barrier, often referred to as ice and water shield, is a specialized, self-adhering membrane that goes directly onto your roof deck before the other layers of underlayment and shingles are installed. Think of it as an extra layer of waterproofing, a robust defense system designed to prevent water from penetrating your roof structure, even when it’s backed up by ice. Unlike standard roofing felt or synthetic underlayment, which are designed to shed water, an ice barrier forms a watertight seal directly to the roof deck. It's typically a rubberized asphalt membrane with a peel-and-stick adhesive backing, making it extremely effective at sealing around roofing nails.
This tough, waterproof material creates a continuous barrier, often along the eaves and in valleys, to stop water that might otherwise sneak past your shingles. It’s a game-changer for homes in regions where temperatures fluctuate around freezing, leading to cycles of melting and refreezing snow. If you've ever dealt with interior water stains or dripping ceilings during winter, you know the frustration. An ice barrier is your proactive answer to preventing those nightmares. For a deeper dive into this specific material, check out our guide on how Ice and Water Shield Explained.
The Menace of Ice Dams: Why Protection is Essential
Ice dams are truly one of winter's most insidious threats to a home. They form when heat escapes from your attic, warming the roof surface and melting snow. This meltwater then runs down the roof until it hits the colder eaves, which extend beyond the heated portion of your home. There, it refreezes, creating a ridge of ice. As more snow melts, the water backs up behind this ice ridge, forming a pool of standing water. Instead of draining, this water can then seep under your shingles and into your roof decking, attic, and even the interior walls of your home.
The damage from ice dams can be extensive and expensive. Beyond the obvious ceiling and wall damage, you can also see insulation loss, ruined paint, warped floors, and even structural damage to the roof decking and framing. The sheer weight of large ice dams can also damage gutters, fascias, and soffits. This is precisely why building codes in many areas don't just recommend an ice barrier; they mandate it. They recognize that preventing ice dam formation and mitigating their effects is not just about protecting your belongings, but about preserving the structural integrity and longevity of your home. Ignoring this critical component can lead to much larger bills down the line for Ice Dam Damage: Repair Options.
Decoding Ice Barrier Code Requirements by Region
It would be wonderfully simple if all roofing codes were the same across the entire country, but alas, that's just not the reality we live in! Ice barrier code requirements are a prime example of how local conditions and climate play a huge role in what's expected of your roof. What's mandatory in Minnesota won't necessarily be required in Miami, and understanding these regional nuances is key to ensuring your roof is up to snuff.
Defining the "Ice Damming Zone"
Building codes, particularly the International Residential Code (IRC), often specify regions where ice barriers are required based on average daily temperatures. Generally, if your area experiences an average daily temperature during January of 25°F (-4°C) or colder, you're likely in what's considered an "ice damming zone." This typically covers a vast swath of the northern U.S., including states like Maine, New Hampshire, Vermont, New York, Michigan, Wisconsin, Minnesota, and parts of the Pacific Northwest, Rocky Mountains, and even higher elevations in states generally considered warmer, like California.
However, it's not always a hard and fast line on a map. Local jurisdictions can and often do modify these requirements based on historical weather data, elevation changes, or even specific microclimates within a larger region. For instance, a town nestled in a valley might have different requirements than a neighboring town on a higher ridge, even if they're only a few miles apart. The intent is always the same: to protect homes where conditions are ripe for ice dam formation. It's always crucial to check with your local building department, as they have the final say on what's required for Roofing Building Codes: What to Know in your specific area.
State and Local Code Variations You Need to Know
While the IRC provides a foundational framework, individual states and municipalities have the authority to adopt, amend, or completely override these recommendations. This means that while an ice barrier might be generally required in a northern state, the exact specifications could vary significantly from one county to the next, or even city to city.
For example, some states might require ice barriers to extend a certain distance up the roof slope from the eaves, while others might specify a minimum number of courses (rows) of shingles to be protected. You might find that in parts of New England, codes are incredibly stringent due to frequent heavy snowfall and freezing rain, demanding more extensive coverage than, say, in parts of the Midwest that experience less severe winters. Conversely, even in states not typically thought of as "cold," like Colorado, high-altitude communities will absolutely have strict ice barrier requirements. These local amendments often reflect years of experience dealing with the specific challenges of that area's weather patterns. This is why when you're hiring a contractor, one of the most important questions to ask is about their familiarity with Roofing Regulations by State and local ordinances. A good contractor will always pull the necessary permits and adhere to these local standards.
Specific Ice Barrier Code Requirements: Depth, Placement, and Materials
Once you’ve confirmed that an ice barrier is indeed required in your area (and if you live in a colder climate, it almost certainly is!), the next step is to understand the nitty-gritty details. It's not enough to just have an ice barrier; it needs to be installed correctly, using approved materials, and covering the right areas of your roof. This is where the codes get very specific, leaving little room for guesswork.
Minimum Eave Coverage: How Far Up is Enough?
This is perhaps the most critical aspect of ice barrier code requirements. The code dictates how far the ice barrier must extend up the roof slope from the eaves – the lowest edge of your roof. The general rule from the International Residential Code (IRC) is that the ice barrier should extend from the lowest edges of all roof surfaces to a point at least 24 inches inside the exterior wall line of the building. This "inside the exterior wall line" measurement is crucial and often misunderstood.
What this means in practice is that the ice barrier needs to start at the bottom edge of your roof (the eave) and extend upwards. For a typical house with a 12-inch overhang, and with the exterior wall roughly 12 inches in from the eave, the ice barrier would need to extend 24 inches plus the 12-inch overhang, totaling 36 inches up the roof from the eave edge. This ensures that even if an ice dam forms and backs up water significantly, the waterproof membrane covers the critical area where water could seep into your home's conditioned space. Pitched roofs, especially those with lower slopes, are more susceptible to water backup, so some local codes might even require greater coverage in those scenarios. This minimum ensures that even with a substantial ice dam, your home's interior remains protected.
Here's a quick look at common minimum coverage based on roof pitch and overhang:
| Roof Pitch (Slope) | Typical Overhang | Distance to Extend Above Exterior Wall Line | Total Distance Up Roof from Eave |
|---|---|---|---|
| Low Slope (2:12 to 4:12) | 12 inches | 24 inches | 36 inches (or more, per local code) |
| Standard Slope (4:12 to 12:12) | 12 inches | 24 inches | 36 inches |
| Steep Slope (12:12 and greater) | 12 inches | 24 inches | 36 inches |
Note: These are general guidelines; always consult your local building department for precise requirements.
Approved Materials and Installation Standards
When it comes to the materials themselves, building codes usually specify acceptable types of ice barriers. The most common and widely approved are self-adhering polymer-modified bitumen membranes – basically, those peel-and-stick rubberized asphalt products. These are favored because of their ability to seal around fasteners (like roofing nails), creating a truly watertight barrier. Other materials like non-self-adhering asphalt felts or synthetic underlayments, while good for general waterproofing, typically don't meet the ice barrier requirements because they don't form that crucial watertight seal around nail penetrations.
Installation standards are equally important. The membrane must be applied directly to a clean, dry roof deck. Overlapping is key, with manufacturers usually specifying a minimum overlap (often 3-6 inches) at seams to maintain watertight integrity. It’s also important that the membrane is laid smoothly, without wrinkles or buckles, which could compromise its effectiveness. Proper adhesion to the roof deck is paramount, especially in cold weather. If the temperature is too low, some ice barrier products require a primer to ensure proper bonding. A professional roofer will be well-versed in these nuances and ensure the installation adheres to both manufacturer specifications and local building codes, which is a vital part of How Asphalt Shingles Are Installed: Step by Step.
Addressing Valleys, Skylights, and Other Penetrations
While the eaves are the primary focus, ice barriers aren't just for the bottom edge of your roof. Codes often require ice barrier protection in other vulnerable areas where water is prone to accumulate or where penetrations create potential leak points. Valleys, for instance, are natural channels for water runoff, making them highly susceptible to ice damming and leaks. Therefore, ice barrier membranes are almost universally required to be installed in valleys, extending a specific distance up each side from the centerline.
Similarly, areas around skylights, chimneys, vent pipes, and other roof penetrations are critical points for water intrusion. Even with expertly installed flashing, ice and water can find their way through tiny gaps. Codes often stipulate that an ice barrier should be installed around these features, providing an extra layer of defense underneath the flashing. This ensures that if the primary flashing system is compromised or if severe ice damming occurs, there’s a secondary waterproof barrier to prevent water from entering your home. Proper application around these complex areas requires meticulous attention to detail and is a hallmark of a high-quality roofing job.
Beyond the Bare Minimum: Enhancing Ice Barrier Protection
It’s easy to look at building codes as the absolute ceiling of what's necessary, but in the world of roofing, codes usually represent the minimum acceptable standard for safety and performance. When it comes to something as vital as protection against water intrusion, sometimes going above and beyond those baseline Ice Barrier Code Requirements can save you a lot of grief and money in the long run.
When to Exceed Code Requirements
There are several compelling reasons why you might want to ask your roofing contractor to install more ice barrier than the code strictly mandates. For starters, if your home is in an area known for exceptionally heavy snowfall, prolonged freezing temperatures, or high winds that can drive snow and ice under shingles, extra coverage is a smart investment. Think of homeowners in places like Buffalo, New York, or areas of the Rocky Mountains, where winter weather is notoriously fierce. The small additional Cost of Peel-and-Stick Underlayment for extra material pales in comparison to the cost of repairing extensive water damage.
You might also consider extended coverage if your roof has a low slope. Lower-pitched roofs, especially those in the 2:12 to 4:12 range, are inherently more prone to ice damming and water backup than steeper roofs. In these cases, extending the ice barrier further up the roof, perhaps even covering the entire roof surface on very low slopes, can offer invaluable peace of mind. Similarly, if your roof has numerous complex features like dormers, multiple valleys, or skylights, these areas are all potential weak points. Increasing ice barrier coverage in these intricate sections can significantly reduce the risk of leaks, providing an extra layer of insurance against the elements. It’s a bit like adding extra airbags to your car – you hope you never need them, but you're glad they're there if you do.
The Long-Term Benefits of Superior Ice Barrier Installation
Investing in superior ice barrier installation isn't just about avoiding immediate leaks; it offers significant long-term benefits that contribute to the overall health and lifespan of your roof and home. Firstly, it substantially reduces the risk of structural damage. When water repeatedly seeps into your roof decking, it can lead to rot, mold growth, and compromised structural integrity. A robust ice barrier prevents this, preserving the costly Roof Decking Replacement Cost and ensuring your roof structure remains sound for decades.
Secondly, it protects your insulation. Wet insulation loses its effectiveness dramatically, leading to higher energy bills and a less comfortable home. By keeping water out, the ice barrier helps maintain the integrity of your attic insulation, contributing to better energy efficiency year-round. Lastly, and perhaps most importantly, it extends the effective life of your entire roofing system. When the underlying components are constantly exposed to moisture, they deteriorate faster. By providing a steadfast waterproof layer, the ice barrier helps your shingles and other roofing materials perform as intended for their full lifespan, delaying the need for a full Asphalt Roof Replacement Cost: Complete Breakdown. It's a foundational element that ensures the elements stay where they belong: outside your home.
Navigating Compliance and Avoiding Pitfalls
Understanding ice barrier code requirements is one thing; ensuring your roofing project actually complies with them is another challenge entirely. Many homeowners, overwhelmed by the complexities of a roof replacement, often leave these details entirely to the contractor. While a reputable contractor will handle everything correctly, it’s still wise for you to be informed. Knowing the codes not only protects your investment but also helps you spot potential red flags before they turn into costly mistakes.
The Consequences of Non-Compliance
Skipping or improperly installing an ice barrier, even if it feels like a small detail at the time, can lead to a cascade of negative consequences. The most immediate and obvious risk is water damage. If an ice dam forms and water infiltrates your home, you'll be facing expensive repairs to ceilings, walls, insulation, and possibly even electrical systems. This kind of damage is not only disruptive but can foster mold growth, which is a health hazard and requires specialized remediation.
Beyond the physical damage, non-compliance can cause significant headaches during home inspections, especially if you plan to sell your house down the road. An inspector will likely flag an improperly installed or missing ice barrier, potentially delaying the sale or requiring you to undertake costly repairs before closing. Furthermore, your homeowners insurance policy might have specific stipulations regarding code compliance. If a claim for ice dam-related damage arises and it's discovered that the roof did not meet local building codes, your insurance company could deny or reduce your payout, leaving you to shoulder the entire burden. This is why understanding Does Insurance Cover Roof Replacement or ice damage often hinges on adherence to local building standards.
Ensuring Your Contractor Meets Code Standards
The best way to ensure your ice barrier meets all code requirements is to work with a reputable, experienced, and licensed roofing contractor. When you're gathering bids, don't be afraid to ask direct questions about their familiarity with Roofing Building Codes: What to Know in your specific municipality. A good contractor will:
- Pull the Proper Permits: This is non-negotiable. A building permit ensures that your roofing project will be inspected by a local code enforcement officer at various stages, including the underlayment installation, which covers the ice barrier. If a contractor tries to dissuade you from getting a permit, consider it a major red flag. Our guide on Roofing Permits Explained offers more insight.
- Detail Ice Barrier Coverage in the Contract: Your roofing contract should clearly specify the type of ice barrier product being used (e.g., specific brand and model), its thickness, and how far up the roof it will be installed. This provides a written guarantee that you can refer back to.
- Provide Manufacturer Specifications: The contractor should be able to show you the manufacturer’s installation guidelines for the ice barrier product. These guidelines often exceed minimum code requirements, and adhering to them is usually a condition for maintaining your shingle warranty.
- Welcome Inspections: A professional contractor won't balk at inspections. In fact, they’ll often coordinate with the building department to ensure inspections happen at the appropriate times. You might even consider being present for the underlayment inspection yourself or requesting photos of the ice barrier installation before the shingles go on.
- Educate You: A truly great contractor will take the time to explain why certain materials and installation methods are necessary, including the importance of the ice barrier. They should be able to articulate how their proposed plan meets or exceeds code, ensuring you understand the value of each component of your new roof.
By being informed and proactive, you can ensure your home receives the durable, code-compliant protection it needs against winter's worst.
Disclaimer
Please remember that building codes are complex and vary significantly by location and can change over time. The information provided in this guide is intended for general informational purposes only and should not be considered legal or professional advice. Always consult with your local building department, a licensed roofing contractor, or a qualified building inspector to confirm the specific ice barrier code requirements applicable to your property and to ensure full compliance with all local ordinances and regulations before undertaking any roofing project.