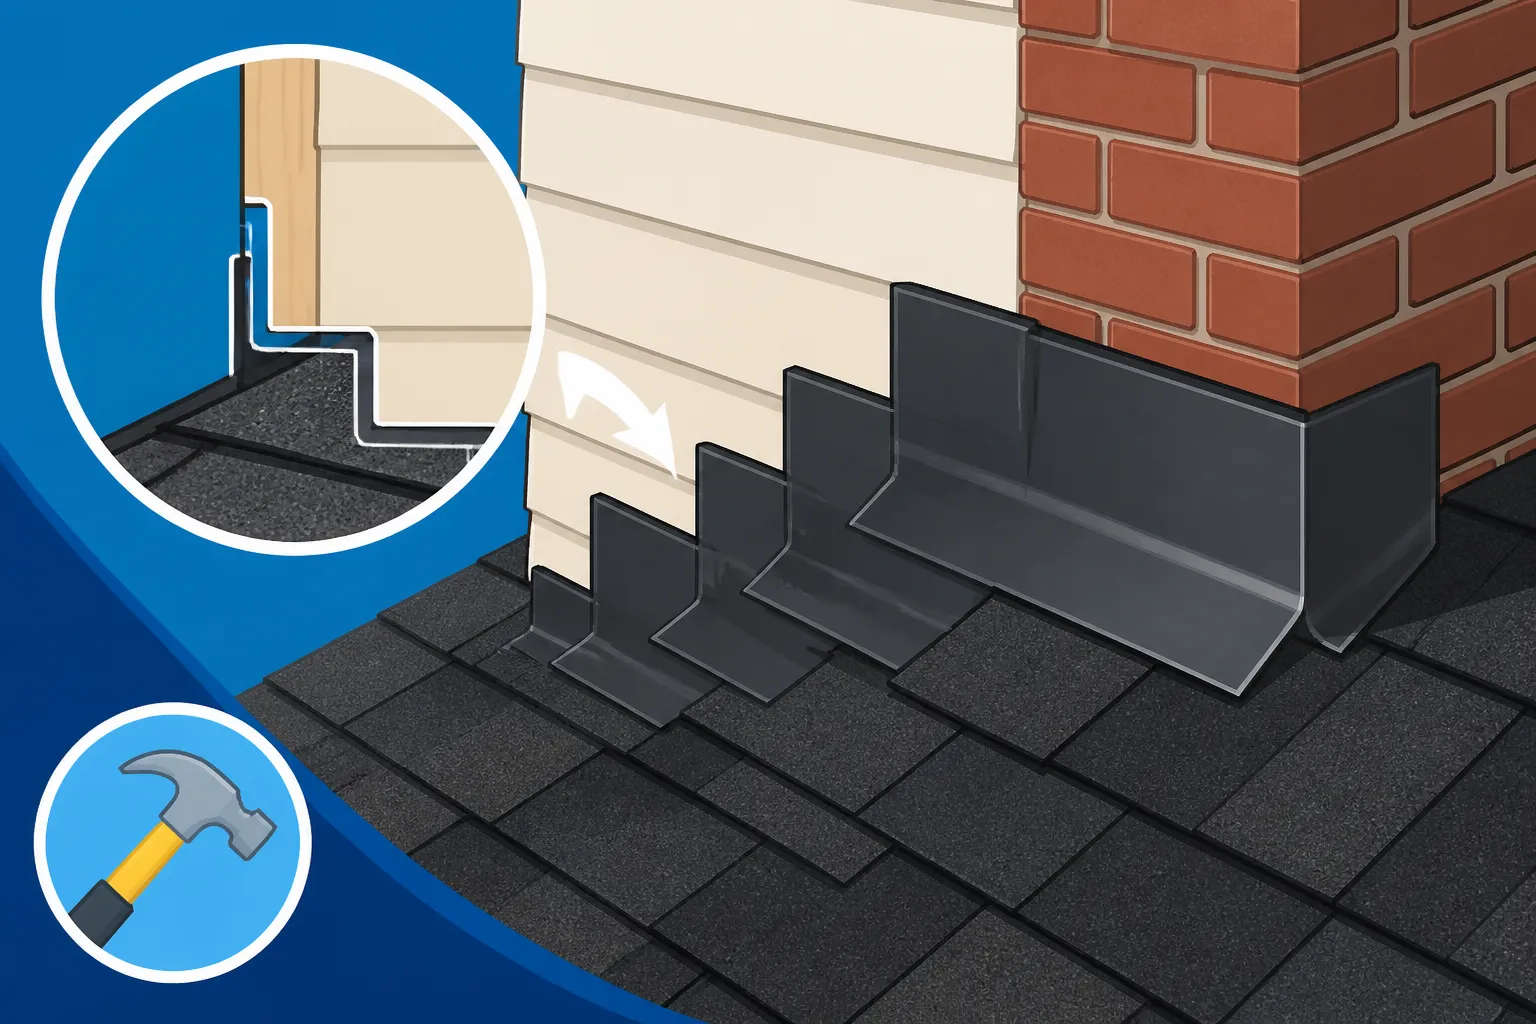
Step Flashing Around Walls
Few things are as frustrating as discovering a mysterious water stain spreading across your ceiling, especially when you can't pinpoint the source. Often, these sneaky leaks originate not from a hole in the middle of your roof, but from those seemingly innocuous spots where your roof meets a vertical wall, like around a dormer, chimney, or an adjoining house section. This guide is here to demystify one of the most critical components preventing these headaches: step flashing, explaining what it is, how it works, and why it's absolutely vital for keeping your home dry.
Understanding Step Flashing: The Unsung Hero of Roof-Wall Intersections
When we think of a roof, our minds often jump straight to the shingles, those visible layers protecting our homes. But beneath and around those shingles, there's a whole system of components working tirelessly, often unseen, to channel water away. Step flashing is a prime example of such a component, a true unsung hero that, when properly installed, ensures those vulnerable points where your roof meets a vertical surface remain completely watertight.
What is Step Flashing and Why Is It So Important?
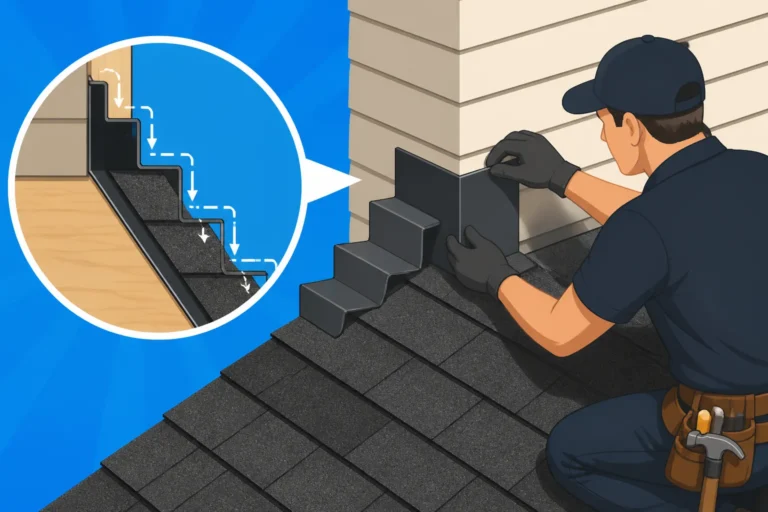
Step flashing refers to individual L-shaped pieces of metal, typically aluminum, galvanized steel, or copper, that are installed in an overlapping sequence with roof shingles along a vertical wall. Imagine a staircase; each step of the flashing overlaps the shingle below it, creating a cascading effect. This design is incredibly clever and effective because it prevents water from running behind the vertical wall and seeping into your home. Instead, any water hitting the wall or the flashing is directed down and over the shingle beneath it, eventually making its way to your gutters.
Without proper step flashing, these intersections are prime candidates for water infiltration. Water naturally flows downwards, and if there's an exposed seam where the roof plane meets a wall, gravity will relentlessly pull water into that gap. This isn't just about preventing a drip; it's about protecting your home's structural integrity. Constant moisture can lead to rotted wood decking, damaged rafters, compromised insulation, and even mold growth within your attic and walls, creating costly problems that go far beyond a simple roof repair. It's a critical part of how a roof replacement works: The Full Process, ensuring every component plays its role in overall protection.
The Anatomy of a Flashing System: Beyond Just the "Step"
While "step flashing" is the star, it's actually part of a larger, integrated flashing system designed to provide comprehensive protection. These individual L-shaped pieces don't work in isolation; they depend on other elements to create a truly watertight seal. Understanding this bigger picture helps underscore just how crucial proper installation is.
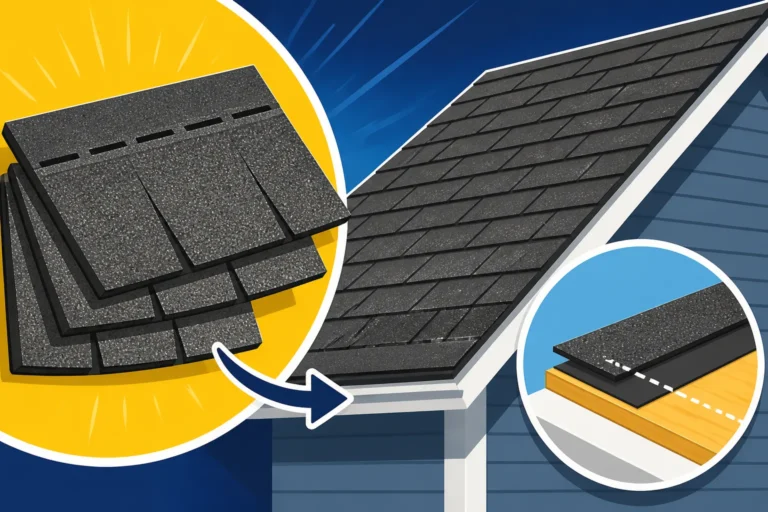
First, the step flashing pieces are installed over the roof's underlayment and directly onto the roof decking. The underlayment itself, whether it's synthetic or traditional felt, provides an initial layer of water resistance across the entire roof surface. Then, each piece of step flashing is integrated with a shingle, with the shingle laid first, followed by a piece of flashing, then another shingle, and so on. This interleaved pattern is fundamental to its effectiveness. On the vertical wall side, the step flashing is usually covered by another, larger piece of flashing called "counter flashing" or "cap flashing." This counter flashing is either mortared into brick joints or mechanically fastened to siding and then bent down over the step flashing. This second layer acts like a cap, preventing water from running down the wall and getting behind the top edge of the step flashing. It essentially creates a shingle-like overlap on the vertical surface, mirroring the way shingles work on the roof slope to shed water.
It's tempting to think caulk or sealant alone can do the job, but relying solely on these for roof-to-wall interfaces is a common mistake and a major red flag. While sealants play a supporting role in some areas, they are not a substitute for metal flashing. Caulk will eventually dry out, crack, and fail, especially under the constant expansion and contraction cycles of roofing materials in varying temperatures. Metal flashing, correctly installed, provides a durable, long-lasting physical barrier that truly prevents water intrusion, making a massive difference in how shingles protect against water.
Common Locations Where Step Flashing Shines
You might not notice it often, but step flashing is prevalent on nearly every home with an asphalt shingle roof. It's specifically required wherever a roof plane intersects with a vertical wall.
One of the most common places you'll find step flashing is around dormers. These architectural features, extending out from the roof slope, have multiple vertical walls that meet the roof. Each side of a dormer where the roof runs up against it will have step flashing installed. Similarly, chimneys are another prime candidate for extensive flashing, including step flashing on the sides, along with specialized apron flashing at the front and saddle or cricket flashing at the back to divert water. Skylights also depend heavily on step flashing, often integrated with the skylight's own flashing kit, to prevent leaks around their frames.
Beyond these common architectural elements, step flashing is crucial anywhere a lower roof abuts a taller wall, such as where an addition connects to the main house, or even in townhouse scenarios where one home's roof meets the adjacent property's wall. Even a simple side wall that extends past the roofline requires careful step flashing. These are all critical points in the roof anatomy: Parts of an Asphalt Shingle Roof that need robust protection. Ignoring these spots is akin to building a house without a solid foundation—it might look fine for a while, but it's bound to cause problems down the line.
The Art and Science of Step Flashing Installation
Installing step flashing isn't just about bending metal and nailing it down; it's a meticulous process that requires precision, an understanding of water flow, and strict adherence to best practices. A poorly installed flashing system is just as bad, if not worse, than no flashing at all because it can funnel water into your home rather than away from it. This is why when you get a roofing estimate, you should carefully review the line items and processes.
Preparing the Area: Decking, Underlayment, and Starter Shingles
Before any flashing or shingles can go down, the area must be properly prepped. This starts with a sound roof deck. If the existing decking is damaged, rotted, or structurally compromised, it needs to be repaired or replaced. A smooth, stable surface is essential for proper shingle adhesion and flashing installation. Skipping this step can lead to a host of problems, including nail pops and shingle displacement, which can compromise the entire system.
Next comes the underlayment, a protective layer installed directly over the roof decking. This material provides an additional barrier against water and is often mandated by local building codes. In areas prone to ice dams or heavy rain, an ice and water shield self-adhering membrane is often applied, extending several feet up from the eave and in valleys, but also around vulnerable wall intersections. This sticky membrane provides an excellent last line of defense against water that might penetrate the shingles and flashing.
Finally, starter shingles are applied along the eaves. These are the first course of shingles, specially designed to protect the eave edge and ensure proper shingle alignment. Once these foundational layers are in place, the roofers can begin the interleaved installation of shingles and step flashing up the wall. This groundwork is vital; without a solid, waterproof base, even the best-installed flashing can't do its job completely. This is all part of how asphalt shingles are installed: Step by Step.
The Step-by-Step Process: Shingle, Flashing, Shingle, Flashing…
The installation of step flashing is a methodical process, requiring patience and accuracy. It works in conjunction with the shingle courses, ascending the roof.
- First Shingle Course: The roofer starts by laying the first course of shingles at the bottom of the roof slope, next to the vertical wall.
- First Step Flashing Piece: A single L-shaped piece of step flashing is then placed directly on top of this shingle, tight against the wall. The horizontal flange (the part that lies on the roof) should extend out from the wall by several inches, covering a portion of the shingle. The vertical flange (the part that goes up the wall) should extend up the wall.
- Nailing: The flashing is then secured, typically with just two nails. Crucially, these nails should only go through the horizontal flange and into the roof decking, not through the vertical flange into the wall. Nailing into the wall directly would create penetrations that could allow water in. The nails should be placed near the top edge of the flashing's horizontal portion, where they will be covered by the next shingle.
- Second Shingle Course: The next shingle course is then laid, overlapping the first shingle and the lower portion of the first step flashing piece.
- Second Step Flashing Piece: Another piece of step flashing is placed on top of this second shingle, overlapping the first step flashing piece. The vertical portion of this second piece should overlap the vertical portion of the first piece by at least a few inches (typically 2-3 inches, depending on local codes and roof pitch). This creates the "step" effect, where each piece acts as a shingle, shedding water over the piece below it.
- Repeat: This process continues all the way up the wall, with each successive shingle and flashing piece overlapping the one below it. The goal is to ensure that no water can ever travel directly behind any piece of flashing or shingle.
- Counter Flashing (Optional, but Recommended): Once all the step flashing is in place, counter flashing is installed over the vertical portion of the step flashing. This piece is typically a longer strip of metal, bent to fit over the step flashing and secured to the wall (e.g., mortared into brick or slid under siding). This creates a final, weatherproof seal, covering the top edge of the step flashing and preventing water from getting behind it.
The success of this method lies in its redundancy and the way it forces water to shed downward and outward. It's a prime example of how proper roof installation protects your home.
Integrating Counter Flashing and Sealants for Watertight Protection
While step flashing is the primary barrier, the integration of counter flashing and judicious use of sealants completes the watertight system, particularly against those persistent forces of nature.
Counter flashing is often overlooked or skimped on, but it's just as important as the step flashing itself. As mentioned, the vertical flange of the step flashing extends up the wall, but its top edge remains exposed. This is where counter flashing comes in. It's a separate piece of metal, often a continuous strip, that's installed over the vertical leg of the step flashing. For brick chimneys or walls, the counter flashing is usually cut and bent to fit into the mortar joints, then sealed with mortar or a quality sealant. For siding, the counter flashing can be slipped up behind the siding panels, or if the siding is removed for the roofing project, installed directly to the sheathing and then covered by the reinstalled siding. This creates a "shingled" effect on the vertical surface, ensuring that any water running down the wall sheds onto the step flashing, which then sheds it onto the shingles below. This critical detail is often the difference between a dry home and a persistent, frustrating leak.
Sealants, while not a replacement for metal flashing, do play an important supporting role. High-quality exterior-grade sealants are used at specific points: to seal the counter flashing into mortar joints, to seal around penetrations like pipes or vents where flashing meets the roof, and occasionally at seams where metal flashing pieces meet. The key is strategic, minimal use. Over-reliance on caulk as a primary sealant for flashing joints is a common mistake made by inexperienced roofers. While it might look fine initially, UV exposure, temperature fluctuations, and moisture will cause caulk to degrade, crack, and pull away over time, leaving your home vulnerable. When you're looking for a roofer, always ask about their approach to flashing and sealant use; a reputable contractor will emphasize the metal-on-metal overlap with minimal, strategic sealant application. You can use platforms like Modernize to find experienced roofing professionals who understand these nuances.
Materials and Best Practices for Durable Step Flashing
The longevity and effectiveness of your step flashing depend heavily on the materials chosen and the precision of the installation. Cutting corners here is a false economy that can lead to expensive repairs down the line. Investing in quality materials and a skilled installation team is always the smarter choice.
Choosing the Right Materials: Aluminum, Copper, or Galvanized Steel?
When it comes to step flashing, you have a few material options, each with its own set of pros and cons regarding durability, aesthetics, and cost.
- Aluminum: This is by far the most common choice for residential step flashing. It's lightweight, relatively inexpensive, and easy to work with, making it a favorite among roofers. Aluminum is also highly resistant to rust and corrosion, which is crucial in a component constantly exposed to moisture. It comes in various pre-finished colors, allowing it to blend seamlessly with your shingles or trim. The main drawback is that it can dent more easily than heavier metals. However, for typical step flashing applications, its balance of cost-effectiveness and performance makes it an excellent choice for most homeowners.
- Galvanized Steel: Another popular and durable option, galvanized steel flashing is steel coated with a layer of zinc to prevent rust. It's stronger and more rigid than aluminum, offering better resistance to hail or physical damage. It's also typically more affordable than copper. However, if the zinc coating is scratched or compromised, the underlying steel can eventually rust, which can lead to unsightly stains on your shingles or siding. It also tends to be heavier and harder to bend than aluminum, which can affect installation labor.
- Copper: If you're looking for the ultimate in durability, longevity, and aesthetic appeal, copper is the top-tier choice. Copper flashing is incredibly resilient, highly resistant to corrosion, and can last for decades, often outliving the roof it protects. Its distinctive patination process, where it gradually turns from a shiny bronze to a beautiful green or brown, is highly prized for certain architectural styles. The major downside, of course, is the cost. Copper is significantly more expensive than aluminum or galvanized steel, both in material and often in labor due to its stiffness and the specialized tools sometimes required for working with it. However, if you have a historic home, a high-end property, or simply want the best possible protection that will last a lifetime, copper is an excellent investment.
The choice often comes down to budget and desired lifespan. For most asphalt roofs, aluminum or galvanized steel provides excellent, cost-effective protection. If you're comparing bids for a full roof replacement, you might notice differences in the type of flashing specified, and this can be a factor in the overall How Much Does an Asphalt Shingle Roof Cost.
Nailing and Overlap: Precision for Longevity
The way step flashing is nailed and overlapped is just as important as the material itself. Improper nailing can lead to leaks, while incorrect overlap can compromise the entire system.
Each L-shaped piece of step flashing should be secured with a minimal number of nails, typically two. These nails must go through the horizontal leg of the flashing and into the roof decking, positioned high enough to be completely covered by the subsequent shingle course. It's critical that nails do not penetrate the vertical leg into the wall sheathing. Why? Because if the vertical leg is nailed to the wall, any movement of the roof (due to thermal expansion/contraction or structural settling) will pull on the flashing, potentially tearing it, creating holes, or causing it to buckle. By only nailing into the roof deck, the flashing can move slightly with the roof while still maintaining its seal against the static wall.
The overlap between successive pieces of step flashing is another non-negotiable detail. As you move up the wall, each new piece of flashing must overlap the previous one by at least 2-3 inches on both the horizontal (roof) and vertical (wall) planes. This creates a redundant system where water has to climb uphill and then pass through a tight seam to get underneath the flashing – a near impossibility if done correctly. The actual length of each step flashing piece typically corresponds to the exposure of the shingles (the visible part), ensuring that each shingle course effectively covers the nails and the top edge of the flashing below it. This meticulous process is what gives step flashing its incredible water-shedding capabilities and contributes to the long-term integrity of your roof, helping to prevent a Flashing Leak Repair.
Code Requirements and Manufacturer Specifications
Don't underestimate the role of building codes and manufacturer specifications when it comes to step flashing. These aren't just arbitrary rules; they're based on decades of experience and engineering to ensure roofs perform safely and effectively.
Local building codes often dictate minimum requirements for flashing materials, thickness, and installation methods. For instance, in areas prone to high winds or heavy rainfall, codes might specify thicker gauge metal or more stringent overlap requirements. Always ensure your chosen roofing contractor is familiar with and adheres to all local building codes. A reputable contractor will pull the necessary permits and schedule inspections to ensure compliance, giving you peace of mind that your roof meets safety and durability standards. If you're wondering, "Do you need a permit to replace a roof?", the answer is almost always yes, and this includes proper flashing installation.
Furthermore, shingle manufacturers often have specific requirements for flashing as part of their warranty agreements. While their primary focus is on the shingles themselves, they understand that the performance of the entire roofing system, including flashing, directly impacts the longevity and integrity of their product. Using appropriate flashing materials and installing them according to industry best practices (which often align with manufacturer recommendations) is crucial for keeping your roofing warranty: Workmanship vs Manufacturer valid. If flashing fails due to improper installation or substandard materials, and that failure leads to shingle damage or leaks, the manufacturer might deny a warranty claim. Always discuss these specifications with your roofer to ensure your investment is protected.
Common Issues and Warning Signs of Failing Step Flashing
Even the best-installed step flashing won't last forever. Like any component exposed to the elements, it will eventually wear down or become compromised. Knowing the warning signs can help you catch problems early, potentially saving you from extensive water damage and expensive repairs. Ignoring these indicators is like ignoring a check engine light in your car—it’s only going to get worse.
The Tell-Tale Signs of a Leak
The most obvious and alarming sign of failing step flashing is, of course, a leak. Water is insidious; it will follow the path of least resistance, often traveling a significant distance from its entry point before it makes itself known.
- Interior Water Stains: Look for water stains on your ceilings or walls, particularly near a vertical wall on the exterior, or below a dormer, chimney, or skylight. These stains can appear as yellow, brown, or discolored patches. A small stain might start as a faint discoloration and grow over time, indicating a slow, persistent leak.
- Dripping Water: In severe cases, you might actually see water dripping from the ceiling, especially during heavy rain or after snowmelt. This is a clear indicator that water has breached your roof and attic space.
- Mold or Mildew: If you notice a musty smell in your attic or near a wall, or see visible mold growth on drywall, insulation, or wood, it's a strong sign of chronic moisture intrusion. Mold loves damp, dark environments, and a consistent leak from failing flashing provides the perfect breeding ground. This isn't just a structural issue; it's a health concern for your family.
- Sagging Drywall: Prolonged water exposure can saturate and weaken drywall, causing it to sag or become soft to the touch. This is usually a sign of a significant, long-standing leak.
If you observe any of these interior signs, it’s imperative to investigate immediately. While the interior damage is what you see, the true extent of the problem often lies hidden within the roof decking and wall cavities. A professional roof damage assessment: A homeowner's guide can help pinpoint the exact source.
Visible Deterioration: Rust, Bends, and Gaps
Sometimes, your roof will give you clues about failing flashing before any water ever makes it inside. Performing regular visual inspections of your roof from the ground (or safely from a ladder) can help you spot these exterior warning signs.
- Rust or Corrosion: For galvanized steel flashing, visible rust is a clear indicator of material degradation. Rust can compromise the integrity of the metal, leading to holes or weakened areas where water can penetrate. Even aluminum, while highly corrosion-resistant, can show signs of deterioration if it's been exposed to certain chemicals or very acidic rainwater over decades.
- Bent, Kinked, or Missing Flashing Pieces: Strong winds, falling branches, or even shifting roof components can bend or dislodge step flashing. A bent piece can create a funnel that directs water underneath the flashing instead of over it. If you see a piece of flashing that isn't flush against the wall or lies flat against the shingles, it's a problem. Missing pieces are an even more urgent issue, leaving large sections of the wall-to-roof intersection completely exposed.
- Gaps or Separation: Over time, due to expansion and contraction, house settling, or poor initial installation, the flashing can separate from the wall or from the shingles it's meant to protect. Look for visible gaps where light can be seen, or where you can easily slide a thin object underneath. These gaps are direct invitations for water.
- Degraded Sealant or Mortar: If your counter flashing is mortared into brick or sealed with caulk, inspect these areas. Cracked, crumbling, or missing mortar, or dried-out, cracked caulk, means the secondary seal is compromised, allowing water to get behind the counter flashing and potentially behind the step flashing below it.
These visible cues are your roof's way of telling you it needs attention. Addressing them promptly can prevent a minor repair from escalating into a full-blown emergency.
Why Flashing Fails: Poor Installation, Age, and Storm Damage
Step flashing doesn't just fail on a whim; there are usually clear reasons behind its breakdown, most of which can be attributed to installation quality, natural aging, or external forces.
- Poor Installation: This is, unfortunately, one of the most common reasons for early flashing failure. If the step flashing pieces aren't overlapped correctly, if they're nailed improperly (e.g., through the vertical flange), if the wrong type of sealant is used, or if counter flashing is omitted, the system is compromised from day one. An inexperienced or careless roofer might rush the job, leading to chronic leaks that can plague a homeowner for years. This underscores the importance of hiring a reputable roofing contractor.
- Age and Wear: Even perfectly installed flashing has a finite lifespan. Over decades, constant exposure to UV radiation, extreme temperature fluctuations, and corrosive elements in rainwater will take their toll. Metal can fatigue, sealants can degrade, and even the nails holding the flashing in place can corrode. As the shingles around it age, their granular surface wears away, reducing the friction that helps hold flashing in place, and their sealant strips can fail, making the entire roof system more vulnerable. For most asphalt roofs, the lifespan is between 15 and 30 years, and flashing often needs attention within that timeframe.
- Storm Damage: Hail, high winds, and heavy snow loads can all inflict significant damage on step flashing. Hail can dent and puncture metal flashing, creating entry points for water. High winds can lift, bend, or completely tear off pieces of flashing, especially if they weren't properly secured. Even massive snow accumulation, followed by thawing and refreezing, can exert immense pressure on flashing, leading to ice dam damage and subsequent leaks. A thorough roof inspection after any major storm is always a good idea to check for such damage. This is a common reason for needing a Flashing Leak Repair or even a full roof replacement if the damage is extensive.
Understanding these failure points helps homeowners appreciate why regular inspections and professional maintenance are so important for protecting their investment.
Maintenance, Repair, and When to Call the Pros
Catching flashing issues early and addressing them promptly is key to extending the life of your roof and avoiding costly interior damage. While some minor issues might be within a DIY enthusiast's grasp, knowing when to call in the experts is crucial.
DIY Inspections and Preventative Maintenance
As a homeowner, you can play an active role in maintaining your roof's flashing, starting with regular, safe inspections.
- Visual Checks from the Ground: Every few months, or after a major storm, take a walk around your house and visually inspect the roof-to-wall intersections. Look for any obvious signs of distress: bent metal, missing pieces, rust, or crumbling caulk/mortar. Use binoculars to get a closer look at hard-to-see areas. Never climb on your roof if you're uncomfortable or inexperienced; safety first!
- Attic Check-ins: Periodically, venture into your attic, especially after heavy rain. Look for water stains on the underside of the roof decking, rafters, or insulation near walls and chimneys. A flashlight can help you spot subtle discoloration. If you see signs of moisture, it's a strong indicator that something is amiss with your flashing or another roof component.
- Keep Gutters Clean: Clogged gutters can cause water to back up, overflow, and potentially pool against walls, exacerbating any existing flashing issues or creating new ones. Ensure your gutters are free of leaves and debris, especially in the sections near dormers or chimneys.
- Trim Overhanging Branches: Tree branches rubbing against your roof or overhanging it can scratch shingles and dislodge flashing over time. Keeping them trimmed back reduces the risk of physical damage and falling debris during storms.
These simple preventative measures can help you identify potential problems before they escalate into major headaches. If you spot anything concerning, don't hesitate to seek a professional opinion.
Tackling Minor Repairs vs. Full Replacement
Once you've identified a problem with your step flashing, the next step is deciding whether a repair is sufficient or if a more extensive replacement is necessary.
- Minor Repairs: If you have a single bent piece of flashing, or a small section of sealant that has cracked, a targeted repair might be feasible. A professional roofer can often carefully remove the affected shingles, straighten or replace the damaged flashing piece, reseal a specific joint, or even replace a small section of deteriorated counter flashing. The key here is "minor" and "isolated." If the damage is limited to a small area and the surrounding flashing and shingles are in good condition, a repair can be a cost-effective solution. However, even a minor repair requires expertise to ensure the new piece is properly integrated and watertight. Trying to patch flashing with gobs of caulk or tar is usually a temporary fix that can lead to bigger problems.
- Full Flashing Replacement: There are many scenarios where a full replacement of the step flashing in a particular area is the only viable option. If the flashing is extensively rusted, if multiple pieces are bent or missing, if the original installation was fundamentally flawed, or if the underlying roof decking has sustained water damage, a comprehensive replacement is necessary. In such cases, the existing shingles in the affected area will need to be removed, the old flashing stripped out, and often, new underlayment and decking installed before new flashing and shingles go down. This can be a more involved and costly undertaking, but it’s essential for ensuring long-term protection. Sometimes, extensive flashing issues are a sign that the entire roof is nearing its end of life, leading to the broader question of roof repair vs. replacement: How to Decide.
When in doubt, always get an assessment from a qualified roofing professional. They can accurately diagnose the extent of the damage and recommend the most appropriate and cost-effective solution.
The Importance of Professional Expertise for Flashing Work
While DIY enthusiasm is admirable, step flashing is one area where professional expertise is absolutely critical. This isn't just about nailing shingles; it's about intricate layering and understanding complex water dynamics.
An experienced roofing contractor understands not only how to install step flashing but also why each step is performed. They know the nuances of different roof pitches, the specific challenges of various wall materials (brick, stucco, siding), and the best materials and techniques to use for maximum durability. They also have the specialized tools, safety equipment, and experience to work efficiently and safely on a roof. A true professional will ensure proper overlap, correct nailing patterns, appropriate integration with underlayment and counter flashing, and adherence to local building codes.
Hiring a professional also provides the benefit of a warranty on their workmanship. If a leak recurs shortly after a repair or replacement, a reputable contractor will stand behind their work and address the issue. Attempting complex flashing repairs yourself can lead to further damage, void existing warranties, and ultimately cost you more in the long run when a professional has to come in and fix mistakes. If you’re looking for a good place to start, platforms like Modernize can connect you with pre-vetted local roofing contractors who have a proven track record of quality work. Don't be afraid to ask potential roofers about their experience specifically with flashing; their answers can tell you a lot about their expertise. Choosing a professional is truly about protecting your home and your investment for the long haul.
Understanding the Cost of Step Flashing Work
When you discover an issue with your step flashing, one of the first questions that comes to mind is often, "How much is this going to cost me?" The reality is, the cost can vary widely depending on the nature and extent of the problem, the materials chosen, and regional labor rates. It's not always a straightforward number, and it's essential to understand the factors at play.
Factors Influencing Repair vs. Replacement Costs
The price tag for addressing step flashing issues hinges significantly on whether you're looking at a minor repair or a more extensive replacement.
- Scope of Work: A small, isolated repair, like replacing a single bent piece of flashing or re-sealing a tiny section of counter flashing, will naturally be less expensive than a complete overhaul. If the problem is widespread, affecting multiple sections of a dormer or a long wall-to-roof intersection, the cost will increase due to the volume of materials and labor required. If the issue is complex, involving multiple valleys or other roof features, it will also command a higher price.
- Material Choice: As discussed earlier, the type of metal used for the flashing plays a direct role in the cost. Aluminum is generally the most budget-friendly option, while galvanized steel is a moderate step up, and copper is significantly more expensive. If your existing flashing is copper and only a small piece needs to be replaced, matching that material will be pricier than if it were aluminum.
- Accessibility and Roof Complexity: A steep roof pitch, multiple stories, or difficult-to-access areas will drive up labor costs. It takes more time, specialized equipment, and higher skill for roofers to work safely and effectively on challenging roofs. If the flashing is located in a particularly tight spot, such as behind an HVAC unit or other obstruction, this can also add to the complexity and cost. You might see a Steep Roof Cost Premium reflected in your estimate if your roof has a significant pitch.
- Underlying Damage: Often, a failing flashing system isn't just about the flashing itself. Water ingress can lead to damaged roof decking, compromised insulation, or even structural wood rot. If these secondary damages are present, they must be addressed before new flashing is installed, adding significantly to the overall cost. For example, Roof Decking Replacement Cost would be a separate, but necessary, line item.
- Labor Rates: Roofing labor rates vary by region, contractor experience, and the time of year. Highly skilled and reputable contractors, especially those with manufacturer certifications, may charge more, but their expertise often translates to a higher quality, longer-lasting repair or replacement. In busy seasons, labor costs might also see a slight increase due to demand.
A straightforward step flashing repair, addressing a small section, might range from a few hundred dollars to around $1,000. A more extensive replacement of flashing around a large dormer or chimney, especially if it includes some decking repair, could easily cost several thousand dollars. The best way to understand the potential cost is to get a detailed estimate from a professional roofer.
Getting and Comparing Quotes for Flashing Projects
Navigating the world of roofing estimates can feel overwhelming, but it's a crucial step in ensuring you get a fair price for quality work. Don't settle for the first quote you receive.
- Get Multiple Quotes: Always aim to get at least three detailed quotes from different reputable roofing contractors. This allows you to compare not just the total price, but also the scope of work, materials proposed, and warranty offerings. Platforms like Modernize can help connect you with local contractors and simplify the process of gathering multiple estimates.
- Look for Detail: A good estimate should break down the costs clearly. It should specify the type of flashing material to be used (e.g., "0.019" aluminum step flashing"), the labor involved, any necessary auxiliary materials like underlayment or sealant, and the cost of debris removal. Be wary of quotes that are vague or lump all costs into a single, undifferentiated figure. This transparency helps you understand what you're paying for and ensures that no hidden costs in a roof replacement sneak up on you.
- Inquire About Underlying Issues: Ask the contractors to explicitly state if their estimate includes inspection for and repair of any underlying decking or structural damage. If they discover such damage during the project, clarify how they will communicate additional costs and get your approval before proceeding.
- Check Credentials: Before accepting any quote, verify the contractor's licensing, insurance, and references. Ensure they are licensed and insured roofers: Why it matters. A contractor without proper insurance could leave you liable if a worker gets injured on your property. Also, check their track record for quality work, especially with flashing. Ask about their specific experience with the type of flashing repair you need.
- Understand Warranties: Clarify what kind of warranty comes with the repair or replacement. Is it a workmanship warranty from the contractor, guaranteeing their installation? How long does it last? This provides a layer of protection should issues arise post-installation.
Comparing roofing estimates isn't just about finding the cheapest option; it's about finding the best value—a combination of quality materials, expert installation, and a fair price that will ensure your step flashing provides reliable, long-lasting protection for your home.
Disclaimer
Please remember that this article provides general information and guidance. Roofing work, especially involving critical components like flashing, can be complex and dangerous. Local building codes, material availability, and specific roof conditions vary greatly. Always consult with qualified and licensed roofing professionals for inspections, detailed assessments, and actual repair or replacement work. Do not attempt roofing repairs or installations if you are not properly trained and equipped, as this can lead to serious injury or further damage to your home.