What Causes Ice Dams on a Roof
There’s nothing quite like the dread of looking up at your roof on a cold winter day and seeing those thick, jagged icicles hanging from the eaves, backed by a massive ridge of ice. It’s not just a pretty (or dangerous) winter decoration; those formidable formations, known as ice dams, are a major headache and a clear signal that something isn't quite right with your roof system. They can cause significant water damage, lead to costly repairs, and undermine the integrity of your home. This comprehensive guide will peel back the layers on exactly why ice dams form, how they threaten your home, and, most importantly, how you can prevent them from taking hold.
What Exactly Are Ice Dams and Why Are They Such a Problem?
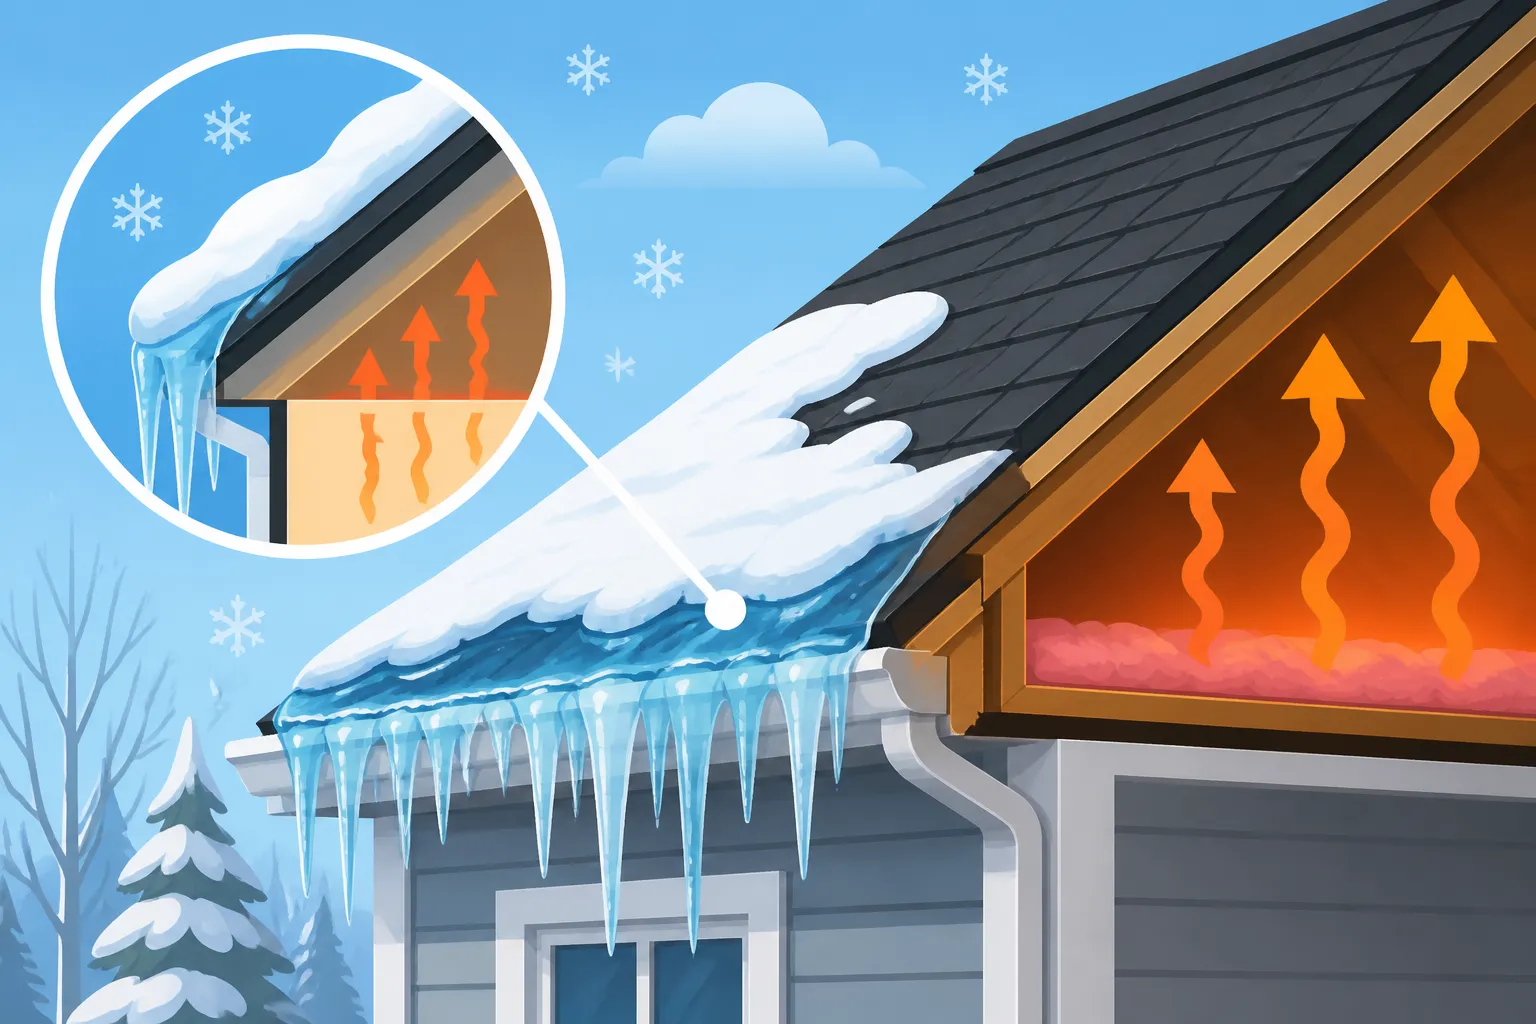
Let's cut right to the chase: ice dams are essentially frozen barriers that form at the edge of your roof, typically right above the gutters. They happen when snow on the warmer parts of your roof melts, runs down to the colder eaves, and then refreezes. This process repeats, building up a formidable "dam" of ice. The water that melts behind this dam has nowhere to go. It pools, backs up under your shingles, and eventually makes its way into your attic, walls, ceilings, and even inside your living space. It’s a sneaky, destructive force that can catch homeowners completely off guard.
The Pernicious Path of Water Intrusion
When that melted snow water gets trapped by an ice dam, it doesn't just sit there. Asphalt shingles, while excellent at shedding water, aren't designed to withstand standing water for prolonged periods, especially if that water can get under them. The water will inevitably find its way through tiny gaps, nail holes, or weakened areas in your roofing materials, leading to serious internal damage. This can manifest as anything from unsightly water stains on your ceilings and walls to saturated insulation, rotting roof decking, and even structural issues over time. Imagine waking up to a dark, spreading stain on your bedroom ceiling – that's often the handiwork of a persistent ice dam.
Beyond the Visible Damage: Hidden Costs and Risks
The immediate water damage is obvious, but ice dams pose other, less visible threats. Constant moisture in your attic creates a prime breeding ground for mold and mildew, which can significantly impact indoor air quality and pose health risks. The added weight of a substantial ice dam can also stress your gutters, pulling them away from the fascia, or even putting undue strain on the roof structure itself, particularly if you have an older roof or one not built to withstand heavy snow loads. Furthermore, attempting to remove these heavy ice formations can be dangerous, leading to falls or further roof damage if not done correctly. It's a problem that goes far beyond just a few icicles.
The Root Causes of Ice Dam Formation
Understanding why ice dams form is crucial to preventing them. It’s a bit of a scientific dance between snow, heat, and cold, but the primary culprit often boils down to an imbalance in your home's thermal envelope and ventilation. Simply put, warm air is escaping from your living space into your attic, heating up the roof deck, melting the snow, and then refreezing where the roof is cold.
Inadequate Attic Insulation
One of the most common reasons for ice dams is insufficient insulation in your attic. Think of your attic as a buffer zone between your heated home and the cold outdoors. If this buffer isn't thick enough, the heat generated in your living areas rises and radiates into the attic. This warm attic air heats up the underside of your roof deck. When the roof deck itself gets warm, it starts to melt the snow resting on top of it, even if the outside air temperature is still below freezing. This isn't just a slight warmth; we're talking about enough heat to melt substantial amounts of snow. For instance, an attic with R-19 insulation when R-49 or R-60 is recommended for your climate zone in the Northeast or Midwest, will be a major heat sieve. This constant warmth escaping from your living space, heating up your attic, is why you might see snow melting faster on your roof compared to your neighbor's, even if they were built at the same time.
Insufficient Attic Ventilation
Hand-in-hand with insulation, proper attic ventilation plays a critical role in preventing ice dams. Even with good insulation, some heat will inevitably make its way into the attic. The job of attic ventilation is to carry that excess heat away. A well-ventilated attic creates a continuous airflow, drawing in cold, fresh air from soffit vents (located under the eaves) and expelling warmer, stale air through ridge vents (along the peak of the roof) or other exhaust vents. This constant air exchange keeps the attic temperature consistent with the outside air temperature, ensuring that the entire roof deck remains uniformly cold.
If your attic lacks adequate ventilation, or if existing vents are blocked (perhaps by insulation batts pushed too far into the eaves), that warm air gets trapped. It accumulates, creating warm spots on the roof surface that melt snow. Then, as the water runs down to the colder, unheated eaves (which are often over an uninsulated overhang), it refreezes. This is a critical component of a healthy roof system, as you can learn more about in our guide on how a roof ventilation works. Properly designed systems also help in the summer, preventing heat buildup and extending the life of your shingles.
Other Contributing Factors
While insulation and ventilation are the big two, several other factors can contribute to the formation of ice dams:
- Air Leaks from Living Space: Small gaps, cracks, and penetrations from your heated living space directly into the attic can allow significant amounts of warm, moist air to escape. This includes unsealed attic hatches, poorly sealed recessed lighting fixtures, gaps around plumbing stacks, exhaust fans that vent into the attic instead of outside, and wiring penetrations. Each one acts like a tiny chimney, channeling heat right where you don't want it.
- Clogged Gutters: While not a primary cause, clogged gutters can exacerbate the problem. If gutters are filled with leaves and debris, they can prevent melted water from draining away efficiently, causing it to pool and freeze, thereby contributing to the base of an ice dam or making an existing one larger.
- Sun Exposure and Inconsistent Temperatures: On a sunny, cold day, direct sunlight can warm portions of the roof and melt snow, even if the ambient air temperature is below freezing. As this water moves into shaded or colder areas, it refreezes. This creates a cycle where snow melts and refreezes, adding to the ice dam. Some homes with complex rooflines might experience this more frequently due to varied sun exposure.
Preventing Ice Dams: Actionable Steps for Homeowners
The good news is that ice dams are largely preventable. Addressing the underlying causes, rather than just chipping away at the ice, is the most effective long-term strategy. It's about creating a "cold roof" where the entire surface stays at or near the outdoor temperature, preventing snow from melting prematurely.
Boost Your Attic Insulation
The first line of defense is a well-insulated attic. Adding insulation acts like a thermal blanket, significantly reducing the amount of heat that can escape from your living space into the attic. Most building codes, especially in colder climates, recommend a higher R-value than many older homes possess. For instance, in colder northern states like Minnesota or New York, an R-value of R-49 to R-60 (which translates to about 16 to 22 inches of fiberglass or cellulose insulation) is often recommended.
Before adding insulation, it's crucial to seal any air leaks from the living space into the attic. This step is often overlooked but is incredibly important. You can use caulk for smaller gaps and expanding foam for larger ones around pipes, wires, and utility chases. Don't forget to properly seal and insulate your attic hatch or pull-down stairs. Once air leaks are sealed, you can add blown-in cellulose or fiberglass insulation, or lay down additional batts. Remember, more insulation means less heat loss, which directly translates to less snowmelt on your roof.
Optimize Attic Ventilation
Proper attic ventilation works in tandem with insulation to keep your attic cold and dry. The goal is to ensure continuous, unobstructed airflow from the soffit (intake) vents to the ridge (exhaust) vents. The general rule of thumb is to have at least 1 square foot of net free vent area for every 150 square feet of attic floor space, divided equally between intake and exhaust. However, if you have an effective vapor barrier in your ceiling, this ratio can be extended to 1:300. You can delve deeper into this topic by reading our article on how attic ventilation prevents damage.
Make sure your soffit vents aren't blocked by insulation. You might need to install baffles (also called rafter vents) in the eaves to ensure a clear channel for air to flow from the soffits up into the attic space, past the insulation. For homes with existing systems, check for blockages or signs of insufficient airflow. Sometimes, upgrading to more efficient ridge vents or ensuring all exhaust vents are properly installed and clear can make a world of difference. Consulting with a roofing professional can help you assess your current ventilation setup and recommend optimal solutions. If you're undertaking a full roof replacement, it's the perfect opportunity to upgrade your entire ventilation system.
Seal All Air Leaks from the Living Space
We touched on this with insulation, but it bears repeating because it's so critical. Even the best insulation can't do its job if warm air is actively bypassing it through leaks. Think of all the places heat can escape:
- Recessed Lighting: Many older recessed light fixtures are not "airtight" and can be major sources of heat loss. Consider upgrading to IC-rated (insulation contact) and airtight models.
- Attic Hatches/Stairs: These are often poorly sealed. Add weatherstripping and an insulated cover.
- Plumbing Stacks and Electrical Wiring: Use expanding foam sealant around any pipes or wires that penetrate your attic floor.
- Bathroom and Kitchen Exhaust Fans: Ensure these vent directly outside through the roof or a side wall, not just into the attic. Venting into the attic introduces warm, moist air, which is a recipe for disaster.
By meticulously sealing these pathways, you prevent warm air from ever reaching the roof deck to begin with, making your insulation and ventilation efforts far more effective. For homeowners in the process of upgrading their home, platforms like Modernize can help connect you with professionals who specialize in home energy efficiency and roofing solutions.
Consider Ice and Water Shield
For extreme climates or homes particularly prone to ice dams, installing an ice and water shield is an excellent protective measure. This is a self-adhering, waterproof membrane applied directly to the roof deck before the underlayment and shingles go down. It creates an impenetrable barrier that prevents water from backing up under the shingles and seeping into your home. Building codes in many colder regions now mandate ice and water shield installation along the eaves and in valleys, typically extending at least 24 inches past the interior wall line.
While it won't prevent ice dams from forming on top of your shingles, it will prevent the water from penetrating your roof and causing damage to your home. This is especially important during a full roof replacement, as it provides a robust, hidden layer of protection against the most severe leaks. To truly understand its importance, check out our article on ice and water shield explained.
Dealing with Existing Ice Dams Safely
Sometimes, despite your best efforts, or if you're dealing with an older roof, ice dams can still form. When they do, the immediate concern is preventing water intrusion. However, dealing with existing ice dams can be dangerous, and doing it incorrectly can cause more harm than good.
Safe Removal Techniques
The golden rule for ice dam removal is never use a hatchet, chisel, or pickaxe. You'll almost certainly damage your shingles or even puncture the roof deck, leading to costly repairs. Here are some safer methods:
- Calcium Chloride Ice Melt: For smaller, manageable dams, you can create channels through the ice using calcium chloride ice melt. Fill old nylon stockings or socks with calcium chloride (avoid rock salt, as it can damage your roof and landscaping). Lay these filled stockings across the ice dam, perpendicular to the eave, at intervals. The calcium chloride will slowly melt channels through the ice, allowing the trapped water to drain. Always follow product instructions and take care not to let the ice melt sit directly on your shingles for too long.
- Steam Removal: This is the safest and most effective method for large or stubborn ice dams. Professional ice dam removal companies use specialized low-pressure steam equipment that melts the ice without damaging your roof materials. It’s quick, efficient, and avoids any physical contact that could harm your shingles or gutters. This is a task best left to the professionals due to the specialized equipment and safety risks involved with working on an icy roof.
When to Call a Professional
Knowing when to call in the cavalry is crucial for both your safety and your home's well-being. If an ice dam is large, extends far up your roof, or if you suspect water has already infiltrated your home, it's time to call a professional roofing contractor. They have the experience, tools, and safety equipment to assess the situation and remove the ice without causing further damage.
A professional can also conduct a comprehensive roof inspection: what they check goes beyond just the visible surface, often involving an attic check to look for signs of water intrusion, mold, or ventilation issues. They can also provide guidance on long-term prevention strategies, such as improving insulation, enhancing ventilation, or recommending an ice and water shield if you're due for a roof replacement. Many homeowners turn to trusted services like Modernize to find qualified local roofing professionals, especially when facing urgent issues like ice dam removal or evaluating options for a new roof. Don't risk a fall or further damage to your home trying to tackle a large ice dam on your own.
Here's a quick comparison of common prevention strategies:
| Prevention Method | Primary Goal | Best Time to Implement | Expected Impact on Ice Dams | Notes |
|---|---|---|---|---|
| Add Attic Insulation | Reduce heat transfer to attic | Anytime | Significantly reduces snowmelt | Crucial for preventing heat escape. |
| Improve Attic Ventilation | Remove excess heat from attic | Anytime | Keeps roof deck uniformly cold | Works with insulation for optimal results. |
| Seal Air Leaks | Prevent warm air from entering attic | Anytime | Stops direct heat transfer | Often overlooked; highly effective. |
| Install Ice & Water Shield | Provide waterproof barrier under shingles | During new roof installation | Prevents leaks from dammed water | Doesn't prevent dam formation, but protects. |
| Clean Gutters | Ensure proper drainage of melted water | Fall, before first snow | Reduces foundation of ice dams | Supports overall roof drainage. |
Remember, a holistic approach combining improved insulation, robust ventilation, and diligent air sealing is your best defense against ice dams. These steps also contribute to overall energy efficiency and can help you extend the life of an asphalt roof.
Final Thoughts on Battling Winter's Frozen Foe
Ice dams are more than just a winter nuisance; they're a clear indication that your home's roof system and attic are out of balance. The potential for serious, costly damage to your roof, attic, and interior is very real. While seeing those formidable ice formations can be disheartening, remember that you have actionable steps you can take. Investing in proper attic insulation and ensuring your ventilation system is functioning correctly are the most impactful long-term solutions.
By taking these preventative measures, you're not just safeguarding your home against future ice dam threats; you're also likely improving your home's energy efficiency and comfort year-round. If you're unsure where to start, or if you already have significant ice dam issues, don't hesitate to reach out to a reputable roofing contractor. They can provide a thorough assessment and guide you through the process of making your home more resilient against winter's worst. A well-maintained roof, combined with proper insulation and ventilation, is your best defense against the costly headaches that ice dams can bring.
Disclaimer
Please note that the information provided in this guide is for general informational purposes only and does not constitute professional advice. Roofing work can be dangerous and should be undertaken by qualified professionals. Always consult with a licensed and insured roofing contractor for specific recommendations and services tailored to your property's needs. Building codes and regulations vary by location, and it is the homeowner's responsibility to ensure compliance.