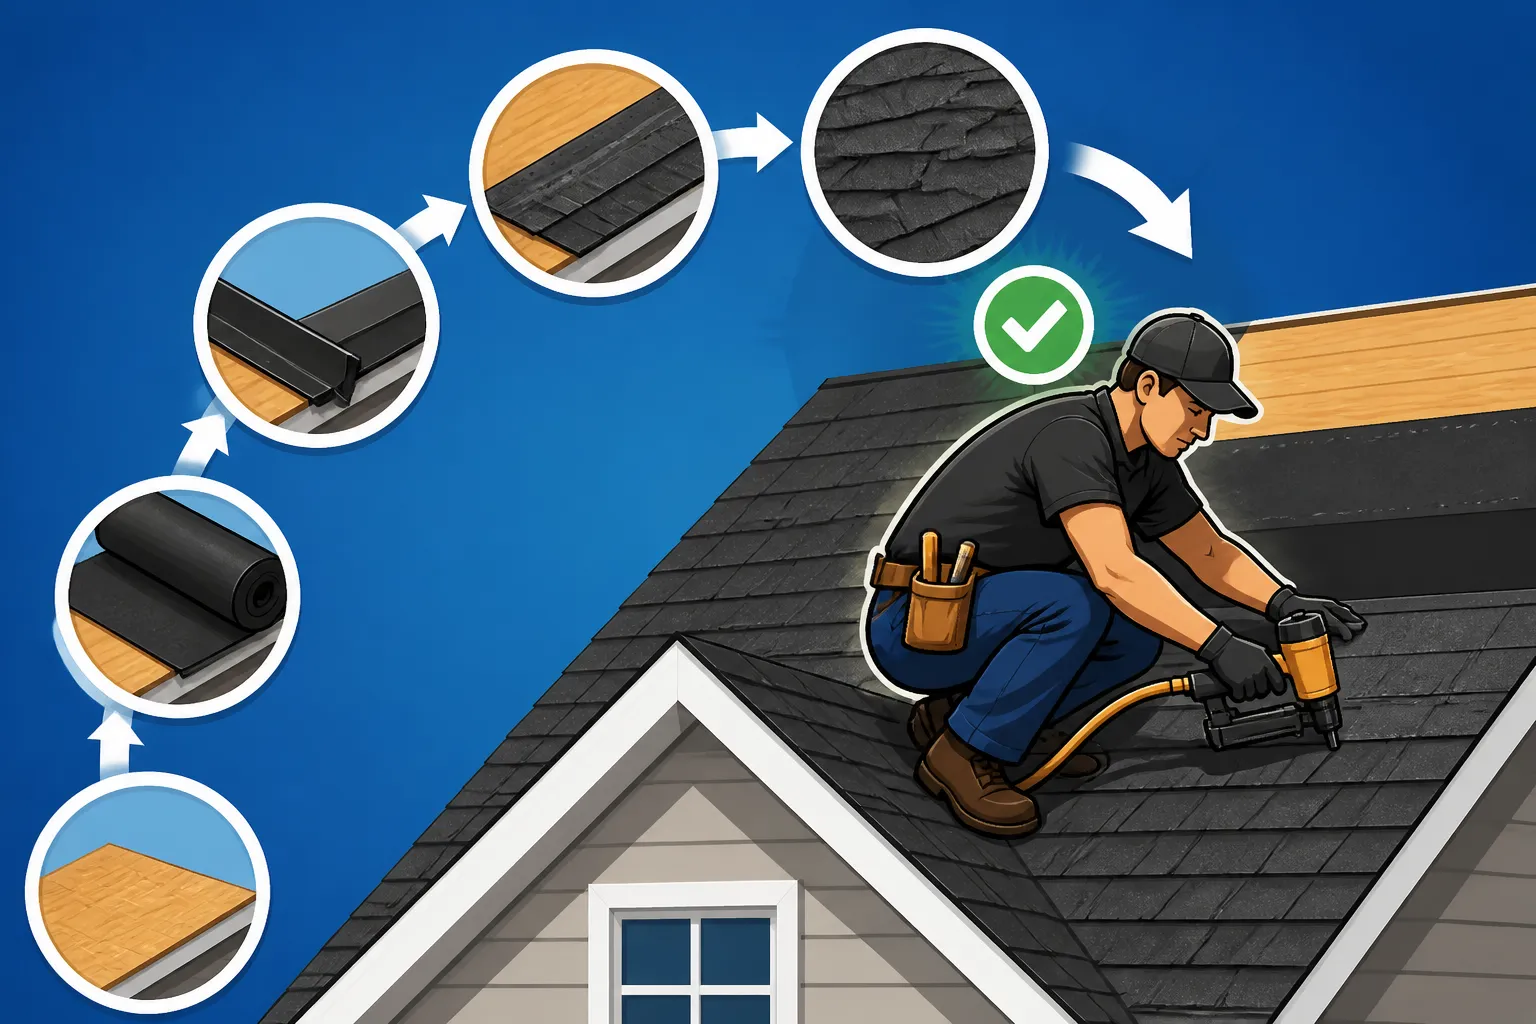
What Order Roofers Install Components In
Replacing a roof is one of those big home projects that can feel incredibly daunting. You might find yourself staring up at your old, weathered shingles, wondering not just about the cost or who to hire, but also, what exactly happens up there? It’s not just slapping shingles on; there's a very specific, crucial order of operations that ensures your new asphalt roof will protect your home for decades. This guide is here to demystify that process, walking you through each step roofers take so you feel informed and confident about your roofing project.
Why Understanding the Installation Order Matters Beyond Curiosity
It’s easy to think of roof installation as a single, big job, but it's actually a series of interconnected steps. Knowing the proper sequence isn't just for the professionals; it empowers you as a homeowner. When you understand the logic behind each component and its placement, you can better assess quotes, ask informed questions, and ensure your investment is truly sound.
Ensuring Quality and Longevity
Think of building a house: you wouldn't pour the foundation after framing the walls, right? The same principle applies to your roof. Each layer and component is designed to work in harmony with the others, building upon the previous one to create a watertight, durable system. If a roofer cuts corners or installs components out of sequence, it compromises the entire system's integrity. For instance, skipping proper underlayment installation before shingles can lead to widespread leaks, even if the shingles themselves are perfectly laid. It’s all about creating layers of defense, and if any layer is out of order or missing, those defenses are weakened, potentially leading to a shorter lifespan for your roof and headaches down the road.
Avoiding Costly Rework
Unfortunately, I've heard too many stories from homeowners who had to deal with frustrating issues just a few years after a "new" roof was installed. Often, these problems stem from improper installation. Imagine your roofers didn't install drip edge correctly, or they neglected the crucial step of inspecting the roof decking for damage before putting down new materials. These aren't minor oversights; they're foundational flaws that can lead to water infiltration, rot, and structural damage, requiring expensive repairs or even another full replacement much sooner than expected. By understanding the proper order and asking questions throughout the process, you become an advocate for your home, helping to prevent these kinds of costly mistakes. It's a bit like being a general contractor for your own project – the more you know, the better equipped you are to ensure things are done right the first time.
The Step-by-Step Asphalt Roofing Installation Process
A proper asphalt roof replacement follows a well-established sequence designed to maximize protection and longevity. While minor variations might exist based on local building codes or specific contractor practices, the core order remains consistent.
Preparing the Worksite and Protecting Your Property
Before any heavy lifting begins, a truly professional roofing crew will take great care to protect your home and yard. This initial phase is all about preparation and safety, something often overlooked by homeowners but critical for a smooth project.
Firstly, large tarps are spread out around the perimeter of your house, often extending several feet out from the foundation. These aren't just for show; they're there to catch old shingles, nails, debris, and any other materials that will come off the roof during the tear-off process. This meticulous ground protection is vital for keeping your landscaping, exterior finishes, and even your driveway safe from damage and stray nails. Imagine stepping on a rogue nail days after the roofers have left – no fun, right? These tarps help prevent that.
Next, the crew will typically secure the area. This might involve setting up safety cones, blocking off access points where debris might fall, and communicating with homeowners about safe zones. They may also remove or cover sensitive items like patio furniture, grills, or potted plants that are too close to the house. Some contractors even use specialized equipment, like a "Catch-All" system or debris chute, which funnels discarded materials directly into a dumpster, further minimizing yard mess and potential damage. This initial setup is a clear indicator of a responsible and organized roofing company, setting the stage for the intense work ahead. You'll also want to consider how to prepare your home for roofers to make this process even smoother.
The Tear-Off: Removing the Old Roof
This is where things get loud and messy, but it’s a non-negotiable step for most quality asphalt roof replacements today. The goal here is to strip everything down to the bare roof deck.
Crews start by carefully removing all the existing layers of shingles, underlayment, and any flashing around penetrations like chimneys, skylights, and vents. Using specialized tools, they work systematically across the roof, often starting at the ridge and moving downwards. All the old materials are then tossed into a dumpster, usually positioned conveniently close to the house for efficient disposal. This phase is intense and often surprisingly quick, as experienced teams work with precision and speed.
Why is a full tear-off so important? While it might be tempting to consider an overlay (installing new shingles over old ones) to save on costs, it's generally not recommended. Most building codes now limit the number of shingle layers, and a complete tear-off allows the contractor to inspect the underlying roof decking for any damage. Plus, new shingles perform best on a clean, flat surface, and laying them over old, uneven shingles can lead to premature failure and void manufacturer warranties. Understanding the true Cost of Roof Tear-Off and Disposal is a key part of the overall budget.
Decking Inspection and Repair
Once the old roof is completely removed, the bare roof decking is exposed. This is a critical juncture where the roofers take a step back from removal and focus on structural integrity.
The decking, typically made of plywood or OSB (oriented strand board), serves as the foundation for your entire roof system. A thorough inspection involves checking every square foot for signs of rot, water damage, warping, or deterioration. Loose or protruding nails are addressed, and any soft spots are identified. If a section of decking is compromised, it absolutely must be replaced before any new materials go down. Failing to do so is like building a beautiful house on a crumbling foundation; it will eventually lead to problems like sagging shingles, poor nail adhesion, and an increased risk of leaks. You definitely don't want to skip this. This inspection also ensures that the roof has a solid surface for the new fasteners to grip securely, which is paramount for wind resistance and the overall longevity of your new roof. If there's significant damage, understanding the potential Roof Decking Replacement Cost is vital.
Laying the Foundation: Underlayment and Drip Edge
With a clean and sound roof deck, the real protective layers begin to be installed. This phase is all about preparing the deck to shed water and protect against ice and wind.
First, drip edge is installed along the perimeter of the roof, specifically at the eaves and rakes (the sloped edges). This L-shaped metal flashing extends beyond the edge of the roof deck, guiding water off the roof and into your gutters, preventing it from running down the fascia board and potentially rotting the wood. It’s a small component that plays a huge role in protecting your home's vulnerable edges.
Next, ice and water shield is applied. This is a crucial self-adhering membrane that provides an extra layer of protection in vulnerable areas. It's typically installed along the eaves (especially important in colder climates prone to ice dams), in valleys (where two roof planes meet), around chimneys, skylights, and other penetrations. Unlike standard felt underlayment, ice and water shield actually seals around nails, creating a watertight barrier that prevents water from backing up under shingles and seeping into your home.
Finally, the primary underlayment is rolled out over the entire roof deck, overlapping the ice and water shield. This layer, which can be either traditional felt or a more advanced synthetic material, provides an additional barrier against moisture, especially during the installation process or if a shingle ever fails. It also acts as a separation layer between the shingles and the roof deck, protecting the wood from the asphalt's oils and offering some fire resistance. The choice between Synthetic vs Felt Underlayment Cost often comes down to budget and desired performance.
Crucial Flashing and Ventilation Installations
With the underlayment and drip edge in place, the focus shifts to ensuring all penetrations and transitions in your roof are completely watertight and that your attic can breathe properly. This is where meticulous work truly pays off.
Flashing is a critical component, typically made of metal, that's installed around anything that projects through your roof – think chimneys, skylights, vent pipes, and wall intersections. These are notoriously weak points where water can easily infiltrate if not properly sealed. Different types of flashing are used for different situations: step flashing for wall intersections, saddle (or cricket) flashing behind chimneys on steeper roofs, and boot flashing for vent pipes. Each piece is custom-fit and carefully integrated with the underlayment and shingles to create a seamless, watertight barrier. Incorrectly installed flashing is a leading cause of roof leaks, so paying close attention here is paramount.
Ventilation components are also installed at this stage. A healthy roof system requires proper attic ventilation to allow hot, moist air to escape. This helps prevent heat buildup, which can prematurely age shingles, and minimizes moisture accumulation, which can lead to mold, mildew, and rot. Common ventilation types include ridge vents (installed along the peak of the roof), soffit vents (in the eaves), and sometimes box vents or turbine vents. The contractor will ensure that there’s a balanced system of intake (at the soffits) and exhaust (at the ridge or higher up) to create continuous airflow. Understanding the Cost of Ridge Vent Installation can help you plan this important upgrade.
Shingle Application: The Star of the Show
Now for the part most people envision when they think of a new roof: the shingles themselves! This stage requires precision, proper nailing, and adherence to manufacturer specifications.
Installation typically begins with starter shingles applied along the eaves. These specially designed shingles (or cut three-tab shingles) have an adhesive strip that helps seal the first course of main shingles, preventing wind uplift and water infiltration at the vulnerable edge.
Next, the main field of asphalt shingles is installed, working upwards from the eaves towards the ridge. Each shingle course is carefully aligned, staggered, and nailed into the roof deck according to the manufacturer's specific nailing patterns. Proper nailing is absolutely critical for warranty validity and the roof’s wind resistance. Too few nails, nails placed too high, or nails driven too deep can all lead to shingles blowing off or leaking. Reputable contractors, like those found through services such as Modernize, understand the importance of following these guidelines precisely.
As the shingles are laid, they overlap each other in a specific way, forming a layered system that sheds water down and off the roof. Valleys, where two roof planes meet, are either open (with metal lining exposed) or closed (where shingles weave through the valley), and are meticulously shingled to ensure they remain watertight. This careful overlapping and staggering ensures that no two shingle cutouts align, creating a robust, interwoven shield against the elements. This is really where you see the "How Asphalt Shingles Are Installed: Step by Step" come to life.
Finishing Touches: Ridge Caps and Cleanup
The project isn't over when the last shingle is laid. The final steps involve sealing the roof's peak and ensuring the work area is spotless.
Once the main field of shingles reaches the peak of the roof, ridge cap shingles are installed. These are thicker, pre-formed shingles designed to cover the ridge line, providing a finished look and, more importantly, a protective seal for the highest point of the roof where the two slopes meet. They are typically installed from one end of the ridge to the other, overlapping to shed water effectively.
After all shingles and components are in place, the crew will conduct a thorough cleanup. This involves removing all remaining debris, scraps, and, most importantly, sweeping the entire perimeter of your property with powerful magnetic rollers to pick up any stray nails that might have fallen. This final sweep is crucial for preventing flat tires or injuries later on. The old shingles and waste from the tear-off, which were collected in the dumpster, are then hauled away for disposal. A professional job isn't truly complete until your property looks as clean as it did before they started, leaving you with nothing but a beautiful, brand-new roof.
Summary of Roofing Installation Steps
Here's a quick overview of the typical order of operations for an asphalt roof replacement:
| Installation Stage | Components Installed / Actions Taken | Key Purpose |
|---|---|---|
| Preparation | Ground tarps, debris chutes, property protection | Safeguard landscaping, exterior, and prevent damage |
| Tear-Off | Old shingles, underlayment, flashing removed | Clear the deck, ensure clean base for new materials |
| Decking Inspection | Plywood/OSB inspected, repaired/replaced as needed | Ensure structural integrity and solid fastening surface |
| Edge & Base Protection | Drip Edge, Ice & Water Shield, Underlayment | Guide water off, protect against ice dams, create secondary water barrier |
| Penetration Sealing | Flashing (chimneys, vents, skylights), Ventilation | Watertight seal around roof openings, allow attic airflow |
| Shingle Application | Starter Shingles, Field Shingles, Valley Treatment | Primary weather protection, aesthetic appeal, structural cover |
| Finishing & Cleanup | Ridge Cap Shingles, Final site cleanup, Nail sweep | Seal roof peak, complete aesthetic, ensure safety and tidiness |
Common Missteps and What to Watch For
Even with a detailed process, sometimes things can go awry. Being aware of common shortcuts or errors can help you spot potential problems and ensure your contractor is doing things by the book.
Skipping or Rushing Essential Steps
One of the biggest red flags you can look out for is a contractor who seems to be rushing or skipping foundational steps. For instance, some less scrupulous roofers might try to convince you that inspecting the roof decking isn’t necessary, especially if they are trying to offer an unusually low bid. This is a massive gamble. The deck is your roof's literal backbone, and neglecting to properly inspect and repair it can lead to costly structural issues down the line. You might save a little money upfront by choosing a contractor who rushes through or skips the decking inspection, but you'll likely pay far more in emergency repairs when the roof sags or leaks prematurely.
Another common area for shortcuts is inadequate preparation. If you see roofers starting to tear off your old roof without properly covering your bushes, garden beds, or driveway, that's a sign they might not be as meticulous with the actual roofing work either. This lack of attention to detail can extend to crucial components like flashing. For example, some might reuse old flashing to save time or material costs instead of installing new, properly bent and sealed flashing. While it might seem like a small detail, proper Roof Flashing Explained will show you that it's indispensable for preventing leaks around chimneys or vent pipes, and reusing old, fatigued metal is a recipe for disaster. This is where a thorough contractor vetting process, maybe even using services like Modernize, becomes indispensable, as they often connect homeowners with pros committed to quality work.
Incorrect Component Overlaps
The roofing system is a series of overlapping layers, and the direction and extent of these overlaps are crucial for shedding water effectively. Water always flows downhill, and the entire system is designed to guide it away from your home.
A common mistake is improper overlapping of the underlayment, particularly around the drip edge or where different sections of ice and water shield meet. For example, the underlayment must always overlap the flange of the drip edge at the eave, but at the rake, the drip edge should overlap the underlayment. If these overlaps are reversed or insufficient, water can get behind these components, infiltrating the roof deck and causing damage. Similarly, ice and water shield and felt underlayment have specific overlap requirements both horizontally and vertically to ensure complete coverage and watertight seams.
Another place where overlaps are critical is in the installation of the shingles themselves. Each course of shingles must correctly overlap the one below it, and the exposure (the amount of shingle visible) needs to be consistent across the entire roof. If shingles are installed with too much exposure, they offer less protection; if too little, they can create excessive thickness or unevenness. Proper staggering of shingle cutouts is also essential to avoid creating continuous vertical lines where water can seep in. It’s a painstaking process, but every detail matters to ensure that your new roof will stand up to years of rain, wind, and whatever else Mother Nature throws its way.
Disclaimer
Please remember that this guide provides general information about asphalt roofing installation. Building codes, regional climate considerations, and manufacturer specifications can vary. Always consult with a qualified, licensed, and insured roofing professional in your area for specific advice tailored to your home and local regulations.