What Is Flashing and Why It Matters
There's nothing quite like the panic that sets in when you spot a water stain spreading across your ceiling, a tell-tale sign that your roof isn't doing its job. Often, the culprit isn't necessarily a failed shingle in the middle of a wide-open roof section, but rather a tiny detail that homeowners often overlook: flashing. This crucial component, though often hidden, is an absolute hero in your roof's defense system, and understanding what it is and why it matters can save you a world of trouble and expense down the line.
The Unsung Hero: What Exactly is Roof Flashing?
Roof flashing might sound like a technical term, but it's really quite simple. Imagine any area on your roof where a penetration occurs, or where two different roof surfaces meet, or where the roof butts up against a wall. These are all natural weak points, prime locations for water to sneak in. Flashing is essentially a thin material, usually made of metal like aluminum, copper, or galvanized steel, that roofers install in these vulnerable spots to create a watertight seal. It's meticulously bent and shaped to direct water away from these junctions and down into your gutters, rather than letting it seep into your home's structure.
Think of it this way: your shingles do a fantastic job of shedding water on the broad, flat areas of your roof. But what about around your chimney? Or where a vent pipe sticks out? Or in the valleys where two roof slopes join? These are complex areas where shingles alone just can't form a perfect seal. That's where flashing steps in, acting like a flexible, impermeable barrier that bridges those gaps and directs the flow of water precisely where it needs to go. Without it, even the most expertly installed shingles would leave your home vulnerable to leaks, rot, and extensive water damage.
The Material Makeup of Flashing
While various metals are used, the choice often depends on the climate, the type of roofing system, and the homeowner's budget. Aluminum flashing is quite common due to its affordability and corrosion resistance, though it can be a bit more prone to bending. Copper, on the other hand, is a premium choice known for its incredible durability, longevity, and beautiful patina over time, but it comes at a higher cost. Galvanized steel is another popular option, offering good strength and resistance to rust, especially when coated. Sometimes, composite materials or even certain types of rubberized membranes are used in conjunction with metal flashing for added protection in specific areas, especially for seals around pipes or skylights. The key is that the chosen material must be non-corrosive, durable, and able to withstand the elements without failing.
Where Flashing is Absolutely Essential
Flashing isn't just a "nice to have"; it's a critical, code-required component in numerous areas of your roof. Anywhere there's an interruption in the continuous surface of the shingles, you can bet flashing is involved. This includes critical areas like the bases of chimneys, around vent pipes for plumbing or exhaust, along skylights, in the valleys where two roof planes meet, and wherever a wall intersects with the roofline. Each of these zones presents a unique challenge for water shedding, and each requires a specific type and method of flashing installation to ensure a long-lasting, watertight seal. Ignoring these details is akin to leaving a window open during a rainstorm – disaster is inevitable.
Why Flashing is Your Roof's First Line of Defense Against Leaks
It might seem like a small detail compared to the vast expanse of shingles on your roof, but flashing is arguably the most critical component in preventing water intrusion. Where shingles rely on overlapping layers to shed water, flashing actively channels it away from penetration points. Without properly installed or maintained flashing, even a brand-new roof could start leaking almost immediately.
Imagine a heavy downpour: water flows quickly down your roof. When it hits a chimney or a skylight, it tries to pool and seep into any tiny crack. Flashing acts as a strategic obstacle, diverting that water down the roof rather than allowing it to penetrate. This isn't just about preventing a drip inside your living room; it's about protecting your entire home's structural integrity.
Protecting Your Home from the Inside Out
The consequences of failing flashing extend far beyond a simple ceiling stain. When water infiltrates your attic and walls, it can lead to a host of serious and expensive problems. Wood rot is a primary concern, weakening your roof deck, rafters, and even wall studs. This compromises the structural integrity of your entire home over time. Mold and mildew thrive in damp, dark environments, leading to poor indoor air quality and potential health issues for your family. Furthermore, water damage can destroy insulation, reducing your home's energy efficiency and leading to higher utility bills. It can also damage electrical wiring, creating fire hazards, and ruin drywall, paint, and personal belongings.
A small leak from compromised flashing might seem minor at first, but left unaddressed, it becomes a major headache and a significant financial burden. Getting a professional roof inspection can help identify potential issues with your flashing before they escalate into widespread damage, saving you from much larger repairs down the road.
The Role of Proper Installation
The effectiveness of flashing isn't just about the material; it's heavily dependent on correct installation. Flashing needs to be integrated seamlessly with the roofing materials, often layered underneath shingles in a way that allows gravity to do its work, shedding water over the flashing and onto the shingle below. For instance, step flashing around a chimney isn't just one piece of metal; it's a series of individual pieces interwoven with the shingles.
If flashing is improperly cut, bent, or nailed, or if sealants fail, it creates an entry point for water. A common mistake is relying too heavily on caulk or roofing cement to seal flashing, as these materials can degrade and crack over time. Professional roofers understand that flashing needs to be mechanically installed to shed water, with sealants used as a secondary defense, not the primary one. This meticulous attention to detail during installation is a hallmark of a reputable roofing contractor and is crucial for a watertight and long-lasting roof. You can learn more about how different roofing components are installed, including flashing, by reading about How Asphalt Shingles Are Installed: Step by Step.
Decoding the Different Types of Flashing You Need to Know
When it comes to protecting your roof, not all flashing is created equal. Different areas of your roof present unique water challenges, and specialized flashing types are designed to address each one. Understanding these variations can help you appreciate the complexity of a proper roof installation and better identify potential problem areas.
Step Flashing
Step flashing is arguably one of the most common and crucial types of flashing you'll find on residential asphalt roofs. It's used wherever a roofline meets a vertical wall, such as along a dormer, a chimney, or an adjoining exterior wall. Instead of one long piece, step flashing consists of multiple individual pieces of metal, typically bent at a 90-degree angle. Each piece is integrated into a course of shingles, stepping up the wall with each subsequent shingle layer. The lower edge of each step flashing piece covers the upper edge of the shingle below it, while the vertical portion extends up the wall and is often covered by siding, counter-flashing, or a sealant. This overlapping "step" design ensures that water running down the wall or the roof cannot penetrate the joint.
A common issue with step flashing occurs if it's not properly interwoven with the shingles or if the sealant where it meets the wall degrades. When done correctly, the water sheds from the wall onto the flashing, then onto the shingle, and so on, creating a stair-step path for water to flow safely away.
Valley Flashing
Roof valleys are formed where two roof planes slope inward and meet, creating a V-shaped channel. These areas collect a significant amount of water runoff, especially during heavy rain, making them highly susceptible to leaks if not properly protected. Valley flashing is designed specifically for this high-traffic water channel. It typically comes in long rolls or pre-formed sections of metal or a heavy-duty membrane, running the entire length of the valley.
There are two primary ways to install valley flashing:
- Open Valley: In an open valley, the metal flashing is exposed, and the shingles are cut neatly along its edges, leaving a visible channel for water to flow. This design allows water to shed quickly and efficiently.
- Closed Valley: In a closed valley, the shingles extend across the valley, concealing the flashing underneath. The shingles are either woven together across the valley or cut and butted against each other with the flashing serving as the hidden waterproof layer beneath. While aesthetically pleasing, closed valleys can sometimes be more prone to issues if not installed perfectly, as debris can get trapped.
Regardless of the type, the goal of valley flashing is to provide a robust, continuous waterproof barrier in a part of the roof that experiences concentrated water flow. Improperly installed or damaged valley flashing can lead to extensive leaks right in the middle of your home, affecting multiple rooms.
Chimney Flashing
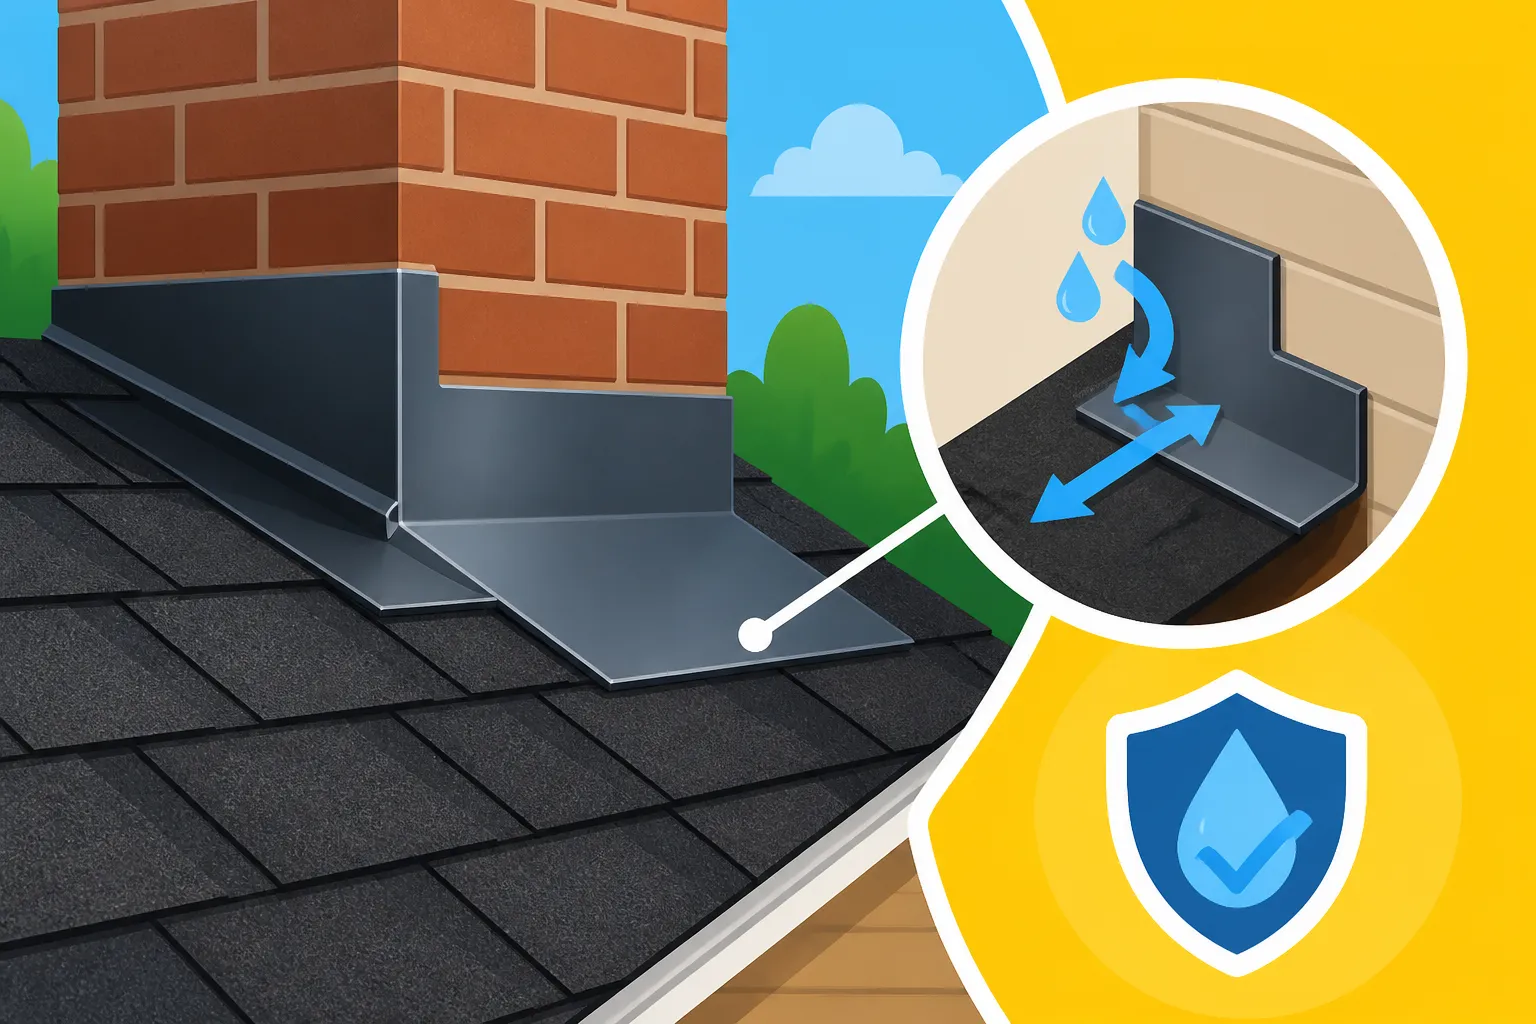
Chimneys are one of the most complex and vulnerable areas on any roof, due to their large size and the different planes they intersect. Chimney flashing is a multi-part system designed to seal all four sides of the chimney securely. It typically involves:
- Base Flashing: This consists of individual pieces of metal that are installed around the base of the chimney, interwoven with the shingles (similar to step flashing on the sides).
- Step Flashing: For the sides of the chimney where it meets the roof slope, step flashing is used, integrated with the shingle courses.
- Apron Flashing: At the lower side of the chimney (uphill side), a single piece of flashing called an apron is often used to divert water around the chimney.
- Cricket (or Saddle): For wider chimneys on sloped roofs, a "cricket" or "saddle" is often built on the uphill side. This is a small, peaked diversion roof designed to shed water and debris around the chimney rather than allowing it to pool against it. The cricket itself is thoroughly flashed.
- Counter-Flashing (or Cap Flashing): This is a second layer of flashing that is cut into the chimney's mortar joints (or attached directly to the chimney masonry) and extends down over the base flashing. It acts like a "cap" to protect the upper edges of the base flashing from water and to hold it in place.
Each component of chimney flashing plays a crucial role in creating a watertight seal around this large protrusion. A common source of roof leaks comes from failed chimney flashing, often due to degraded sealant in the counter-flashing joints or improper layering.
Vent Pipe Flashing and Skylight Flashing
Vent Pipe Flashing: Every home has various pipes protruding through the roof for plumbing vents, exhaust fans, or HVAC systems. These smaller penetrations require specific flashing. Typically, a pre-formed "boot" or "collar" made of metal and flexible rubber is used. The metal base is installed directly over the roofing felt and under the shingles, while the rubber collar snugly fits around the pipe, creating a watertight seal. The rubber portion is particularly important as it accommodates the pipe's expansion and contraction due to temperature changes without cracking. If you have an older roof, inspect these rubber boots for cracking or deterioration. These are very common causes of a leak on a roof.
Skylight Flashing: Skylights, while beautiful for bringing natural light indoors, are another significant weak point for water intrusion if not properly flashed. Skylight flashing kits are usually specific to the skylight manufacturer (e.g., Velux or Andersen) and are designed to integrate seamlessly with the roof. They typically include multiple pieces that fit around all four sides of the skylight frame, overlapping and shedding water similar to how step flashing and apron flashing work, but specifically contoured for the skylight. Like vent pipes, proper installation and continuous maintenance of the seals are vital to prevent leaks. Many homeowners regret adding skylights due to persistent leaks, which almost always stem from incorrect flashing installation or failure over time.
Drip Edge
While not technically "flashing" in the same way as the types above, drip edge serves a very similar, critical water-diversion purpose. Drip edge is a metal strip installed along the eaves and rake edges of your roof, beneath the underlayment and starter shingles. Its primary job is to direct water away from the fascia board and into the gutters. Without it, water can wick back underneath the shingles, rot the fascia and roof decking, and potentially damage the siding below. It also helps protect the edge of the roof from wind uplift and creates a clean finish. You can often find drip edge made from galvanized steel, aluminum, or copper, chosen to match the home's aesthetics and climate needs. Learn more about What Is Drip Edge and Why It Matters.
Ensuring Your Flashing Does Its Job: Installation, Maintenance, and When to Call a Pro
The absolute best way to ensure your flashing works as intended is to start with a top-notch installation. When your roofers are on site, whether it's for a full replacement or a targeted repair, the quality of their flashing work is paramount. After installation, ongoing vigilance and knowing when to seek professional help are key to preventing costly water damage.
The Importance of Correct Installation Practices
Proper flashing installation is an art form within roofing. It requires precise measurements, careful cutting, correct bending, and a deep understanding of how water flows. A skilled roofer knows to layer the flashing beneath the shingles in such a way that gravity naturally directs water over it, preventing any backflow or penetration. This often involves using minimal sealants, relying instead on the mechanical layering of materials. For example, for step flashing, each piece is tucked under a shingle and then another shingle overlaps its top edge. For chimney flashing, the base flashing is integrated with the shingles, and then the counter-flashing is mortared into the chimney brick and bent down over the base flashing, acting as a cap.
Relying too heavily on caulk or roof cement instead of proper layering is a significant red flag. While sealants play a supporting role in certain areas, they are not a substitute for the correct mechanical installation of metal flashing. Sealants degrade over time due, expanding and contracting with temperature changes, and eventually cracking and creating new pathways for water. If you're comparing roofing estimates, ask detailed questions about their flashing installation process. A truly comprehensive quote will include details about How Flashing Is Installed and the materials they use. If you're considering a new roof, working with a reputable company can make all the difference. Platforms like Modernize can help homeowners connect with experienced local roofers who understand the nuances of proper flashing installation.
Signs of Flashing Failure and What to Look For
As a homeowner, being proactive about checking your flashing can save you a lot of headaches. While you should never climb on your roof yourself, a pair of binoculars can give you a decent view of potential problems from the ground. Here's what to look for:
- Rust or Corrosion: Especially on older galvanized steel or aluminum flashing, rust can indicate the material is breaking down and may no longer be watertight.
- Bent, Kinked, or Missing Flashing: High winds or storm debris can damage flashing, causing it to lift, bend, or even pull away from the roof. If you see pieces that are visibly detached or distorted, it's a major problem.
- Cracked or Deteriorated Sealants/Caulk: Around chimneys, skylights, or vent pipes, inspect any visible caulk or sealant. If it's cracked, crumbling, or missing, water can easily penetrate.
- Water Stains in the Attic or on Ceilings: This is the most obvious sign that water has already found its way in. Trace the leak's path if possible; it often leads back to a flashing issue, even if the stain isn't directly below a flashed area (water travels!). Check for signs of water damage in the attic and around any penetrations.
- Moss or Algae Buildup Around Flashing: While moss and algae can grow anywhere, concentrated growth around flashing might indicate moisture retention, which could be a sign of poor drainage or a compromised seal.
When to Call a Professional Roofer
If you notice any of these signs, it's time to call a professional roofer. Flashing repairs are typically not DIY friendly, given the height, complexity, and the need for specialized tools and materials. A professional can safely access your roof, properly assess the damage, and perform the necessary repairs or replacements. They can determine if it's a simple resealing job or if the entire section of flashing needs to be replaced. Delaying these repairs can lead to more extensive and costly damage to your roof deck, insulation, and interior. If you suspect an issue, getting a quote for Flashing Leak Repair is a smart first step. Don't wait until a small issue becomes a full-blown emergency. Regularly scheduled roof inspections, perhaps every 3-5 years or after a major storm, can help catch these issues early.
| Flashing Type | Primary Location | Purpose | Common Issues |
|---|---|---|---|
| Step Flashing | Where roof meets vertical walls (e.g., dormers) | Channels water down the roof, preventing seepage between roof and wall | Improper layering, degraded sealant on wall side |
| Valley Flashing | In roof valleys where two slopes meet | Provides a continuous, durable channel for concentrated water runoff | Punctures, improper cutting, debris accumulation (closed valleys) |
| Chimney Flashing | Around all four sides of a chimney | Seals large, complex penetration; multi-part system (base, step, counter) | Cracked mortar, rusted metal, failed sealant, missing cricket |
| Vent Pipe Flashing | Around plumbing and exhaust pipes through the roof | Seals circular penetrations, accommodates pipe movement | Cracked rubber boots, rusted metal base, improper seal around pipe |
| Skylight Flashing | Around skylight frames | Creates watertight seal for skylight units, specific to manufacturer | Failed seals, damaged components, improper integration with shingles |
| Drip Edge | Along roof eaves and rake edges | Directs water away from fascia, protects roof edge from wind uplift | Missing, bent, rusted, not properly overlapped by underlayment |
Disclaimer
Please remember that this information is for educational purposes only and should not be considered professional advice. Always consult with a qualified and licensed roofing contractor for any roof inspections, repairs, or replacements. Roofing work can be dangerous and should only be undertaken by experienced professionals.