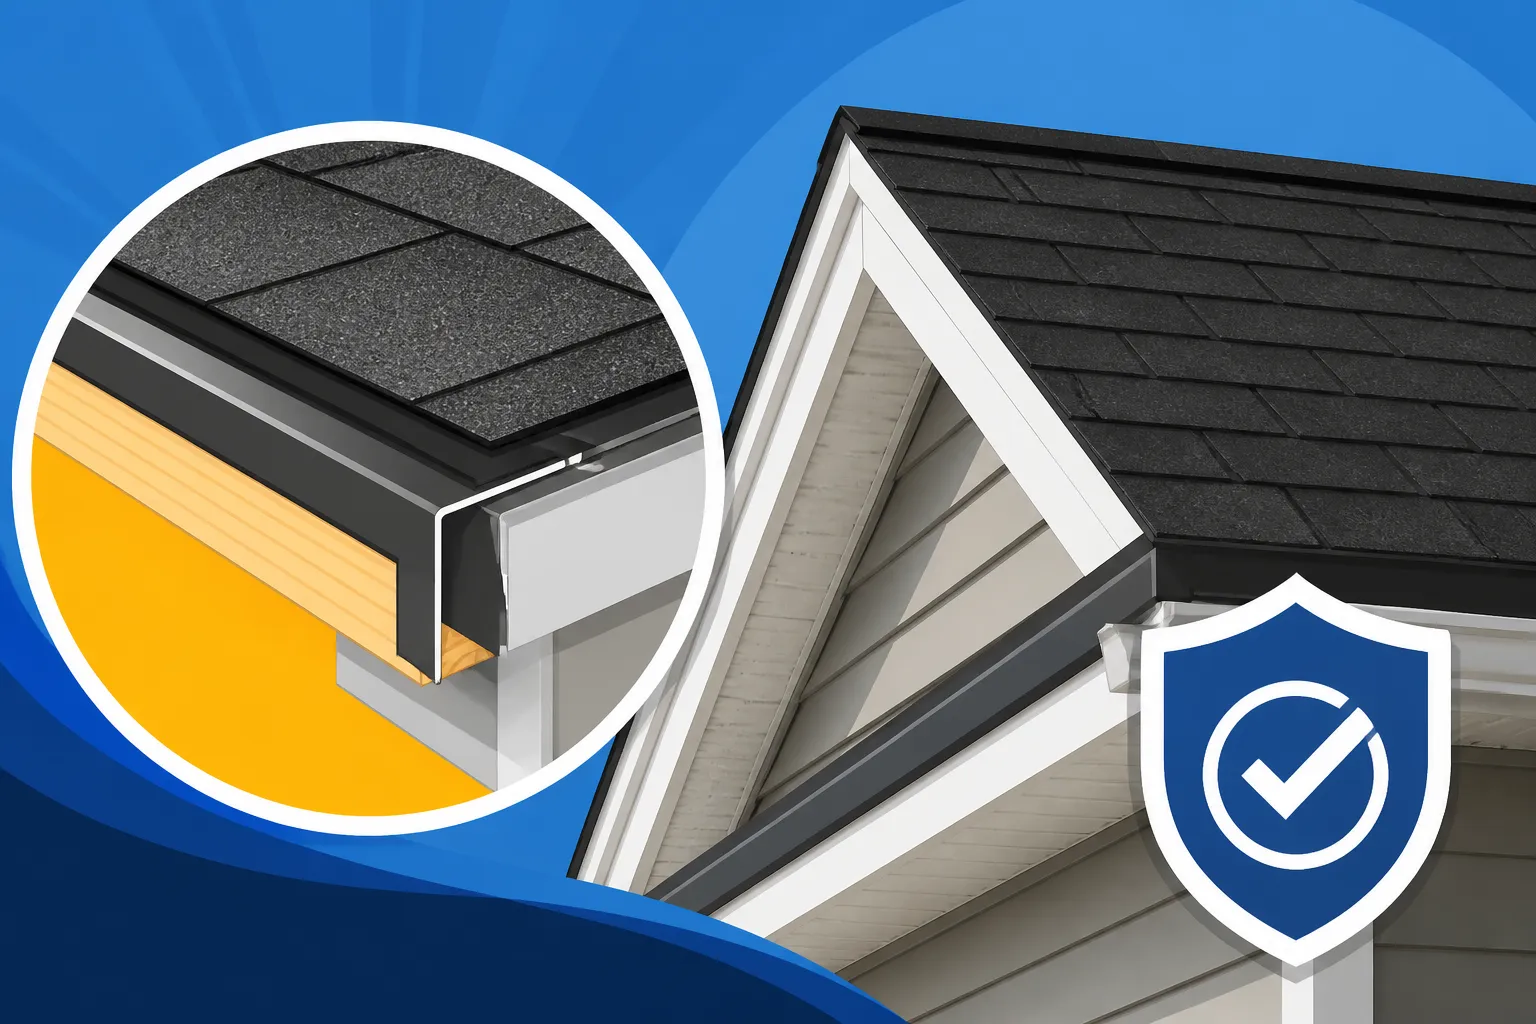
Drip Edge Code Requirements
It’s a scenario no homeowner wants to face: you’ve just invested in a brand-new roof, only to discover later that something critical was missed during installation, potentially jeopardizing its longevity and even your home’s structural integrity. One often-overlooked yet incredibly vital component is the drip edge, and believe it or not, there are specific code requirements that dictate its installation. This comprehensive guide will walk you through everything you need to know about drip edge code requirements, helping you understand their importance and ensuring your asphalt roof is up to snuff.
What is Drip Edge and Why is it Essential?
When you’re thinking about a new roof, your mind probably jumps straight to the shingles – the color, the style, maybe even whether you want 3-tab vs architectural shingles cost compared. But beneath those beautiful shingles, there's a whole system working hard to protect your home. One crucial player in that system, often relegated to the background, is the drip edge. It might seem like a small, unassuming piece of metal, but its role in safeguarding your home from the elements is monumental. Many homeowners don't even realize it exists until a problem arises, but understanding what it is and why it's there can save you a world of trouble down the line.
Understanding Drip Edge Functionality and Components
At its core, a drip edge is a non-corrosive metal flashing installed along the edges of your roof. It typically comes in L-shaped or T-shaped profiles, designed specifically to extend past the fascia board and divert water directly into your gutters or away from your house. Think of it as a meticulously engineered shield that bridges the gap between your roof deck, fascia, and gutters. Without it, water runoff, especially during heavy rain or melting snow, could easily seep behind your gutters, rot your fascia and soffit, and even compromise your roof decking.
The components of a drip edge are fairly straightforward but each serves a specific purpose. There's the horizontal flange that lays flat on the roof deck, tucked under your underlayment, and the vertical flange that extends down past the fascia. The "drip" part of the drip edge refers to the small hem or kick-out at the very bottom of the vertical flange, which creates surface tension to ensure water drips off cleanly, preventing it from clinging to and running back along the underside of the edge. This clever design feature is what truly sets it apart from a simple piece of metal and makes it so effective.
Benefits Beyond Code Compliance
While code compliance is a major reason for its installation, drip edge offers a host of benefits that go far beyond just meeting regulations. Firstly, it provides an additional layer of protection against water infiltration, something that any homeowner who's dealt with a leaky roof can appreciate. It stops water from reaching vulnerable areas like the eaves and rake boards, preventing costly rot and prolonging the life of your entire roof system. It’s like having an extra bodyguard for the most exposed parts of your home.
Secondly, drip edge helps protect your fascia and soffit from moisture damage, which can lead to unsightly stains, peeling paint, and eventually, structural decay. This protection also extends to preventing pests like insects and small animals from nesting in your attic or behind your fascia, as it seals off potential entry points. Furthermore, in windy conditions, a properly installed drip edge helps secure the edge of your roof's underlayment and starter shingles, making them less susceptible to being lifted and torn off. This is a huge advantage, especially in regions prone to strong winds, as it contributes significantly to the overall wind resistance of your roof.
The Evolution of Drip Edge Codes: A Necessity, Not a Luxury
It might seem like a modern invention, but the concept of protecting roof edges isn't new. However, the formal requirement for drip edge in building codes is a relatively recent development in many areas. For years, many homes were built without it, and homeowners are now grappling with the consequences. The shift from an optional add-on to a mandatory component reflects a growing understanding of building science and the long-term impact of proper water management on a home's structural integrity. It’s a classic case of learning from past mistakes and continuously improving construction standards.
Historical Context: When Drip Edge Became Standard
Historically, many roofs, particularly older ones, often lacked a dedicated drip edge. Builders sometimes relied on the shingle overhang or a simple piece of flashing to direct water. However, it became increasingly evident that these methods were insufficient. Over time, contractors and building scientists observed accelerated deterioration of fascia boards, soffits, and even roof decking at the perimeter of homes without proper drip edge protection. Water, driven by wind or simply gravity, would wick back under the shingles, leading to chronic moisture problems.
The widespread adoption of drip edge into building codes, particularly the International Residential Code (IRC), began gaining significant traction in the early 2000s. Before this, its inclusion was often optional or only mandated in specific high-wind or heavy-precipitation regions. However, as catastrophic weather events became more frequent and the cost of repairing water-damaged homes escalated, the value of robust roof edge protection became undeniable. Now, in most jurisdictions following the IRC, drip edge is no longer a suggestion but a mandatory component of a complete roofing system, and understanding these "Permits & Regulations" is key for homeowners.
Why Codes Became Standard: Protecting Homes from the Elements
The primary driver behind making drip edge installation a code requirement was comprehensive home protection. Water infiltration is a homeowner's worst nightmare, leading to rot, mold, and structural damage that can be incredibly expensive to remediate. Drip edge acts as the first line of defense, ensuring that water sheds cleanly from the roof surface, bypassing the vulnerable fascia and eaves. Without it, water can stagnate, creating a perfect breeding ground for algae, moss, and eventually, rot.
Beyond water, wind uplift also played a crucial role. In high-wind areas, the edges of a roof are particularly susceptible to wind damage. The wind can get underneath the shingles and underlayment, peeling them back like the lid of a tin can. A properly fastened drip edge helps to lock down the roof underlayment and starter course of shingles, providing a more robust perimeter that resists wind intrusion. This enhanced wind resistance not only protects the structural components of the roof but can also potentially qualify homeowners for insurance discounts in certain areas, particularly when combined with other wind-resistant measures like Class 4 Shingle Roof Cost installations.
Common Drip Edge Code Requirements to Know
Navigating building codes can feel like deciphering ancient texts, but when it comes to drip edge, many of the requirements are quite logical once you understand their purpose. These codes are in place to ensure a minimum standard of performance and longevity for your roofing system, preventing common failure points that often lead to leaks and damage. Understanding these basics will empower you to have more informed conversations with your roofing contractor and ensure your home is truly protected.
Material and Installation Specifications
The codes typically specify that drip edge must be made of a corrosion-resistant material, such as galvanized steel, aluminum, or copper. This is crucial because it’s constantly exposed to moisture, and rust would quickly defeat its purpose. The thickness or gauge of the metal can also be specified, particularly in areas prone to high winds or heavy snowfall, where a more robust edge is needed to withstand environmental stressors.
Installation specifications are equally important. For instance, the IRC, which is adopted in various forms by many states, generally requires drip edge to be installed along eaves and rake edges. The "eaves" are the lower edges of the roof that typically overhang the walls, while the "rakes" are the inclined edges that run up the gable ends of the house. The drip edge must extend a certain distance onto the roof deck (often 1/4 to 1/2 inch) beneath the underlayment, and extend at least 1/4 to 1/2 inch beyond the fascia board. This overhang ensures water clears the fascia effectively. The underlayment (whether it's synthetic vs felt underlayment cost) then goes over the drip edge at the eaves, but often under the drip edge at the rake edges to create that smooth flow.
Overlap and Fastening Requirements
Another critical aspect of drip edge codes relates to how individual pieces are overlapped and fastened. Drip edge comes in sections, usually 10 feet long, and these sections need to be joined together seamlessly. Codes generally mandate a minimum overlap of 2-4 inches where two pieces meet. This overlap helps to maintain a continuous barrier, preventing water from seeping through the joints. Imagine trying to make a watertight seam with no overlap; it just wouldn't work.
Fastening is arguably one of the most vital code requirements. Drip edge must be securely attached to the roof deck, typically with corrosion-resistant roofing nails. The nailing schedule is usually specified, often requiring nails every 4-12 inches. The nails should penetrate the roof decking adequately to ensure a strong hold. Improper fastening is a common red flag in roofing, as loose drip edge can be easily torn off by wind, rendering it useless and leaving your roof vulnerable. When considering how to choose a roofing contractor, always ask about their fastening practices and how they ensure code compliance for all components, not just the shingles.
Location-Specific Requirements: Eaves and Rakes
While drip edge is generally required on both eaves and rake edges, the specific installation methods can differ slightly based on the location and local building codes.
-
Eaves (Horizontal Edges): At the eaves, where gutters are typically installed, the drip edge is usually installed under the roof underlayment but over the fascia board. This creates a smooth path for water to flow from the underlayment, over the drip edge, and into the gutter. Some codes, particularly in colder climates, may also integrate ice and water shield directly into the eave installation, extending it from the eave edge further up the roof deck to prevent ice dam formation. For more on this, you might explore "Ice and Water Shield Explained".
-
Rake Edges (Sloping Edges): For rake edges, which don't have gutters, the drip edge is commonly installed over the roof underlayment. This allows any water that gets under the shingles at the rake to run over the drip edge and shed away from the side of the house. This also helps to prevent wind from lifting the underlayment at the rakes. The goal is always to direct water away from the vulnerable wooden components of the roof structure.
State-Specific Drip Edge Code Variations and Examples
It would be wonderful if all building codes were exactly the same across the board, but unfortunately, that's rarely the case. While the International Residential Code (IRC) provides a baseline, states and even local municipalities often adopt their own versions, adding amendments, stricter requirements, or omitting certain clauses based on their unique climates and regional challenges. This is where things can get a little tricky for homeowners, as what's standard in one state might be insufficient or even non-compliant in another.
General Differences in Regional Codes
The primary reason for these variations usually boils down to the local climate. For example, states in hurricane-prone regions, like Florida and parts of Texas, will have much more stringent requirements for roof components, including drip edge, due to the constant threat of high winds and torrential rain. They might specify thicker gauge metals, a denser nailing schedule, or particular fastening techniques that are designed to withstand extreme uplift forces. These regions often prioritize enhanced wind mitigation features above and beyond the basic IRC standards.
Conversely, in states with milder climates that experience less severe weather, the drip edge requirements might align more closely with the standard IRC guidelines, perhaps with fewer prescriptive details on fastening or material gauge. However, even in these areas, local amendments can exist. For instance, a city might have specific aesthetic requirements or mandates for recycled materials that impact the type of drip edge allowed. It's truly a patchwork, which is why understanding your local "Roofing Regulations by State" is so important.
Examples: Florida and Texas Standards
Let's look at some real-world examples to illustrate these differences:
-
Florida: Florida is a prime example of a state with highly prescriptive and rigorous building codes, especially the Florida Building Code, which largely supersedes the IRC in its stringency. Given its susceptibility to hurricanes, Florida's drip edge codes are extremely detailed. They often require the drip edge to be installed with a minimum 2-inch extension onto the roof deck, with specific fastening patterns – typically nails spaced no more than 4 inches on center. The goal is to create a continuous, robust seal against wind-driven rain and wind uplift. In many coastal counties, adherence to these enhanced codes is not just about protection but also about maintaining insurance coverage and even qualifying for reduced premiums. This is a topic that overlaps with "High-Wind Roofing Code Requirements".
-
Texas: Texas, particularly its Gulf Coast regions, also has robust requirements, often adopting stricter wind design criteria. While the whole state doesn't have uniform mandates, municipalities within hurricane zones often require drip edge with specific fastening schedules and material gauges to meet wind resistance standards. For example, the Texas Department of Insurance often refers to standards that prioritize components like drip edge for improving roof resilience against high winds and hail. This focus is less about state-wide general rules and more about localized, risk-driven regulations.
-
California: In California, particularly in areas prone to wildfires, the focus shifts slightly. While drip edge is still required for water management, codes might also emphasize the use of non-combustible materials or specific fire-resistant installation techniques around the perimeter of the roof to prevent embers from entering the attic space. This demonstrates how unique regional threats shape building codes beyond just water and wind.
Here's a simplified table comparing general drip edge code tendencies:
| Feature/Requirement | General IRC Guideline | Florida (High-Wind) | Mild Climate State (e.g., Ohio) |
|---|---|---|---|
| Material | Corrosion-resistant metal | Corrosion-resistant metal (often thicker gauge) | Corrosion-resistant metal |
| Placement | Eaves and Rakes | Eaves and Rakes (mandated) | Eaves and Rakes (common, but variations) |
| Roof Deck Ext. | 1/4" – 1/2" | Min. 2" | 1/4" – 1/2" |
| Fascia Overhang | 1/4" – 1/2" | 1/4" – 1/2" | 1/4" – 1/2" |
| Nail Spacing | 4" – 12" on center | Max. 4" on center | 8" – 12" on center |
| Underlayment | Over drip edge at eave, under at rake | Over drip edge at eave, under at rake (often with enhanced sealant) | Over drip edge at eave, under at rake |
| Purpose Focus | Water diversion | Water diversion, high-wind resistance, insurance mitigation | Water diversion |
Remember, this table provides generalizations. Always check your specific local building department's adopted codes for the most accurate and up-to-date requirements.
Ensuring Drip Edge Code Compliance and Avoiding Issues
You’ve decided to replace your roof, and now you know that drip edge isn't just a suggestion; it's a code-mandated component crucial for your home's protection. But how do you, as a homeowner, ensure that your contractor actually installs it correctly and in compliance with all the regulations? It can feel overwhelming, especially if you're not an expert in roofing. The key is proactive engagement, asking the right questions, and understanding the process.
Working with Reputable Roofing Contractors
The single most effective way to ensure code compliance is to hire a reputable, licensed, and experienced roofing contractor. A good contractor will be intimately familiar with the local building codes, including those for drip edge, and will incorporate them into their standard operating procedures. They won't see drip edge as an "extra" or a way to cut corners, but as an essential part of a quality roof installation. When you're learning "How to Choose a Roofing Contractor", vetting their knowledge of local codes should be a top priority.
During the bidding process, make sure the contractor's estimate explicitly includes the installation of drip edge, specifying the material, type, and fastening schedule they plan to use. Don't be shy about asking questions like, "Will the drip edge be installed at both the eaves and rake edges?" or "What gauge metal will you use for the drip edge, and what's the nailing pattern?" A knowledgeable contractor will be happy to explain their process and reassure you of their compliance. You can also verify if they are a manufacturer-certified roofer, as these contractors often adhere to higher standards that meet or exceed local codes to maintain their certifications with brands like GAF or Owens Corning.
The Importance of Roofing Permits and Inspections
This brings us to the crucial role of roofing permits and inspections. In almost all jurisdictions, a permit is required for a full roof replacement. This isn't just bureaucratic red tape; it's your safeguard. When a permit is pulled, it triggers a mandatory inspection by a local building official after the roof installation is complete. This inspector's job is to ensure that the work was done according to the local building codes, including the proper installation of drip edge. Many homeowners wonder, "Do you need a permit to replace a roof?", and the answer is almost always yes for this very reason.
A reputable contractor will always pull the necessary permits. If a contractor tries to convince you that a permit isn't needed, or suggests you pull it yourself (which is often discouraged), consider that a major red flag. During the post-installation inspection, the inspector will check for various aspects of the roofing system, and the drip edge will definitely be on their checklist. They'll look at the material, the overhang, the overlap at seams, and the fastening. If the drip edge isn't up to code, the inspection will fail, and the contractor will be required to correct the issue, which protects you from having to fix a non-compliant roof later.
What Happens If Drip Edge Codes Aren't Followed?
Ignoring building codes might seem like a shortcut to save a few bucks or a bit of time, but when it comes to something as vital as drip edge, the consequences can be severe and far-reaching. It’s not just about a bureaucratic technicality; it’s about compromising the structural integrity and longevity of your most important asset – your home. The repercussions can range from immediate headaches to long-term financial burdens that far outweigh any initial savings.
Legal, Financial, and Insurance Ramifications
The most immediate consequence of non-compliant drip edge installation, often encountered before you even get settled into your new roof, is a failed final inspection. If your contractor didn't pull a permit or didn't follow the codes, the city or county inspector will flag the issue. This means your contractor will have to return to fix the problem, which can cause significant delays in the project timeline and may involve tearing off newly installed shingles to correct the drip edge underneath. In some cases, if the contractor refuses to remedy the situation, you might have to pursue legal action or hire another contractor to complete the work correctly, incurring additional costs. You can learn more about what happens "If You Skip a Roofing Permit".
Financially, a non-compliant roof can be a huge liability. When it comes time to sell your home, a professional home inspector will likely identify the missing or improperly installed drip edge. This can lead to delays in the sale, demands for repairs, or a reduction in your home's asking price. Essentially, you'll end up paying for the correction anyway, often at a higher cost than if it had been done right the first time.
Perhaps one of the most significant risks is related to homeowner's insurance. Many insurance policies require your home to be built and maintained to code. If your roof suffers damage (e.g., from wind or water) and it's discovered that the drip edge was not installed according to current codes, your insurance claim could be partially or even fully denied. Imagine a major storm hits, your fascia rots, and water leaks into your attic, causing thousands in damage, only to find out your policy won't cover it because of a non-compliant drip edge. That’s a nightmare scenario no homeowner wants to experience.
Structural Damage and Warranty Invalidations
Beyond the administrative and financial headaches, the physical integrity of your home is at stake. Without a proper drip edge, water will inevitably seep behind your gutters, directly onto your fascia board. Over time, this constant exposure to moisture leads to wood rot. The fascia will soften, decay, and lose its structural integrity, which can then affect the soffits and even the ends of your roof rafters. This kind of structural damage is expensive to repair and can attract pests like termites and carpenter ants, adding another layer of costly problems.
Moreover, the entire roofing system, including your underlayment and roof decking, becomes more vulnerable to moisture damage and wind uplift. Water can wick under the edge of the underlayment, leading to rot in the roof deck, which is a major structural concern. For details on related issues, you can check out "Roof Decking Replacement Cost". In high winds, the lack of a properly fastened drip edge means the edge of your roof's underlayment and starter course of shingles has less protection, making it far more likely to lift and blow off. This exposes your home to catastrophic water damage during a storm.
Finally, and this is a big one for long-term peace of mind, most manufacturer warranties on asphalt shingles are contingent upon proper installation according to both the manufacturer's guidelines and local building codes. If your drip edge is not installed to code, the manufacturer could argue that your roof was not installed correctly, potentially invalidating your shingle warranty. This means if your shingles fail prematurely, you might be left footing the bill for a brand new roof, even if the shingle material itself was defective. When you're investing thousands in a new roof, losing out on a valuable warranty due to a skipped component is a risk simply not worth taking.
Disclaimer
Please note that the information provided in this article is intended for general guidance and informational purposes only. Building codes and regulations can vary significantly by location and are subject to change. It is always recommended to consult with your local building department and a qualified, licensed roofing contractor to ensure compliance with all current local codes and requirements before undertaking any roofing project.