How Step Flashing Is Installed
There's nothing quite as gut-wrenching as discovering a dark, spreading stain on your ceiling, especially when you know it's directly below a wall line or a chimney on your roof. You might have excellent shingles, but if the flashing isn't installed correctly where your roof meets a vertical surface, water will find a way in. This often-overlooked component is absolutely critical for keeping your home dry and safe. This guide will walk you through exactly how step flashing is installed, explaining every detail so you understand this vital part of your asphalt roofing system.
Understanding Step Flashing and Its Indispensable Role
When we talk about roof flashing, many homeowners picture continuous metal strips, but that's not always the case, especially around vertical walls or chimneys. That's where step flashing comes into play, and it's truly an unsung hero in the battle against water intrusion. It's a method that relies on a series of overlapping, L-shaped metal pieces, meticulously woven in with your shingles, to create an impenetrable barrier.
What Step Flashing Actually Is
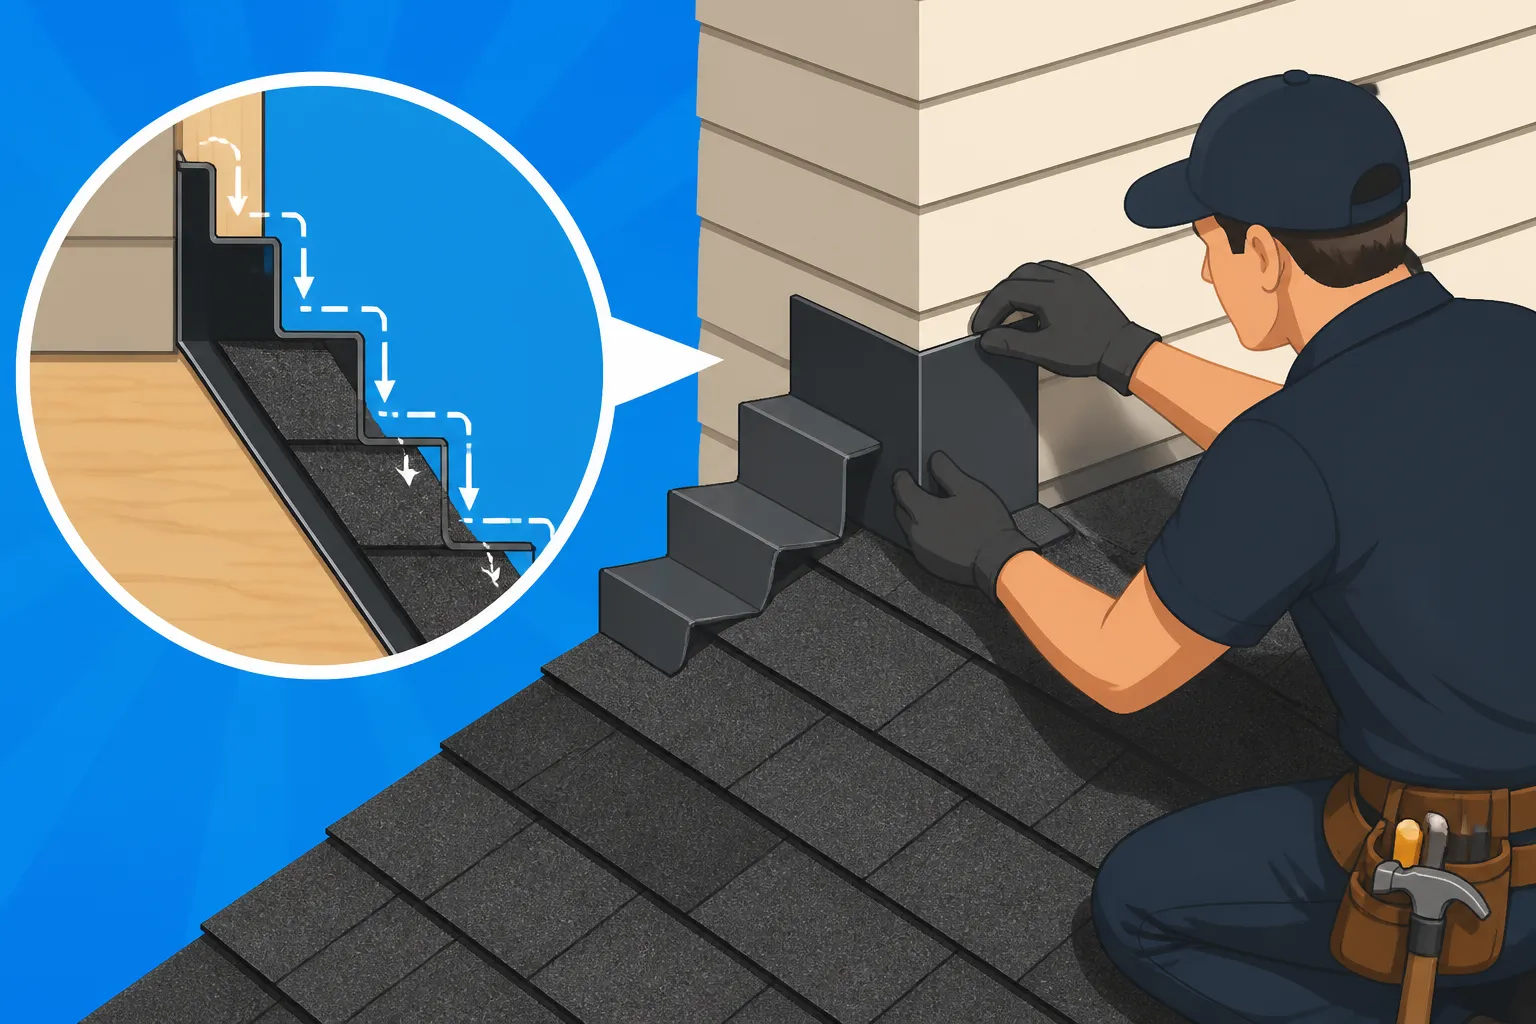
Imagine a tiny, pre-bent piece of metal, usually about 10-12 inches long and bent at a 90-degree angle to form an 'L' shape. One leg of the 'L' sits flat on the roof deck, while the other extends vertically up the adjacent wall or chimney. The magic, and the "step" in its name, comes from how these pieces are installed: each individual piece of step flashing is placed over the downhill shingle and under the uphill shingle, with successive pieces overlapping each other like a set of stairs. This clever layering ensures that any water flowing down the roof hits the flashing, is diverted over the top of the shingle below it, and continues its journey off the roof, rather than seeping behind the vertical surface.
Without this step-by-step layering, water would simply flow down the wall, get behind a single, long piece of flashing, and eventually find its way into your home. It's a simple yet incredibly effective design, proving that sometimes the best solutions are the most ingenious.
Why It's Crucial for a Watertight Roof
The stakes couldn't be higher when it comes to proper flashing. These critical transition points—where your roof surface meets a vertical wall, a chimney, a dormer, or even a skylight curb—are inherently vulnerable. They interrupt the smooth, shedding surface of your shingles, creating seams and angles that water loves to exploit. If step flashing is missing, damaged, or incorrectly installed, you're practically inviting leaks into your home.
Think about it: every raindrop that hits your roof wants to run downhill. When it encounters a wall, it will try to go behind it if there isn't a proper system to redirect it. The consequences of improper or missing step flashing are far-reaching and expensive. You might initially notice a small water stain on your ceiling or wall. But over time, that seemingly minor leak can lead to:
- Rotting wood: Your roof decking, rafters, and even wall studs can become saturated and begin to rot, compromising the structural integrity of your home.
- Mold and mildew growth: Dark, damp environments are perfect breeding grounds for mold, which can cause serious health issues for your family and degrade your indoor air quality.
- Damage to insulation: Wet insulation loses its R-value, making your home less energy-efficient and costing you more on utility bills.
- Interior damage: Beyond the structural issues, leaks can ruin drywall, paint, flooring, and personal belongings.
Considering all these potential headaches, investing in proper step flashing installation isn't just a recommendation; it's an absolute necessity for the longevity and health of your entire home. It’s part of ensuring your roof actually works the way it should, protecting against water rather than just looking good. For a deeper understanding of all the elements working together, you might want to read our guide on how a roof replacement works: the full process.
Essential Tools and Materials for Flashing Installation
Before any work begins, gathering the right tools and materials is paramount. There’s nothing worse than being halfway through a roofing project only to realize you’re missing a crucial item. Preparation is key to a smooth and successful step flashing installation.
Selecting the Right Flashing Materials
Step flashing is typically made from sheet metal, chosen for its durability and resistance to corrosion. The most common types include:
- Galvanized Steel: This is a very common choice, offering good durability and cost-effectiveness. The galvanization process adds a zinc coating that helps prevent rust. However, if the coating is scratched or compromised, it can still rust over time.
- Aluminum: Lightweight, easy to work with, and highly resistant to rust. Aluminum flashing is a popular option, especially in coastal areas where salt air can be a concern. It can be a bit more expensive than galvanized steel but offers excellent longevity.
- Copper: The premium choice, copper is incredibly durable, develops a beautiful patina over time, and requires virtually no maintenance. It's also the most expensive and typically used on high-end homes or historic properties where aesthetics are a major consideration.
- Pre-painted Steel or Aluminum: These come in various colors to match or complement your shingles, which can be a nice aesthetic touch.
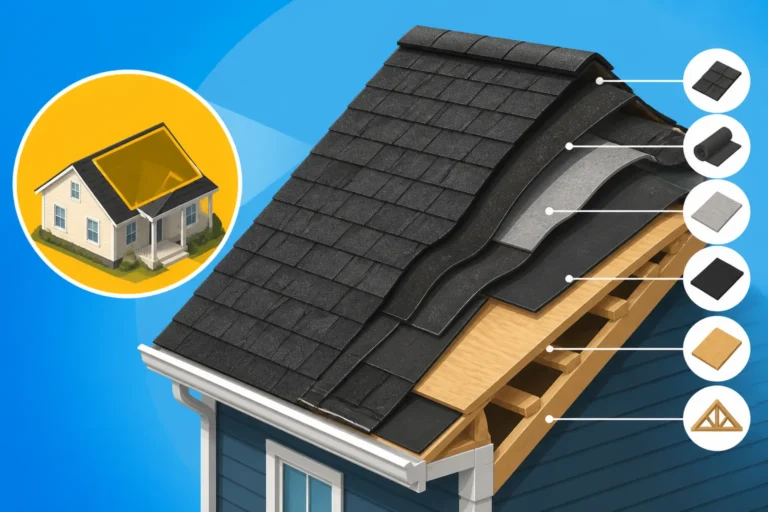
Regardless of the material, step flashing pieces usually measure about 10-12 inches long and 2-3 inches wide on each leg of the 'L' bend. You'll want to ensure you have enough pieces to cover the entire length of the vertical surface, allowing for proper overlap. For a thorough understanding of different roofing components, check out our article on roof anatomy: parts of an asphalt shingle roof.
Necessary Tools and Fasteners
Having the right tools makes all the difference between a frustrating, messy job and a precise, watertight installation.
- Hammer or Roofing Nail Gun: For fastening shingles and flashing.
- Roofing Nails: 1-1/4 inch or 1-1/2 inch galvanized roofing nails are standard. Make sure they are specifically for roofing to prevent rust.
- Utility Knife: Essential for cutting asphalt shingles accurately.
- Tin Snips or Aviation Snips: Absolutely necessary for cutting and trimming metal flashing pieces. You might need right, left, and straight cut snips for intricate work.
- Tape Measure and Chalk Line: For precise measurements and straight lines on the roof.
- Pry Bar: If you need to lift existing siding or trim to tuck the flashing underneath.
- Caulk Gun: For applying roofing cement or sealant.
- Roofing Cement/Sealant: A high-quality, asphalt-based roofing cement or a compatible sealant for sealing nail heads and critical joints.
- Safety Gear: Never, ever forget safety. Sturdy work gloves, safety glasses, and a reliable ladder are non-negotiable. If you're working on a steep roof, a fall arrest system is also highly recommended.
- Utility Trowel or Putty Knife: For spreading roofing cement smoothly.
When you're dealing with something as vital as your roof, cutting corners on materials or tools isn't worth the potential cost down the line. A reliable contractor will always show up with all these items and more, ensuring the job is done right. Finding a reputable contractor is easier than you think. A platform like Modernize can connect you with pre-vetted professionals in your area who have the experience and equipment to handle complex flashing installations.
A Detailed Walkthrough of Step Flashing Installation
The process of installing step flashing isn't complicated, but it demands meticulous attention to detail. Each step builds on the last, and skipping even a small part can compromise the integrity of the entire system. Remember, we’re essentially creating a custom, woven gutter system where your roof meets a wall, all designed to shed water away from your home.
Preparation: Setting the Stage for Success
Before you even think about nailing in flashing, proper preparation is key.
- Clear the Area: Ensure the section of the roof where you'll be working is free of debris, old nails, and any existing damaged materials. If you're replacing old flashing, carefully remove the old shingles and flashing pieces. This might involve using a pry bar to gently lift siding or trim boards on the vertical wall to create space.
- Inspect the Roof Decking: This is a critical step that often gets overlooked. With the shingles and old flashing removed, inspect the roof decking for any signs of rot, water damage, or weakened areas. If you find any, these sections must be repaired or replaced before proceeding. Installing new flashing over compromised decking is like putting a band-aid on a broken leg; it won't hold up. Our guide on roof decking replacement cost can give you an idea of what that might entail if repairs are needed.
- Ensure a Clean Vertical Surface: The wall or chimney surface should be clean and smooth. If it's siding, ensure it's not loose or damaged. If it's masonry, remove any loose mortar or debris.
Laying the Foundation: Shingle and Flashing Integration
This is where the "step" truly comes alive. The process involves alternating shingles and flashing pieces, working your way up the roof slope.
- Start with a Starter Course and First Shingle: Just like any shingle installation, you'll begin by laying your starter course along the eaves, followed by the first full shingle course, extending up to the vertical wall. The shingle should butt snugly against the wall.
- Position the First Piece of Step Flashing: Take your first L-shaped piece of flashing. Slide it under the top edge of the first shingle you just laid. The horizontal leg of the flashing should lie flat on the roof deck, overlapping the shingle by at least a few inches (typically 2-3 inches, or more if the shingle exposure is wider). The vertical leg will extend up the wall.
- Nailing the Flashing: This is a crucial point: nail the flashing only to the roof deck, not into the vertical wall. Nailing into the wall creates penetration points where water can enter, defeating the purpose of the flashing. Place two roofing nails, one near the top of the horizontal leg and another near the bottom, securing it firmly to the roof deck. The nails should be positioned so that they will be covered by the next shingle.
- Lay the Next Shingle: Now, lay the next shingle in the course, overlapping the lower part of the first flashing piece. The shingle's leading edge should cover the lower portion of the vertical flashing leg and extend over the horizontal leg.
- Place the Next Flashing Piece: Take another piece of step flashing. This one will be placed over the shingle you just laid. Slide it under the next shingle that will be installed. It should overlap the previous piece of flashing by at least 2 inches and be positioned so it is completely covered by the shingle above it. Secure it with two nails to the roof deck, again making sure these nails will be covered by the next shingle.
- Repeat the Process: Continue this alternating pattern—shingle, then flashing; shingle, then flashing—working your way up the entire length of the vertical wall. Each shingle covers the lower part of the flashing below it, and each piece of flashing is installed under the shingle above it, creating a cascading, watertight seal. This is the essence of how shingles are installed and how they protect against water.
Integrating with Siding, Stucco, or Masonry (Counter-Flashing)
The step flashing alone isn't enough when dealing with walls that aren't just bare wood. You need a second layer of protection called "counter-flashing" or "cap flashing," especially with masonry.
- For Siding: If the vertical surface is sided (vinyl, wood, fiber cement), the vertical leg of the step flashing should be tucked behind the siding. This means you might need to carefully lift the siding panels as you work your way up, sliding the flashing underneath. The siding then acts as the counter-flashing, shedding water over the top of the step flashing.
- For Stucco: A similar principle applies. A groove, called a "reglet cut," is often cut into the stucco, and a continuous piece of L-shaped metal (the counter-flashing) is inserted into this groove, then sealed. The counter-flashing then extends down over the vertical leg of your step flashing.
- For Masonry (Chimneys, Brick Walls): This is where proper counter-flashing is absolutely critical. The vertical leg of the step flashing goes up the brick. Then, a separate piece of metal, often bent or cut specifically for the job, is installed into the mortar joints (a reglet cut is made, the metal is inserted and sealed) and extends down over the step flashing. This way, water flowing down the brick hits the counter-flashing, which directs it onto the step flashing, and then onto the shingles. This is meticulously detailed in guides on chimney flashing explained. For these complex intersections, it's particularly important to get the angles and seals just right.
Once all the step flashing and shingles are in place, apply a small dab of roofing cement over any exposed nail heads on the vertical leg of the flashing (though ideally, nails should be completely covered by shingles). Then, re-install any siding or trim pieces you had to remove. The entire system should look neat, uniform, and most importantly, ready to shed water efficiently. Understanding the overall process of how roofers install components can provide a broader perspective on why each detail matters.
Common Pitfalls and Ensuring a Watertight Seal
Even with the best intentions, things can go awry during a roofing project. When it comes to step flashing, mistakes can be particularly costly, leading to those frustrating leaks we talked about. Knowing what to watch out for, whether you’re doing it yourself or overseeing a contractor, can save you a lot of grief down the line.
Mistakes That Lead to Leaks
Homeowners and even inexperienced roofers can sometimes make critical errors during flashing installation. These missteps often become glaringly obvious a few heavy rainfalls later.
- Nailing into the Vertical Wall: This is arguably the most common and detrimental mistake. It's so tempting to just nail that vertical leg of the flashing directly into the wall for security. However, every nail hole is a potential entry point for water. The flashing should only be nailed to the roof deck, under the shingle above it. The siding or counter-flashing on the vertical surface is what holds the upper edge of the step flashing against the wall, not direct nails.
- Insufficient Overlap: The "step" in step flashing relies on generous overlaps. If the individual pieces of flashing don't overlap each other sufficiently, or if the shingles don't adequately cover the flashing below, water can easily seep through the gaps. You want several inches of overlap to ensure a robust barrier.
- Using the Wrong Materials or Gauge: Attempting to use thin, flimsy metal or a material that isn't corrosion-resistant will lead to premature failure. Flashing needs to withstand the elements just like your shingles. Similarly, using incompatible sealants that don't bond well with asphalt or metal can lead to cracks and gaps over time.
- Skipping Counter-Flashing, Especially on Masonry: As discussed, step flashing protects the seam, but counter-flashing (or proper siding integration) protects the top edge of the step flashing. On brick or stone, without properly integrated counter-flashing mortared into the joints, water will simply run down the masonry, get behind the step flashing, and cause a leak. This is a tell-tale sign of a bad roofing job if you see it.
- Not Inspecting the Underlying Structure: If the roof decking or wall sheathing is already rotted or damaged from a previous leak, installing new flashing over it is a temporary fix at best. The structural integrity is compromised, and new problems will quickly arise. Always address underlying damage first. For more on this, check out our guide on when a leak means deck damage.
- Improper Shingle Cuts or Placement: Shingles need to butt snugly against the vertical leg of the flashing. Gaps here can expose the underlayment and create areas where wind-driven rain can push water.
The Importance of Professional Help
While understanding the process is empowering, actually executing a flawless step flashing installation is a task best left to seasoned professionals. Roofing is demanding work, requiring specialized skills, attention to detail, and a commitment to safety.
A reputable roofing contractor understands local building codes, manufacturer specifications for different shingle types, and the nuances of working with various vertical surfaces. They know that proper flashing is critical, and they’ll approach it with the precision it demands. For example, they’ll ensure all components, including the underlayment, drip edge, and flashing, work together as a complete roofing system, qualifying for full warranties.
If you're dealing with a complex roof structure, multiple valleys, dormers, or a chimney, the difficulty of ensuring a watertight seal increases exponentially. Trying to DIY these critical areas without proper experience often leads to more expensive repairs down the road. Finding a reliable expert is key. Platforms like Modernize can be a valuable resource for homeowners looking to connect with qualified local roofing contractors who have a proven track record of quality workmanship and comprehensive knowledge, ensuring that critical elements like step flashing are installed correctly the first time.
Remember, your roof is your home's first line of defense against the elements. Ensuring its components, especially the often-overlooked step flashing, are installed perfectly is an investment in your home's long-term health and your peace of mind. If you suspect you have a roof leak, understanding when to repair a roof leak vs replace the roof is an important consideration.
Disclaimer
Please note that this guide provides general information for educational purposes. Roofing work can be dangerous and should ideally be performed by qualified and experienced professionals. Always consult with a licensed roofing contractor and adhere to all local building codes and safety regulations before undertaking any roofing project.