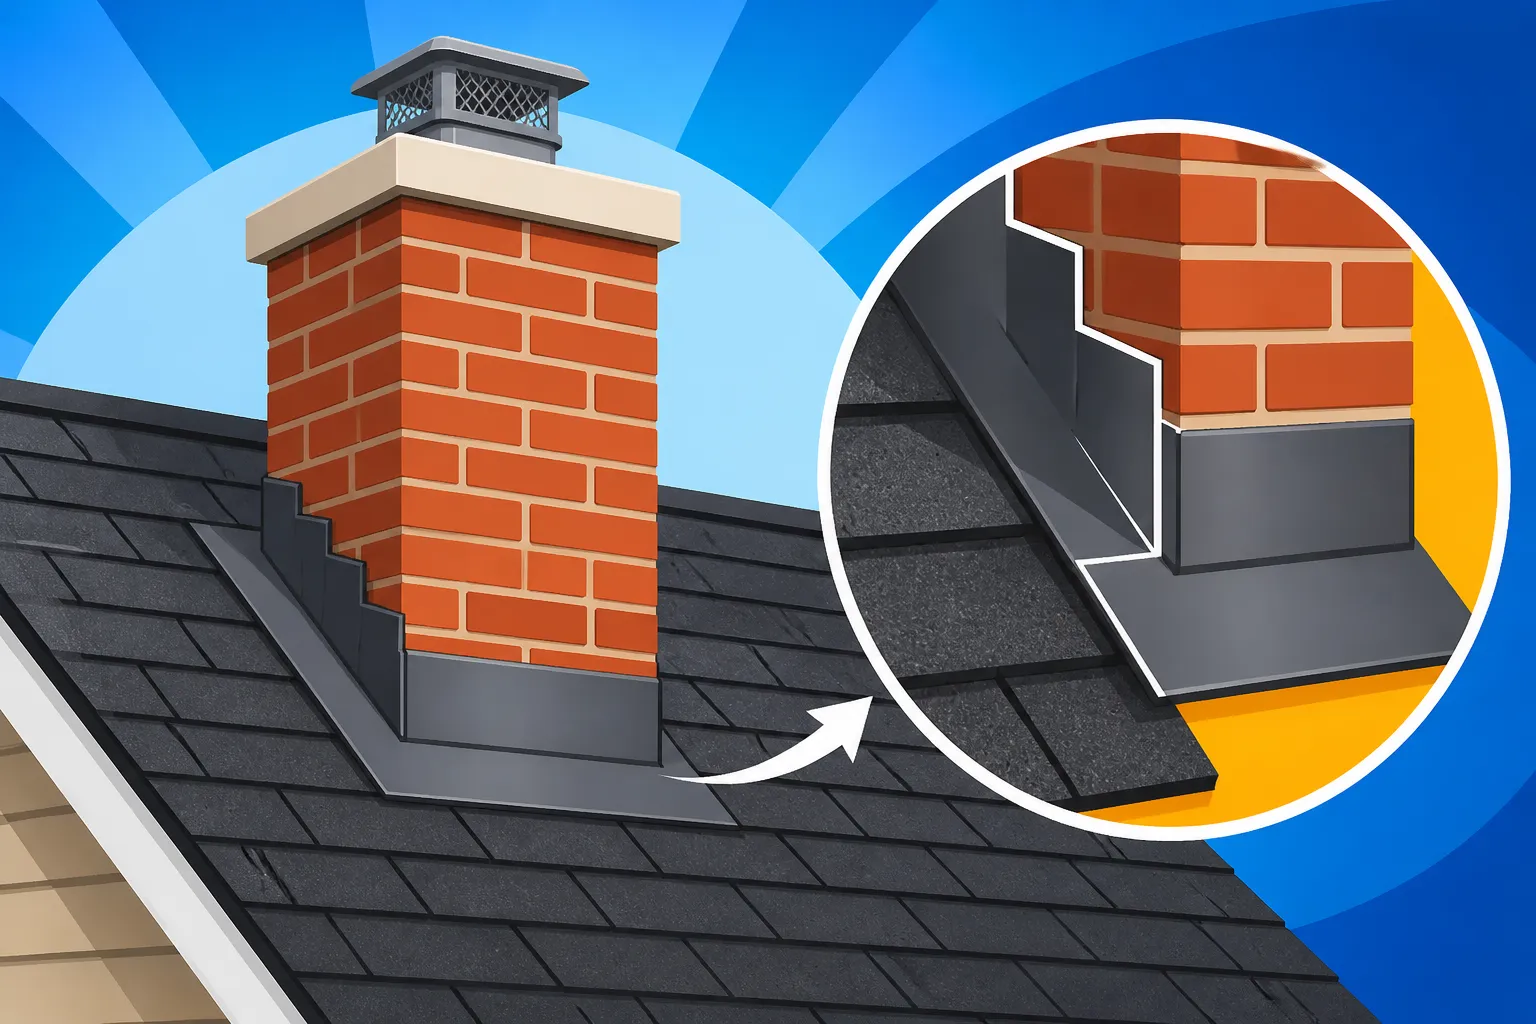
Chimney Flashing Explained
One of the most insidious and frustrating problems a homeowner can face is a roof leak, and often, the culprit isn't a damaged shingle out in the open, but rather an issue lurking around your chimney. That mysterious damp spot on your ceiling, especially after a heavy rain, can send shivers down your spine, leaving you wondering where to even begin. This comprehensive guide is designed to pull back the curtain on chimney flashing, explaining exactly what it is, why it's so vital, and how to spot problems before they turn into major headaches and costly repairs.
What is Chimney Flashing and Why is it So Critical?
When you look at your roof, the chimney often seems like a solid, unmoving fixture, but the reality is that where two different planes meet – your vertical chimney and your sloped roof – there's a natural vulnerability to water intrusion. This intersection point is perhaps the most critical area on your entire roof system when it comes to keeping water out. Without proper protection, rain, snowmelt, and ice would simply run down the chimney sides and seep directly into your attic and home, leading to mold, rot, and significant structural damage. That's where chimney flashing steps in.
Defining Flashing's Role
At its core, chimney flashing is a system of overlapping, water-resistant material, usually metal, that creates a watertight seal around the base of your chimney where it penetrates the roof. Think of it like an impenetrable raincoat for this vulnerable seam. It’s not just one piece of metal, but a carefully engineered series of components designed to divert water away from the chimney structure and down the roof slope. Because your roof and chimney are made of different materials and expand and contract at different rates with temperature changes, the flashing needs to be flexible enough to accommodate these movements without breaking its seal. It’s a silent guardian, working tirelessly to ensure the integrity of your home's interior, often overlooked until it fails.
The High Stakes of Neglect
The stakes really couldn't be higher when it comes to neglected chimney flashing. A small crack or a minor separation in the flashing might seem insignificant at first, but it opens a gateway for water. This water doesn't just evaporate; it drips down, finds its way through your attic, stains ceilings, compromises insulation, and can even weaken the wooden framing of your home. Imagine the horror of a sudden downpour, only to find a dark, spreading stain on your living room ceiling right below the chimney. Beyond the visible damage, persistent moisture can lead to hidden dangers like mold and mildew growth, which pose serious health risks to your family and can be incredibly expensive to remediate. Furthermore, water damage to your roof decking or rafters can cause them to rot, leading to structural instability that puts your entire roof system at risk. Understanding the crucial role of chimney flashing is the first step in appreciating its importance and being proactive about its maintenance. You can learn more about how a complete roof system works to protect your home.
The Anatomy of a Chimney Flashing System
It might sound complicated, but a typical chimney flashing system is a marvel of simple, overlapping logic designed to shed water. It's not just a single band of metal wrapped around the chimney; it’s a multi-layered defense strategy, each component playing a specific, vital role. Ignoring any one piece can compromise the entire system, turning your chimney into a leak magnet.
Base Flashing: The First Line of Defense
The base flashing is the very first layer of defense, typically a continuous strip of metal that runs along the lowest side of the chimney (the 'upslope' side) and extends underneath the roofing shingles. Its job is to form a gutter or trough to collect any water that flows down the roof and direct it around the sides of the chimney. This piece needs to be wide enough to extend well under the shingles and up the face of the chimney, usually by several inches, to prevent capillary action from drawing water upwards. This initial barrier is crucial for diverting the bulk of the water flow before it even reaches the more complex areas around the chimney sides. Without a properly installed base flashing, water has a direct path to the roof deck beneath your chimney.
Step Flashing: The Overlapping Armor
Following the base flashing, we have the step flashing. This is where the magic of overlapping protection truly shines. Step flashing consists of individual, L-shaped pieces of metal, bent at a 90-degree angle, that are interwoven with each course of shingles along the sides of the chimney. One leg of the 'L' lies flat on the roof deck, tucked under the shingle above it, while the other leg extends up the side of the chimney. Each subsequent piece of step flashing overlaps the one below it, much like the shingles themselves. This overlapping technique ensures that water always flows over a piece of metal and onto the shingle below, never finding a seam to penetrate. The concept is identical to how shingles protect against water, creating a continuous, shingle-like water barrier up the sides of the chimney.
Counter Flashing: The Seal Against the Chimney
While step flashing handles the water coming down the roof, counter flashing (sometimes called cap flashing) is what seals the entire system to the chimney itself. This flashing is typically a longer, continuous piece of metal that is set into the mortar joints of the chimney bricks, not just against them. A shallow groove, or reglet, is cut into the mortar joint, and the top edge of the counter flashing is inserted into this groove, then sealed with mortar or a flexible sealant like urethane caulk. The counter flashing then overlaps the top edge of the step flashing, ensuring that any water running down the chimney face flows over the step flashing, preventing it from getting behind the individual step flashing pieces. This two-layer approach – counter flashing over step flashing – provides exceptional protection against water penetrating the vertical surfaces of the chimney.
Cricket/Saddle Flashing: For Wider Chimneys
For chimneys that are particularly wide (generally anything over 24-30 inches), there's an additional component called a chimney cricket, or saddle flashing. The problem with wide chimneys on a sloped roof is that they create a "dam" on the upslope side, allowing water and debris to collect against the chimney base. This pooling water can prematurely age shingles and eventually find its way under the flashing. A chimney cricket is a small, peaked mini-roof structure built behind the chimney on the roof itself. It has two sloped sides that divert water and debris away from the back of the chimney and down its sides. This significantly reduces the risk of water pooling and allows for much better water drainage, crucial for the longevity of your flashing and the surrounding shingles. Installing this critical feature can sometimes affect the overall asphalt roof replacement cost, but it's a vital investment for wide chimneys.
Common Types of Flashing Materials
The material chosen for your chimney flashing is just as important as the installation method. Different materials offer varying levels of durability, aesthetic appeal, and cost. Understanding these options can help you make an informed decision when it's time for a repair or a full roof replacement.
Aluminum and Galvanized Steel
Aluminum is a popular choice for flashing due to its affordability, light weight, and corrosion resistance. It's relatively easy to bend and shape, making installation quicker for roofers. However, aluminum is softer than other metals, making it more susceptible to damage from hail or falling debris. It can also react with certain roofing materials, leading to galvanic corrosion if not properly isolated. Galvanized steel, on the other hand, is steel coated with a layer of zinc to prevent rust. It's stronger and more rigid than aluminum, offering better resistance to physical damage. However, if the zinc coating is scratched or compromised, the steel underneath can rust. Both aluminum and galvanized steel are widely available and represent a cost-effective solution for many homeowners, but they may not offer the same lifespan as more premium options. When considering your roofing material cost vs. labor cost, flashing material choice is a minor but impactful detail.
Copper and Lead
For those seeking maximum durability and a distinctive aesthetic, copper and lead are top-tier choices for chimney flashing. Copper is renowned for its exceptional longevity, often outlasting the roof itself, and develops a beautiful green patina over time. It's highly resistant to corrosion and is incredibly durable, standing up well to harsh weather. The downside, of course, is the higher initial cost and the specialized skill required for installation, as it's a more rigid material to work with. Lead is another traditional and highly effective flashing material, prized for its extreme malleability. It can be easily shaped and molded to conform perfectly to irregular surfaces, creating a very tight seal. Lead is also very long-lasting and resistant to corrosion. However, lead's cost and the environmental concerns surrounding its use mean it's less common today, though still utilized for its unique properties, particularly in historical homes or complex installations.
Self-Adhering Membranes
While not a primary flashing material in the same way metal is, self-adhering membranes play a crucial supporting role, particularly as an underlayment for the metal flashing. Products like ice and water shield are rubberized asphalt membranes with a sticky backing, designed to create a secondary waterproof barrier directly on the roof deck before any metal flashing or shingles are applied. These membranes are especially valuable in areas prone to ice dams or heavy rain. They conform tightly to the roof deck and seal around nails, providing an extra layer of leak protection should water somehow breach the primary metal flashing. While they aren't a substitute for metal flashing, incorporating a high-quality self-adhering membrane underneath your metal flashing can significantly enhance the overall waterproofing around your chimney and is often a requirement by modern building codes, especially in colder climates. Understanding how underlayment works is key to a robust roof.
| Flashing Material | Typical Lifespan | Pros | Cons | Cost (Relative) |
|---|---|---|---|---|
| Aluminum | 20-30 years | Lightweight, affordable, corrosion-resistant, easy to work with | Softer, prone to denting, can react with other metals | Low |
| Galvanized Steel | 20-40 years | Strong, rigid, good impact resistance | Can rust if coating is scratched, heavier | Medium |
| Copper | 60+ years | Extremely durable, corrosion-resistant, beautiful patina, long lifespan | High cost, specialized installation, aesthetic may not suit all homes | High |
| Lead | 60+ years | Highly malleable, excellent sealing, very durable | High cost, environmental concerns, heavier | High |
| Self-Adhering Membrane | 20-30 years | Excellent secondary barrier, seals around fasteners, flexible | Not a primary flashing (used as underlayment), UV exposure degrades | Low (as an accessory) |
How Chimney Flashing is Properly Installed
Proper installation is paramount for chimney flashing to do its job effectively. Even the highest quality materials will fail if not installed correctly. This is one area where trying to cut corners or DIY can lead to disastrous, expensive consequences down the line. A skilled roofing contractor understands the nuances of water diversion and the precise layering needed to create a long-lasting, watertight seal. When you're looking for a roofer, always ask about their experience with complex flashing details. Services like Modernize can help you find experienced professionals who understand these critical details.
The Tear-Off and Preparation Phase
A thorough and proper flashing installation always begins with a complete tear-off of the old, failing flashing and surrounding roofing materials. You absolutely cannot simply patch over old, compromised flashing or install new metal on top of it. This process involves carefully removing shingles around the chimney, exposing the roof deck and the chimney base. During this phase, the roofer will meticulously inspect the underlying roof decking for any signs of rot or damage. If rotted wood is found, it must be replaced before any new flashing goes down. This is also the stage where any old mortar from previous counter flashing installations is cleaned out of the chimney's mortar joints, ensuring a clean surface for the new counter flashing to be set into. This preparation ensures a solid, clean foundation for the new, watertight system. Understanding what happens during a roof tear-off is crucial for homeowners.
Layering the Flashing Components
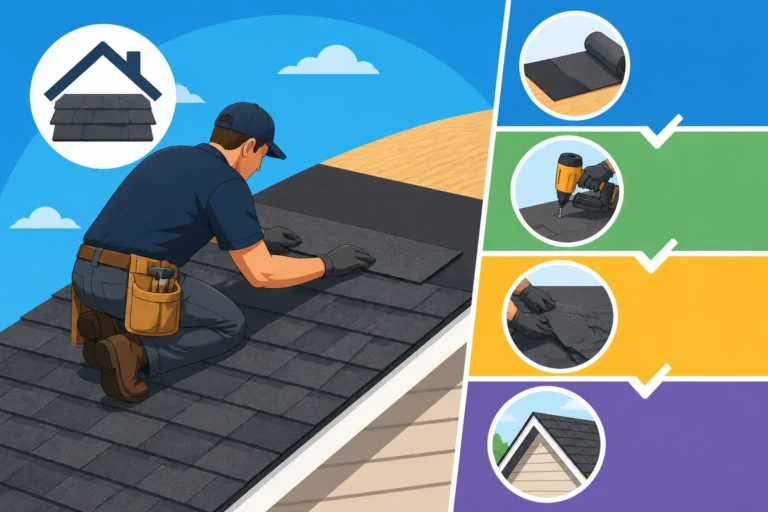
Once the deck is prepped, the careful layering begins. First, a self-adhering ice and water shield membrane is applied directly to the roof deck around the chimney, extending several inches up the chimney walls and under where the base and step flashing will sit. This creates an impermeable secondary barrier. Next, the base flashing is installed, typically on the lowest side of the chimney, extending underneath the first course of new shingles. Then, working up both sides of the chimney, individual pieces of step flashing are interwoven with each course of new shingles. Each piece is slipped under the shingle above it and bent up the side of the chimney, meticulously overlapping the piece below. If a cricket is needed, it would be installed at this stage on the upslope side, also properly integrated with underlayment and shingles. The precision here is key: every overlap, every bend, and every tuck ensures water is continuously shed downwards and away.
Sealing and Finishing Touches
The final, critical step is installing the counter flashing and properly sealing the system. The counter flashing is carefully cut, bent, and inserted into the pre-cut reglets in the chimney's mortar joints. This often involves cutting the metal to fit the varying contours of the brickwork. Once the counter flashing is in place, covering the step flashing with a generous overlap, the reglets are sealed with a high-quality, flexible sealant. This sealant, often a polyurethane or silicone, ensures that no water can penetrate the joint where the counter flashing meets the chimney. On the upslope side, the counter flashing extends around the sides of the cricket if present. Sometimes, additional sealant is also applied along critical seams, although relying solely on caulk for flashing is a major red flag. Proper flashing is about mechanical overlaps, with sealant providing a final, supplementary seal. How a roof replacement works involves many such intricate details.
Signs of Failing Chimney Flashing and What to Do
The good news is that chimney flashing rarely fails overnight without warning. There are usually tell-tale signs that something isn't right, which, if caught early, can prevent more extensive and costly damage. Being observant and knowing what to look for can save you a significant amount of money and stress.
Visible Damage: Cracks, Rust, Separation
One of the easiest ways to spot failing flashing is through a visual inspection, either from the ground with binoculars or, more safely, by hiring a professional. Look for physical signs of wear and tear:
- Cracks or Holes: These are direct entry points for water. Metal flashing can crack over time due to repeated expansion and contraction, or from physical impact.
- Rust: If you have galvanized steel or painted flashing, rust is a clear indicator of corrosion and weakening. Copper, while it develops a patina, shouldn't show signs of actual rust.
- Separation: This is perhaps the most common issue. The flashing might pull away from the chimney wall, or the sealant used where the counter flashing enters the mortar joint might be cracked, crumbling, or missing entirely. You might also see step flashing pieces that are bent, torn, or no longer properly tucked under the shingles.
- Missing or Loose Pieces: Strong winds can sometimes lift or tear away sections of flashing. If you notice any pieces missing or flapping in the breeze, it's an immediate red flag.
These visible signs mean your protective barrier is compromised, and water is likely finding its way into your home.
Indoor Water Stains and Leaks
Often, the first sign homeowners notice is an indoor symptom: a water stain on the ceiling or wall, typically directly below or near the chimney. These stains might be faint at first, growing larger or darker after heavy rain. You might also notice peeling paint, bubbling plaster, or a musty odor in the attic or rooms adjacent to the chimney. If the leak is severe, you could even have active dripping.
- Attic Inspection: If possible and safe, head into your attic with a flashlight during or immediately after a rainstorm. Look for moisture on the roof decking, insulation, or rafters around the chimney. Even dampness without active dripping is a sign of a problem.
- Musty Odors: A persistent musty smell can indicate hidden mold growth, a common consequence of prolonged moisture intrusion from a leaky roof or flashing.
It's important to remember that water can travel, so a stain on your living room ceiling might not be directly where the water is entering the roof; it simply indicates the lowest point where the water accumulates and eventually breaches the interior finish. Learning how to spot a roof leak early can save you from extensive damage.
Early Detection and Professional Inspection
The best defense is early detection. Regular visual checks from the ground can help you spot obvious problems, but a professional roof inspection is invaluable. A qualified roofing contractor has the expertise and safety equipment to get up on your roof and meticulously examine the flashing, shingles, and other components. They can identify subtle issues you might miss, such as degraded sealant or minor lifting of flashing pieces that aren't visible from below. If you suspect any problems, or if your roof is nearing its estimated lifespan, don't hesitate to call in a professional. Ignoring these signs will only lead to more extensive damage and a more expensive repair down the line, potentially requiring a full Flashing Leak Repair. You can consult resources like Modernize to find reputable roofers for an inspection.
Maintaining Your Chimney Flashing for Longevity
Like any critical component of your home, chimney flashing isn't a "set it and forget it" system. Regular attention and prompt action on any issues will significantly extend its lifespan and, in turn, protect your entire roof system and home interior. A little proactive maintenance goes a very long way in preventing major headaches.
Regular Visual Checks
One of the simplest yet most effective maintenance steps is to perform regular visual checks of your chimney flashing. This doesn't necessarily mean climbing onto your roof every month (unless you're comfortable and have the right safety gear!). From the ground, use a pair of binoculars to scan the flashing for obvious signs of distress like rust, lifting, or cracks in the sealant. If you have access to your attic, make it a point to inspect the area around the chimney from the inside, especially after heavy rains or significant snowmelt. Look for water stains, drips, or any signs of moisture on the wood or insulation. Spring and fall are excellent times for these checks, as you can often spot problems before the harsh summer storms or winter freezes set in. Think of it like changing the oil in your car – routine checks prevent breakdowns.
Keeping Gutters Clean
While it might not seem directly related to chimney flashing, keeping your gutters clean and free of debris is incredibly important for the health of your entire roof system, including the flashing. Clogged gutters prevent water from draining properly, causing it to back up and pool along the eaves and, crucially, around the base of your chimney. This standing water can sit against the bottom edge of your flashing, accelerate corrosion, and eventually seep behind it. In colder climates, clogged gutters contribute to ice dam formation, which can force water under shingles and flashing through capillary action. By ensuring water freely flows off your roof and into your downspouts, you reduce unnecessary stress and prolonged moisture exposure on your chimney flashing, extending its effective life.
Prompt Repairs and Upgrades
The moment you identify an issue with your chimney flashing, no matter how small it seems, it's crucial to address it promptly. A tiny crack in sealant can quickly become a significant leak after a few storms. Don't fall into the trap of thinking a small problem can wait until your next roof replacement. Often, small repairs, like re-sealing a joint or replacing a single piece of step flashing, are relatively inexpensive and quick when caught early. However, if left unchecked, that minor issue can lead to extensive water damage, mold growth, or even structural compromise, turning a simple repair into a much more costly endeavor involving roof decking replacement cost. If your flashing is very old, showing widespread wear, or if you're experiencing recurring leaks, it might be time to consider a complete upgrade or replacement, especially if your roof is also nearing its end of life. When that time comes, make sure you choose a reputable roofing contractor who understands the intricacies of proper flashing installation. For instance, finding a GAF Master Elite Contractor can give you peace of mind that they adhere to high standards.
Disclaimer
Please note that this guide is for informational purposes only and should not be taken as professional advice. Roofing work, especially involving complex components like chimney flashing, can be dangerous and requires specialized skills and equipment. Always consult with a licensed and insured roofing professional for inspections, repairs, and replacements to ensure safety and proper installation.